Category Archives: Technique

Practical Tip: Penetrating Injury To The Vertebral Artery

This is an uncommon injury. But when encountered it can cause the trauma professional (and the patient) some major headaches. The majority of the vertebral artery injuries you are likely to encounter are caused by blunt trauma. They are generally diagnosed using CT angiography, and the treatment usually consists of low dose anti-platelet agents like aspirin. Occasionally, coiling or stenting using interventional radiology is needed.

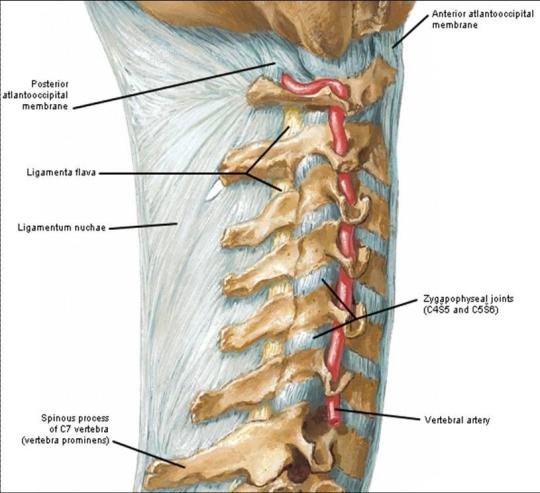
But penetrating trauma is a totally different animal. Gunshot is the most common mechanism, because of the small windows available to access the artery within the vertebral canal using a knife. See the course of the artery in the picture below:

Unfortunately, this bony cage also makes it difficult to surgically approach the artery, especially if the field is continually filling with blood.

The techniques for dealing with this injury according to the doctor books are:

  • Send the patient to interventional radiology. Cutting off flow using coils is the preferred technique. Gelfoam and other products are not used because of the concern for distal embolization (to the brain). Stenting may be a consideration for blunt trauma, but not for penetrating.
  • Or, obtain proximal control by ligating the vertebral artery as it takes off from the subclavian. Hmm, this requires either a separate incision, or a supraclavicular extension of your neck incision. It takes time and is not as easy as it sounds.

Generally, the trauma surgeon stumbles upon this injury while doing a trauma neck exploration. Bleeding can be pesky, and may serve to obscure the field. My preferred method of control is:

  • Jam a wad of bone wax into the vertebral canal right where the bleeding is coming from.
  • Then jam another wad into the canal in the space below it. Proximal control!
  • Jam one final wad into the space above, if accessible. Distal control!

End of problem. Then do a thorough evaluation for all other injuries and address them. Feel free to share any additional tips that you may have!

Print Friendly, PDF & Email

Damage Control Dressing: The ABThera (Video)

In the late 1980’s, when we started the work that would be published in the first damage control paper from Penn, we used the vacuum pack dressing. This was first described in a paper from the University of Tennessee at Chattanooga in 1995. Prior to that, the so-called Bogota bag was the usual technique. This consisted of slicing opening up a sterile IV bag (either the standard 1 liter or the urology 3 liter bag for big jobs) and sewing it into the wound. This worked, but it freaked out the nurses, who could see the intestines through the print on the clear plastic bag.

The vacuum pack was patient friendly, with a layer of plastic on the bottom, some absorbent towels in the middle with a drain in place to remove fluid and apply suction, and an adherent plastic layer on top to keep the bed clean. As you can imagine, this was a little complicated to apply correctly. One misstep and things stuck to the bowel or leaked out onto the bed.

In the past few years, a commercial product was developed that incorporated all these principles and was easy to apply. This is the KCI ABThera (note: I have no financial interest in KCI or this product; I just wish I had invented it). The only downside is that there is a small learning curve when first using this product.

YouTube player

The video above shows a demonstration of the application on an abdominal mannikin. It is not as slick as the company videos, but I think it’s more practical, with some good tips.

References:

  • Damage control: an approach for improved survival in exsanguinating penetrating abdominal injury. J Trauma 35(3):375-382, 1993.
  • Temporary closure of open abdominal wounds. Am Surg 61(1):30-35, 1995.
Print Friendly, PDF & Email

How To Troubleshoot Air Leaks in Chest Tube Systems

An air leak is a sure-fire reason to keep a chest tube in place. Fortunately, many air leaks are not from the patient’s chest, but from a plumbing problem. Here’s how to locate the leak.

To quickly localize the problem, take a sizable clamp (no mosquito clamps, please) and place it on the chest tube between the patient’s chest and the plastic connector that leads to the collection system. Watch the water seal chamber of the system as you do this. If the leak stops, it is coming from the patient or leaking in from the chest wall.

If the leak persists, clamp the soft Creech tubing between the plastic connector and the collection system itself. If the leak stops now, the connector is loose.

If it is still leaking, then the collection system is bad or has been knocked over.

Here are the remedies for each problem area:

  • Patient – Take the dressing down and look at the skin entry site. Does it gape, or is their obvious air hissing and entering the chest? If so, plug it with petrolatum gauze. If not, the air is actually coming out of your patient and you must wait it out.
  • Connector – Secure it with Ty-Rap fasteners or tape (see picture). This is a common problem area.
  • Collection system – The one-way valve system is not functioning, or the system has been knocked over. Click here for an example. Replace it immediately.

Note: If you are using a “dry seal” system (click here for more on this) you will not be able to tell if you have a leak until you fill the seal chamber with some water.

Print Friendly, PDF & Email

Off-Label Use of the Foley Catheter

Foley catheters are a mainstay of medical care in patients who need control or measurement of urine output. Leave it to trauma surgeons to find warped, new ways to use them!

Use of these catheters to tamponade penetrating cardiac injuries has been recognized for decades (see picture, 2 holes!). Less well appreciated is their use to stop bleeding from other penetrating wounds.

foleyinheart

Foley catheters can be inserted into just about any small penetrating wound with bleeding that does not respond to direct pressure. (Remember, direct pressure is applied by one or two fingers only, with no flat dressings underneath to diffuse the pressure). Arterial bleeding, venous bleeding or both can be controlled with this technique.

In general, the largest catheter with the largest possible balloon should be selected. It is then inserted directly into the wound until the entire balloon is inside the body. Inflate the balloon using saline until firm resistance is encounted, and the bleeding hopefully stops. Important: be sure to clamp the end of the catheter so the bleeding doesn’t find the easy way out!

Use of catheter tamponade buys some time, but these patients need to be in the OR. In general, once other life threatening issues are dealt with in the resuscitation room, the patient should be moved directly to the operating room. In rare cases, an angiogram may be needed to help determine the type of repair. However, in the vast majority of cases, the surgeon will know exactly where the injury is and further study is not needed. The catheter is then prepped along with most of the patient so that the operative repair can be completed.

Related posts:

Print Friendly, PDF & Email