Resuscitative thoracotomy is a (sometimes) life-saving procedure reserved for trauma patients in extremis. Thankfully, most trauma centers do very few of these a year. However, that makes it one of those “high severity – low frequency” procedures that generate many, many quality improvement problems. Many of these issues are due to operator unfamiliarity or equipment availability.
Today, I’ll highlight a problem that crops up occasionally at various trauma centers across the US: the “backward Finochietto.” One of the most essential components of the resuscitative thoracotomy is rapid access to the chest. A large skin incision is typically made, the thoracic wall and intercostal musculature are divided, and the pleural space is entered.
It’s not easy to insinuate your arm between the ribs in an average person. But, of course, there’s a retractor for that! Von Mikulicz presented the first rib spreader at a German surgical society meeting in 1904. Various versions of this instrument were devised over the next three decades to make it easier and faster to use.
The Finochietto retractor was introduced in 1936 and boasted several enhancements. It used a rack and pinion system to make it easier for the surgeon to spread the chest wall and made it unlikely to close on its own. The turning lever was hinged so it could flattened and placed out of the surgical field. The blades contained fenestrations so chest wall tissue could protrude into them and keep it from slipping when opened. It remains a workhorse instrument for us today and is found in most instrument packs for resuscitative thoracotomy.
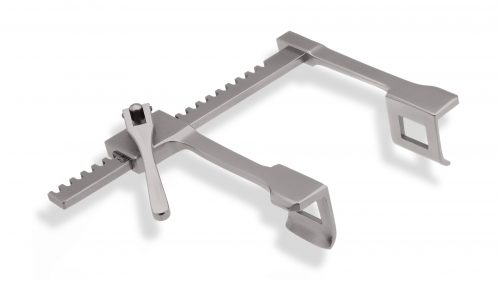
But there is a potential problem. Some Finochietto retractors consist of only two pieces: a blade with the linear gear teeth (the rack) and another blade that fits onto it with the turning handle (the pinion). See the image below:
Looks great, right? However, there is one downside. The retractor parts that hook into the soft tissue are of a fixed depth. What if your patient has a more generous body habitus? Placing multiple sets of this retractor into the thoracotomy pack is not practical.
The solution is to allow detachable blades of various sizes. Here’s a modern-day example:
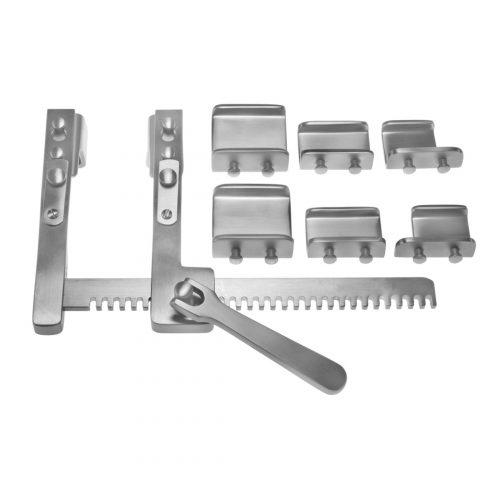
The good news is that the retractor tips are interchangeable. The bad news is that they are sometimes interchangeable with the wrong arm of the retractor! Hence the “backward Finochietto” problem. It’s impossible to use the retractors with the blades on the wrong side, and it takes time the trauma professional does not have to figure out how to snap them off and switch them around.
So what’s the solution? This is clearly an instrument reprocessing quality issue. These instruments are expensive, so your hospital may not be excited about purchasing new ones just for the trauma bay. It all boils down to foolproofing it in as many ways as possible. Here are some tips:
- Provide an educational session for all of the reprocessing techs. Unfortunately, this effect will wear off as staff turnover occurs.
- Post a photograph of a properly assembled retractor for the techs to use when processing the tray.
- Use colored instrument marking tape on each piece of the instrument. For example, a green tape strip should be placed on both the rack arm of the retractor and the left blade. Use red tape for the pinion arm and the right blade. All the tech needs to do now is match the colors as they assemble the retractor.
Bottom line: This problem is more common than you may think. Ask one of your old-timer trauma surgeons and I’ll bet they can tell you some stories. But it is easily avoided with a little creativity and some tape! Be sure to do it now so it doesn’t pop up in the heat of a resuscitative thoracotomy .