Tag Archives: technique

When To Take The Catheter Out After Bladder Repair

Bladder injuries are a relatively uncommon finding in abdominal trauma. The most common mechanisms are penetrating injury and blunt force injuries that disrupt the anterior pelvic ring. In most cases, repair of a full-thickness injury is straightforward and can be performed by the trauma surgeon during the abdominal exploration. More complicated injuries near the trigone usually require assistance from our urology colleagues.

But what happens after the repair? How long should the urinary catheter be left? Should a cystogram be performed before removing it? Over time, the interval to catheter removal and the number of patients with pre-pull studies have been shrinking. There is a huge amount of variability in how trauma professionals approach this, making it one of those areas that is ripe for a practice guideline! And unfortunately, there are none.

The group at the Medical College of Wisconsin in Milwaukee performed a retrospective review of their experience over 13 years at their Level I trauma center. All adult patients with non-complex, full-thickness bladder injuries that were repaired were included in the study.

Here are the factoids:

  • Only 86 patients met the inclusion criteria
  • The injuries were intraperitoneal in 43%, extraperitoneal in 31%, and mixed in the remaining 26%
  • Trauma managed 41% of patients, and urology managed 59%
  • Comparing care by trauma surgery vs urology, there were significant differences in catheter duration (median 11 vs 17 days) and use of pre-pull cystogram (77% vs 100%)
  • There was a 4% leak rate in patients treated by each group (1 vs 2)

The authors concluded that the variation in management between urology and trauma resulted in similar leak and complication rates and suggested that a standard practice should be developed.

Bottom line: This is a provocative study, but still falls under the rule “don’t let a single scientific paper change your practice.” It’s small, it’s retrospective, and it essentially examines “how we do it.” 

However, it does extend and add to things we already know. Inaba published a paper in 2013 that showed bladder injuries typically healed within 9 days. A urology group noted that there were no complications in their patients who did not undergo cystography before removing the catheter.

This paper should stimulate two things. First, a carefully designed prospective study should be conducted to determine the timing of catheter removal and the need for a cystogram. And in the meantime, some enterprising centers should craft their own practice guideline that adopts a standard discontinuation time (seven days?) and selective or non-use of pre-pull cystography with safeguards built in to ensure patient safety.

References: 

  1. Investigating the timing of catheter removal after traumatic bladder injury: a single-institution 12-year experience: Trauma Surgery & Acute Care Open 2025;10:e001693.
  2. Prospective evaluation of the utility of routine postoperative cystogram after traumatic bladder injury. J Trauma Acute Care Surg 2013; 75:1019–23.
  3. Clinical Utility of Routine Follow-up Cystography in the Management of Traumatic Bladder Ruptures. Urology 2018; 113:230–4.

Novel Hip Reduction Technique: The Captain Morgan

I wrote about posterior hip dislocation and how to reduce it using the “standard” technique quite some time ago (see link below). Emergency physicians and orthopedic surgeons at UCSF-Fresno have published their experience with a reduction technique called the Captain Morgan.

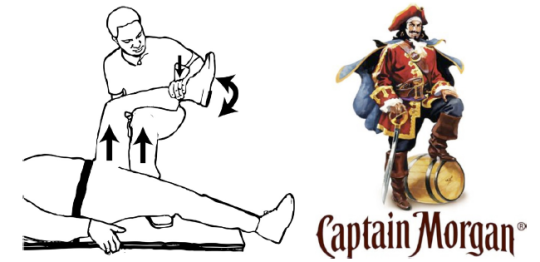
Named after the pose of the trademark pirate for Captain Morgan rum, this technique simplifies the task of pulling the hip back into position. One of the disadvantages of the standard technique is that it takes a fair amount of strength (and patient sedation) to reduce the hip. If the physician is small or the patient is big, the technique may fail.

In the Captain Morgan technique, the patient is left in their usual supine position and the pelvis is fixed to the table using a strap (call your OR to find one). The dislocated hip and the knee are both flexed to 90 degrees. The physician places their foot on the table with their knee behind the patient’s knee. Gentle downward force is placed on the patient’s ankle to keep the knee in flexion, and the physician then pushes down with their own foot, raising their calf. Gentle rotation of the patient’s hip while applying this upward traction behind the patient’s knee usually results in reduction.

Some orthopedic surgeons use a similar technique, but apply downward force on the patient’s ankle, using the leverage across their own knee to develop the reduction force needed. The Captain Morgan technique use the upward lift from their own leg to develop the reduction force. This may be gentler on the patient’s knee.

The authors report a series of 13 reductions, and all but one were successful. The failure occurred due to an intra-articular fragment, and that hip had to be reduced in the operating room.

I’m interested in hearing comments from anyone who has used this technique (or the leverage one). And does anyone have any other techniques that have worked for them?

Related post:

Reference: The Captain Morgan technique for the reduction of the dislocated hip. Ann Emerg Med (in press) dol:1016/j.annemergmed.2011.07.010, 2011.

Practical Tip: Penetrating Injury To The Vertebral Artery

This is an uncommon injury. But when encountered it can cause the trauma professional (and the patient) some major headaches. The majority of the vertebral artery injuries you are likely to encounter are caused by blunt trauma. They are generally diagnosed using CT angiography, and the treatment usually consists of low dose anti-platelet agents like aspirin. Occasionally, coiling or stenting using interventional radiology is needed.

But penetrating trauma is a totally different animal. Gunshot is the most common mechanism, because of the small windows available to access the artery within the vertebral canal using a knife. See the course of the artery in the picture below:

Unfortunately, this bony cage also makes it difficult to surgically approach the artery, especially if the field is continually filling with blood.

The techniques for dealing with this injury according to the doctor books are:

  • Send the patient to interventional radiology. Cutting off flow using coils is the preferred technique. Gelfoam and other products are not used because of the concern for distal embolization (to the brain). Stenting may be a consideration for blunt trauma, but not for penetrating.
  • Or, obtain proximal control by ligating the vertebral artery as it takes off from the subclavian. Hmm, this requires either a separate incision, or a supraclavicular extension of your neck incision. It takes time and is not as easy as it sounds.

Generally, the trauma surgeon stumbles upon this injury while doing a trauma neck exploration. Bleeding can be pesky, and may serve to obscure the field. My preferred method of control is:

  • Jam a wad of bone wax into the vertebral canal right where the bleeding is coming from.
  • Then jam another wad into the canal in the space below it. Proximal control!
  • Jam one final wad into the space above, if accessible. Distal control!

End of problem. Then do a thorough evaluation for all other injuries and address them. Feel free to share any additional tips that you may have!

How To: Retrograde Urethrogram

One of the hallmarks of urethral injury is blood and the meatus in males. The standard answer to the question “how do you evaluate for it?” is “retrograde urethrogram.” Unfortunately, too few people know how to perform this test, and not all radiologists are familiar. Many times it falls to the urologist, who may not be immediately available.

The technique is simple. The following items are needed:

  • A urine specimen cup
  • A tube of KY jelly (not the little unit dose packs)
  • A bottle of renografin or ultravist contrast
  • A 50-60 cc Toomey syringe (slip-tip)
  • A fluoroscopy suite

Pour 25cc of contrast and 25cc of KY jelly in the specimen cup, cap it and shake well. Draw the contrast jelly up into the syringe. Under fluoro, insert the tip of the syringe into the penis and pull the penis toward yourself, pinching the meatus around the tip of the syringe. Slowly inject all the contrast, watching the contrast column on the fluoro screen. Once there is easy flow into the bladder, you can stop the study. If you see extravasation into the soft tissues, stop the study and call Urology.

The advantages to using this technique are:

  • The contrast/jelly mix creates a contrast gel that is less likely to leak from the meatus when injected
  • The jelly makes it easy to insert the catheter if no urethral injury is detected

Normal urethrogram:

Normal urethrogram

Abnormal urethrogram:

Abnormal urethrogram