Tag Archives: tips

What Is: Lunchothorax?

Here’s an operative tip for trauma professionals who find themselves in the OR. Heard of “lunchothorax?” I’m sure most of you haven’t. The term originated in a 1993 paper on the history of thoracoscopic surgery. It really hasn’t been written about in the context of trauma surgery, though.

Lunchothorax is an empyema caused by pleural contamination in patients with concomitant diaphragm and hollow viscus injury. This most commonly occurs with penetrating injuries to the left upper quadrant and/or left lower back. The two penetrations tend to be in close proximity (diaphragm + stomach), but may occasionally be further away (diaphragm + colon).

One of the earlier papers describing the correlation of gastric injury and empyema was written by one of my mentors, John Weigelt. Although gastric repair is usually simple and heals well, his group did note a few severe complications. Of 243 patients with this injury, 15 developed ones that were considered severe, and 10 of those were empyema! What gives?

It turns out that the combination of gastric contents and pleural space is not a good one. It’s not really clear why this is. Is it bacterial? The acid? Undigested food? I’ve seen cases with what I would consider minimal contamination go on to develop a nasty empyema. This is also borne out in a National Trauma Databank review from 2009. It looked at complications in patients with a diaphragm injury and found that a gastric injury increased the probability of empyema by 3x. Interestingly, there was no increased risk of empyema with a concomitant colon injury.

Bottom line: Lunchothorax, or empyema after even minimal contamination from a hollow viscus, is a dreaded complication of thoraco-abdominal penetrating injury. Any time the stomach and diaphragm are violated, I recommend thoroughly irrigating the chest. It’s probably a good idea for concomitant colon injury as well, but there’s less literature support.

This can be done through the diaphragm injury if it is large enough, or through a chest tube inserted separately. Most of the time, you’ll be placing the chest tube anyway because the pleural space has been violated via the abdomen. In either case, copious lavage with saline is recommended to clear all particulate material, with a few extra liters just for good measure. There’s no data on use of antibiotics, but standard perioperative coverage for the abdominal injuries should be sufficient if the lavage was properly performed.

References:

  • The history of thoracoscopic surgery. Ann Thoracic Surg 56(3):610-614, 1993.
  • Penetrating injuries to the stomach. SGO 172(4):298-302, 1991.
  • Risk factors for empyema after diaphragmatic injury: results of a National Trauma Databank analysis. J Trauma 66(6):1672-1676, 2009. 

How To Remember Those “Classes of Hemorrhage”

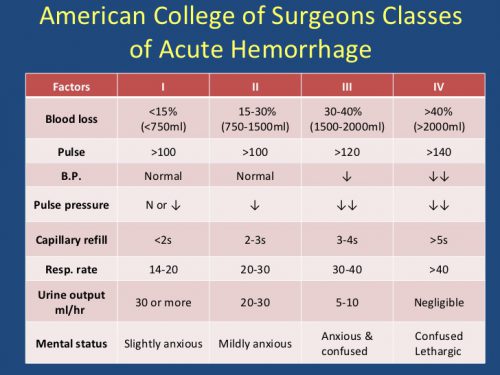
The Advanced Trauma Life Support course lists “classes of hemorrhage”, and various other sources list a similar classification for shock. I’ve not been able to pinpoint where these concepts came from, exactly. But I am sure of one thing: you will be tested on it at some point in your lifetime.

Here’s the table used by the ATLS course:

classes_of_shock

The question you will always be asked is:

What class of hemorrhage (or what % of blood volume loss) is the first to demonstrate systolic hypotension?

This is important because prehospital providers and those in the ED typically rely on systolic blood pressure to figure out if their patient is in trouble.

The answer is Class III, or 30-40%. But how do you remember the damn percentages?

multiscore-maxi1

It’s easy! The numbers are all tennis scores. Here’s how to remember them:

Class I up to 15% Love – 15
Class II 15-30% 15 – 30
Class III 30-40 30 – 40
Class IV >40% Game (almost) over!

Bottom line: Never miss that question again!

How To Remove A Tourniquet

Tourniquets had been banished for several decades due to the misconception that they caused more harm than good. But thanks to the experience of the US military, they have made a resurgence again in civilian use. If handled properly, they can literally be a life-saver.

More and more often, our prehospital trauma professionals are applying a tourniquet in the field. The question once they arrive in your trauma bay is “now what?”

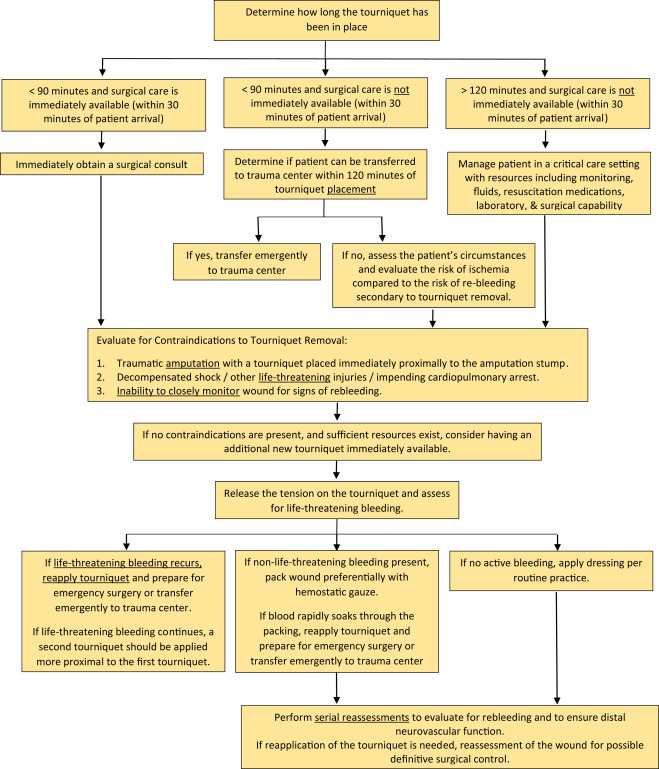
Well, obviously it’s got to come off. But there is a lot of nuance around how to do that. And I don’t just mean the technical aspects of releasing it. It’s important to understand what injuries your patient has, and what the capabilities of your trauma center are first. Here is a framework to help you think through the details.

  1. How long has the tourniquet been up? Hopefully that has been recorded somewhere, or written on the tourniquet. If you don’t know exactly, assume that medics applied it upon arrival at the scene.
    1. If < 90 minutes and you have surgical support available, call the surgeon! If they believe the patient needs to be in the OR right away, make it happen.
    2. If < 90 minutes and you do not have surgical support, transfer your patient ASAP to a center that has it. If the transfer will take more than 2 hours (due to distance / weather and not a slow transfer on your part, consider dropping the tourniquet as described below.
    3. If > 120 minutes regardless of transfer status, consider dropping the tourniquet as described below.
  2. Is there a contraindication to removal?
    1. Traumatic amputation with the tourniquet nicely placed just proximal to an amputation stump. It may slip off after releasing the tension.
    2. Decompensated shock or near arrest. The patient is trying to die and the tourniquet is helping to prevent them from doing just that.
    3. Inability to closely monitor for rebleeding. If the patient needs to be transported in a relatively unsupervised setting, new bleeding may not be treatable.

If there are no contraindications and there is a need to at least temporarily release the tourniquet, then prepare your area appropriately.  Ideally, this should be done in an OR or ICU, but that is not always practical. Otherwise, make your trauma bay look like one. Make sure you have at least one new tourniquet in case the old one can’t be reapplied for some reason. Ensure there is plenty of hemostatic gauze and dressing materials. Have the crash cart nearby and make the ACLS drugs readily available, just in case.

Then release the tension on the tourniquet and note the time. Three things can happen:

  1. There is no bleeding. This happens about 80% of the time in my experience. Either there was no surgical bleeding in the first place, or it has clotted. Place a nice dressing that can be monitored easily.
  2. There is only “non-surgical” bleeding. This is typically oozing or pesky venous bleeding. These should be controlled with sutures or hemostatic dressings. Pressure dressings are also wonderful in the situation. Craft them carefully.
  3. Life threatening bleeding resumes. Reapply the tourniquet and get the patient to definitive care ASAP (OR or another center that has one).

Bottom line: There is very little magic to dealing with tourniquets on the receiving end. But get a very clear picture of what your patient needs and what your center has to offer them. If these factors don’t match up, initiate the transfer as fast as you possibly can. Otherwise move to your OR to fix the problem!

Reference: Removal of the Prehospital Tourniquet in the Emergency Department. J Emerg Med 60(1):98-102, 2020.

The Ultimate Distracting Injury?

By now, we are all very familiar with the concept of the distracting injury. Some of our patients sustain injuries that are so painful that they mask the presence of others. The patient is so distracted by the big one that others just slip their notice.

This concept has been notoriously difficult to test, but there is a reasonable amount of data that suggests it is true. One of the more common and disturbing injury patterns occurs when there is a significant amount of chest wall trauma. When there are fractures focused around the upper chest, cervical spine injuries may be masked, then missed during the exam by trauma professionals.

I’d like to introduce a new concept: the ultimate distracting injury. This goes beyond an injury distracting the patient from another painful problem.

The ultimate distracting injury is one that is so gruesome that it distracts the entire trauma team! It could actually be so distracting that the team might miss multiple injuries!

It’s just human nature. We are drawn to extremes, and that goes for trauma care as well. And it doesn’t matter what your level of training or expertise, we are all susceptible to it. The problem is that we get so engrossed (!) in the disfiguring injury that we ignore the fact that the patient is turning blue. Or bleeding to death from a small puncture wound somewhere else. We forget to focus on the other life threatening things that may be going on.

What are some common ultimate distracting injuries?

  • Mangled extremity
  • Traumatic amputation
  • Impalement
  • Severe soft tissue injury

How do we avoid this common pitfall? It takes a little forethought and mental preparation. Here’s what to do:

  • If you know in advance that one of these injuries is present, prepare your crew or team. Tell them what to expect so they can guard against this phenomenon.
  • Quickly assess to see if it is life threatening. If it bleeds or sucks, it needs immediate attention. Take care of it immediately.
  • If it’s not life threatening, cover it up and focus on the usual priorities (a la ATLS, for example).
  • When it’s time to address the injury in the usual order of things, uncover, assess and treat.

Don’t get caught off guard! Just being aware of this common pitfall can save you and your patient!

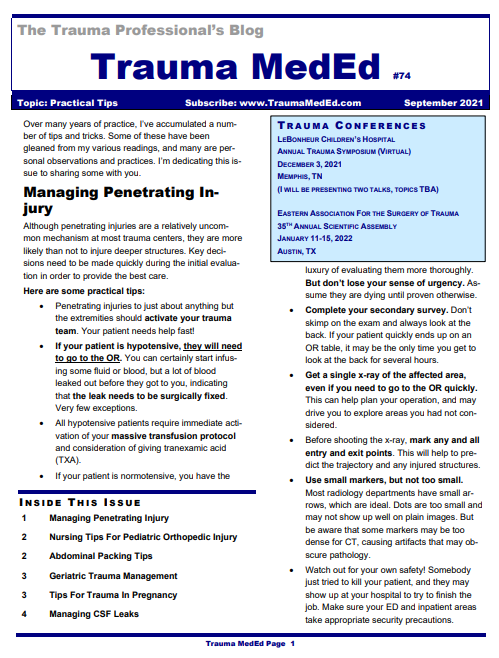
The September Issue of the TraumaMedEd Newsletter is Live!

The September issue of the Trauma MedEd newsletter is now available to everyone!

In this issue, get some tips on:

  • Managing Penetrating Injury
  • Nursing Tips For Pediatric Orthopedic Injury
  • Abdominal Packing Tips
  • Geriatric Trauma Management
  • Tips For Trauma In Pregnancy
  • Managing CSF Leaks

To download the current issue, just click here!

Or copy this link into your browser:
https://www.traumameded.com/courses/practical-tips/

This newsletter was released to subscribers a few weeks ago. If you would like to be the first to get your hands on future newsletters, just click here to subscribe!