Tourniquets had been banished for several decades due to the misconception that they caused more harm than good. But thanks to the experience of the US military, they have made a resurgence again in civilian use. If handled properly, they can literally be a life-saver.
More and more often, our prehospital trauma professionals are applying a tourniquet in the field. The question once they arrive in your trauma bay is “now what?”
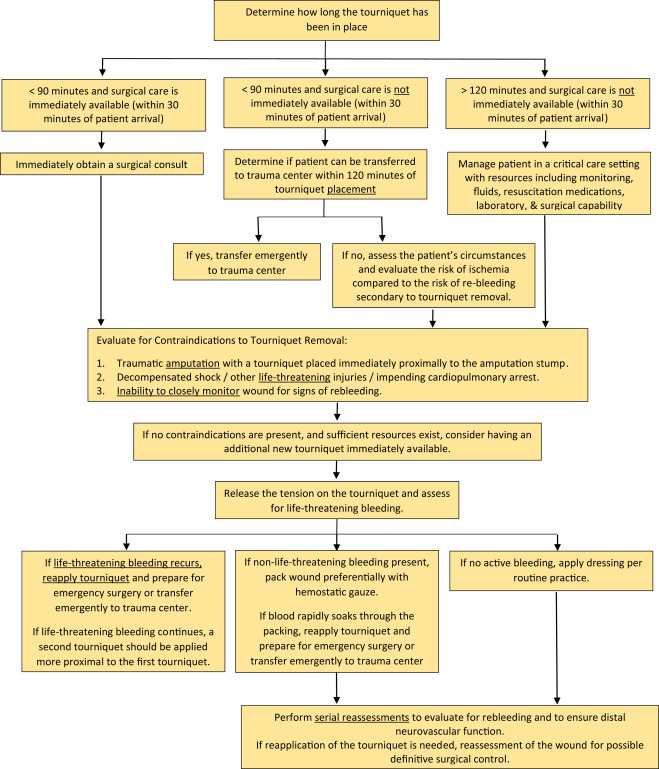
Well, obviously it’s got to come off. But there is a lot of nuance around how to do that. And I don’t just mean the technical aspects of releasing it. It’s important to understand what injuries your patient has, and what the capabilities of your trauma center are first. Here is a framework to help you think through the details.
- How long has the tourniquet been up? Hopefully that has been recorded somewhere, or written on the tourniquet. If you don’t know exactly, assume that medics applied it upon arrival at the scene.
- If < 90 minutes and you have surgical support available, call the surgeon! If they believe the patient needs to be in the OR right away, make it happen.
- If < 90 minutes and you do not have surgical support, transfer your patient ASAP to a center that has it. If the transfer will take more than 2 hours (due to distance / weather and not a slow transfer on your part, consider dropping the tourniquet as described below.
- If > 120 minutes regardless of transfer status, consider dropping the tourniquet as described below.
- Is there a contraindication to removal?
- Traumatic amputation with the tourniquet nicely placed just proximal to an amputation stump. It may slip off after releasing the tension.
- Decompensated shock or near arrest. The patient is trying to die and the tourniquet is helping to prevent them from doing just that.
- Inability to closely monitor for rebleeding. If the patient needs to be transported in a relatively unsupervised setting, new bleeding may not be treatable.
If there are no contraindications and there is a need to at least temporarily release the tourniquet, then prepare your area appropriately. Ideally, this should be done in an OR or ICU, but that is not always practical. Otherwise, make your trauma bay look like one. Make sure you have at least one new tourniquet in case the old one can’t be reapplied for some reason. Ensure there is plenty of hemostatic gauze and dressing materials. Have the crash cart nearby and make the ACLS drugs readily available, just in case.
Then release the tension on the tourniquet and note the time. Three things can happen:
- There is no bleeding. This happens about 80% of the time in my experience. Either there was no surgical bleeding in the first place, or it has clotted. Place a nice dressing that can be monitored easily.
- There is only “non-surgical” bleeding. This is typically oozing or pesky venous bleeding. These should be controlled with sutures or hemostatic dressings. Pressure dressings are also wonderful in the situation. Craft them carefully.
- Life threatening bleeding resumes. Reapply the tourniquet and get the patient to definitive care ASAP (OR or another center that has one).
Bottom line: There is very little magic to dealing with tourniquets on the receiving end. But get a very clear picture of what your patient needs and what your center has to offer them. If these factors don’t match up, initiate the transfer as fast as you possibly can. Otherwise move to your OR to fix the problem!
Reference: Removal of the Prehospital Tourniquet in the Emergency Department. J Emerg Med 60(1):98-102, 2020.
