Tag Archives: tips

Tips For Taking Care Of CSF Leaks

The management of CSF leaks after trauma remains somewhat controversial. The literature is sparse, and generally consists of observational studies. However, some general guidelines are supported by large numbers of retrospectively reviewed patients.

  • Ensure that the patient actually has a CSF leak. In most patients, this is obvious because they have clear fluid leaking from ear or nose that was not present preinjury. Here are the options when the diagnosis is less obvious (i.e. serosanguinous drainage):
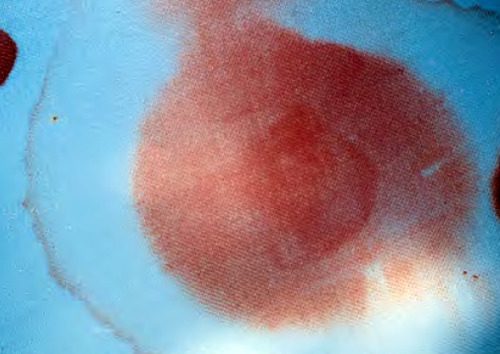
    • The “halo” or “double ring sign” is a form of pillow chromatography. The blood components separate from the CSF as they move through the pillow fabric, creating a clear ring or halo surrounding a bloody spot. This is the cheapest, fastest test and is actually fairly reliable.
    • High resolution images of the temporal bones and skull base. If an obvious breach is noted, especially if fluid is seen in the adjacent sinuses, then a CSF leak is extremely likely.
    • Glucose testing. CSF glucose is low compared to serum glucose.
    • Beta 2 transferrin assay. Don’t do it!! This marker is very specific to CSF. However, the test is expensive and results may take several days to a few weeks to receive. Most leaks will have closed before the results are available, making this a poor test.
  • Place the patient at bed rest with the head elevated. The basic concept is to decrease intracranial pressure, which in turn should decrease the rate of leakage. This same technique is used for management of mild ICP increases after head injury.
  • Consider prophylactic antibiotics carefully. The clinician must balance the likelihood of meningitis with the possibility of selecting resistant bacteria. If the likelihood of contamination is low and the patient is immunocompetent, antibiotics may not be needed.
  • Ear drops are probably not necessary. They may confuse the picture when gauging resolution of the CSF leak.
  • Wait. Most tramatic leaks will close spontaneously within 7-10 days. If it does not, a neurosurgeon or ENT surgeon should be consulted to consider surgical closure.

References:

  1. Brodie HA, Thompson TC. Management of complications from 820 temporal bone fractures. Am J Otol, 1997;18:188-197.
  2. Brodie HA. Prophylactic antibiotics for posttraumatic cerebrospinal fluid fistulas. Arch Otolaryngol Head, Neck Surg. 123:749-752.

Trauma Tip: The “Dang!” Factor

This issue continues to rear its ugly head, so I continue to repost from time to time.

This tip is for all trauma professionals: prehospital, doctors, nurses, etc. Anyone who touches a trauma patient. You’ve probably seen this phenomenon in action. A patient sustains a very disfiguring injury. It could be a mangled extremity, a shotgun blast to the torso, or some really severe facial trauma. People cluster around the injured part and say “Dang! That looks really bad!”

It’s just human nature. We are drawn to extremes, and that goes for trauma care as well. And it doesn’t matter what your level of training or expertise, we are all susceptible to it. The problem is that we get so engrossed (!) in the disfiguring injury that we ignore the fact that the patient is turning blue. Or bleeding to death from a small puncture wound somewhere else. We forget to focus on the other life threatening things that may be going on.

How do we avoid this common pitfall? It takes a little forethought and mental preparation. Here’s what to do:

  • If you know in advance that one of these injuries is present, prepare your crew or team. Tell them what to expect so they can guard against this phenomenon.
  • Quickly assess to see if it is life threatening. If it bleeds or sucks, it needs immediate attention. Take care of it immediately.
  • If it’s not life threatening, cover it up and focus on the usual priorities (a la ATLS, for example).
  • When it’s time to address the injury in the usual order of things, uncover, assess and treat.

Don’t get caught off guard! Just being aware of this common pitfall can save you and your patient!

Nursing Tips for Managing Pediatric Orthopedic Trauma

Nurses have a complementary role with physicians in caring for children with orthopedic injuries. Typically, the child will have been evaluated and had some sort of fracture management implemented. In children, nursing management is easer than in adults since a child is less likely to need an invasive surgical procedure. Many fractures can be dealt with using casts and splints alone.

Here are a few tips for providing the best care for your pediatric patients:

  • Ensure adequate splinting / casting. You will have an opportunity to see the child at their usual level of activity. If it appears likely that their activity may defeat the purpose of the cast or splint, inform the surgeon or extender so they can apply a better one.
  • Focus on pain control. Nothing aggravates parents more than seeing their child in pain! Make sure acetominophen or ibuprofen is available prn if pain is very mild, or scheduled if more significant. Ensure that mild narcotics are available if pain levels are higher. Remember, stool softeners are mandatory if narcotics are given.
  • Monitor compartments frequently. If a cast is used, check the distal part of the extremity for pain, unwillingness to move, numbness or swelling. If any are present, call the physician or extender and expect prompt attention to the problem.
  • Always think about the possibility of abuse. Fractures are rarely seen in children under 3, and almost never if less than 1 year old. If you have concerns about the physical findings or parent interactions, let the physician and social workers know immediately.

Best Of: Finding Rib Fractures On Chest X-Ray

A lot of people have been viewing and requesting this post recently.

Here’s a neat trick for finding hard to see rib fractures on standard chest xrays.

First, this is not for use with CT scans. Although chest CT is the “gold standard” for finding every possible rib fracture present, it should never be used for this. Rib fractures are generally diagnosed clinically, and they are managed clinically. There is little difference in the management principles of 1 vs 7 rib fractures. Pain management and pulmonary toilet are the mainstays, and having an exact count doesn’t matter. That’s why we don’t get rib detail xrays any more. We really don’t care. Would you deny these treatments in someone with focal chest wall pain and tenderness with no fractures seen on imaging studies? No. It’s still a fracture, even if you can’t see it.

So most rib fractures are identified using plain old chest xray. Sometimes they are obvious, as in the image of a flail chest below.

But sometimes, there are only a few and they are hard to distinguish, especially if the are located laterally. Have a look at this image:

There are rib fractures on the left side side on the posterolateral aspects of the 4th and 5th ribs. Unfortunately, these can get lost with all the other ribs, scapula, lung markings, etc.

Here’s the trick. Our eyes follow arches (think McDonald’s) better than all these crazy lines and curves on the standard chest xray. So tip the xray on its side and make those curves into nice arches, then let your eyes follow them naturally:

Much more obvious! In the old days, we could just manually flip the film to either side. Now you have to use the rotate buttons to properly position the digital image.

Final exam: click here to view a large digital image of a nearly normal chest xray. There is one subtle rib fracture. See if you can pick it out with this trick. You’ll have to save it so you can manipulate it with your own jpg viewer. 

Related posts: