Category Archives: Tips

Tongue Piercings And Emergency Intubation

Urgent and emergent intubation is challenging enough, but what if your patient is sporting some type of tongue piercing? Does it make a difference? Do you need to do anything differently?

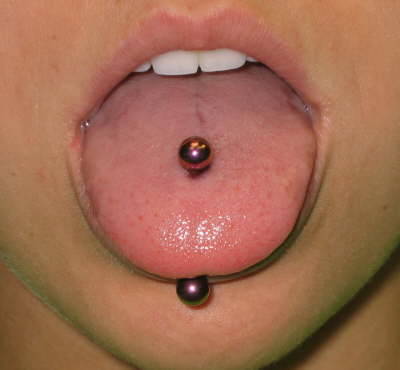
Obviously, the jewelry may physically impede the process of intubating the patient, impairing visualization of structures or getting in the way of inserting the tube. It can also cause complications later down the road, such as pressure necrosis from the tube coming into contact with it.

The anesthesia literature recommends removing all oral jewelry prior to elective intubation, or declining to do the case if the patient refuses. Unfortunately, trauma professionals do not have that option when the patient needs an emergency airway.

Here are some pointers for dealing with oral jewlry:

  • Is the item going to impede insertion of the airway? Is it large, or obstructing the usual tube pathway? If so, remove it quickly (see below).
  • Sweep the tongue well to the side during tube insertion to avoid the jewelry. You may need an assistant to grasp it with gauze to keep it out of the way.
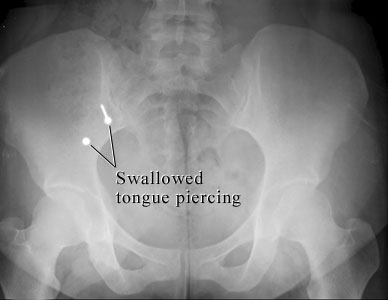
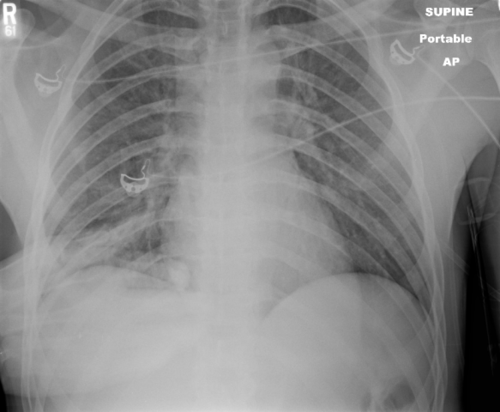
  • Once the airway is secured, remove the item. This takes two people! The ET tube should be moved to the side, and one person will grasp the tongue with a gauze pad and extend it. The other person can then grasp the jewelry with gloved fingers, and unscrew the ball on one side. It can then be removed and saved in an envelope.

Note: both hands must always be in contact with the jewelry at all times! It is slippery, and if the pieces are not controlled, this can happen!

Sharp stud foreign body in the bowel from tongue piercing that came apart and was swallowed (arrow). Images courtesy of Intermountain Medical Imaging, Boise, Idaho.


Print Friendly, PDF & Email

How To Remember To Give The TXA!

The CRASH-2 study did a good job of demonstrating the value of giving tranexamic acid (TXA) in patients with major hemorrhage. The kicker is that the data seemed to show that the effect was best if given early, and might even be detrimental after 3 hours.

The reality is that most patients with major hemorrhage will present as a trauma activation. And if they really are bleeding badly, they will probably trigger your massive transfusion protocol (MTP). But at the same time, they will probably keep you very busy, and it’s easy to forget to order the TXA.

How can you make sure to start the TXA promptly on these patients? Easy! Check out this picture:

Yes, that’s a cheat sign right on top of the first cooler for the MTP! Have the blood bank include this sign in the cooler, so that everyone can see it when you crack the cooler open to give the first units of blood products.

In most hospitals, TXA is a pharmacy item. It should be stocked in the ED, and not in a far away pharmacy satellite. And don’t forget that TXA is given twice, 1 gram given over 10 minutes (or just IV push for speed), followed by another gram infused over 8 hours.

Related posts:

Print Friendly, PDF & Email

Best Practice: Laundry Basket In The Resus Room?

How do you get patients out of their clothes during a trauma resuscitation? Most of the time, I bet your answer is “with a pair of scissors.” And once they are off, what do you do with them? Admit it. You just throw them on the floor. And sometime later, someone’s job is to find it all, put it in a bag, and store it or hand it over to the police.

There are more problems than you might think with this approach. First, and most importantly to the patient, their stuff can get lost. Swept up with all the other detritus from a trauma activation. And second, their belongings may become evidence and it’s just been contaminated.

So here’s an easy solution. Create a specific place to put the clothes. Make it small, with a tiny footprint in your trauma room. Make it movable so it can be kept out of the way. And make sure it is shaped so it can contain a large paper bag to preserve evidence without contamination.

And here’s the answer:

Yes, it’s a plain old laundry basket. The perfect solution. And best of all, these are dirt cheap when you are used to seeing what hospitals charge for stuff. So your ED can buy several ($14.29 ea on Amazon.com) in case they can’t be cleaned anymore or just disappear.

Print Friendly, PDF & Email

Don’t Repeat Trauma Activation X-rays!!

You are in the middle of a fast-paced trauma activation. The patient is awake, and mostly cooperative. The x-ray plate is under the patient and everyone stands back as the tech gets ready to fire the x-ray machine. At that very moment, your patient reaches up and places his hand on his chest. Or one of the nurses reaches over to check an IV site.

The x-ray tech swears, and offers to re-shoot the image. What do you do? Is it really ruined? They have an extra plate in hand and are ready to slide it under the patient bed.

The decision tree on this one is very simple. There are two factors in play: what do you need to see, and how hard is it to see? The natural reaction is to discard the original image and immediately get a new one. It’s so easy! Plus, the techs will take heat from the radiologist because of the suboptimal image. But take a look at this example of a “ruined” chest xray.

It’s just the patient’s hand! You can still see everything that you really need to.

Bottom line: You are looking for 2 main things on the chest x-ray: big air and big blood. Only those will change your management in the trauma bay. And they are very easy to see. Couple that with the fact that an arm overlying the image does not add a lot of “noise” to the image. So look at the processed image first. 99% of the time, you can see what you need, and will almost never have to repeat. [Hint: the same holds true for the pelvic x-ray, too. You are mainly looking for significant bony displacements, which are also easy to see.]

Related posts:

Print Friendly, PDF & Email

The “Dang!” Factor

This tip is for all trauma professionals: prehospital, doctors, nurses, etc. Anyone who touches a trauma patient. You’ve probably seen this phenomenon in action. A patient sustains a very disfiguring injury. It could be a mangled extremity, a shotgun blast to the torso, or some really severe facial trauma. People cluster around the injured part and say “Dang! That looks really bad!”

It’s just human nature. We are drawn to extremes, and that goes for trauma care as well. And it doesn’t matter what your level of training or expertise, we are all susceptible to it. The problem is that we get so engrossed (!) in the disfiguring injury that we ignore the fact that the patient is turning blue. Or bleeding to death from a small puncture wound somewhere else. We forget to focus on the other life threatening things that may be going on.

How do we avoid this common pitfall? It takes a little forethought and mental preparation. Here’s what to do:

  • If you know in advance that one of these injuries is present, prepare your crew or team. Tell them what to expect so they can guard against this phenomenon.
  • Quickly assess to see if it is life threatening. If it bleeds or sucks, it needs immediate attention. Take care of it immediately.
  • If it’s not life threatening, cover it and focus on the usual priorities (a la ATLS, for example).
  • When it’s time to address the injury in the usual order of things, uncover, assess and treat.

Don’t get caught off guard! Just being aware of this common pitfall can save you and your patient!

Print Friendly, PDF & Email