What? Still Using MRI For Cervical Spine Clearance?

Cervical spine clearance as evolved considerably over the years. First, there were five views of the spine using plain radiography. Then there were three. Then we moved to CT scan with clinical clearance. And currently, many institutions are relying only on CT.

But MRI has been used as an adjunct for quite some time. Initially, it was the tie breaker in patients who had equivocal CT findings, and for a while it was used for clearance in obtunded patients. And thanks to conflicting literature and disparate studies, the occasional usage became more frequent.

The group at Cedars-Sinai Medical Center in Los Angeles  noted that the percentage of patients undergoing MRI for cervical spine evaluation at their center slowly slowly crept up from 0.9% to 5.6% over a 10 year period. They designed a study to analyze the utility of this practice and inform their future practice.

Here are the factoids:

  • Over 9,000 patients had cervical spine CT during the 10-year study period; 513 (5.6%) were positive
  • Of the 513 CT-positive patients, 290 (56%) underwent an MRI. This showed:
    • Confirmation of the major injury in 250
    • Minor injury in 40
    • Clinically significant injury was seen in only 2 which was no surprise since they both had neurologic deficits
  • Of the 8,588 CT-negative patients, only 9 had clinically significant findings and 8 of them had neurologic deficits

Bottom line: So what have we learned here? First, MRI usage at Cedars-Sinai increased over time but was really not that useful. The main use was for imaging obtunded patients or those with an obvious neurologic deficit.

More than half of patients with positive CT scans also underwent MRI. If a major injury was seen on CT, MRI confirmed it. But if the CT findings were minor, none of the MRIs added any clinically significant findings in the absence of a neurologic deficit.

And what about MRI after negative CT? In the absence of a deficit, only one had a clinically significant finding (which only required a brace).

This study shows the wisdom of monitoring “how we do it.” There is sometimes some creepage away from what the literature shows is the best practice. The best way to remedy this is to do a good study, just like the authors did. They saw a slow change in practice, investigated it, and found that there was no good clinical reason for it. This gives the trauma program the ammunition to squelch the unwelcome behavior and return the clinicians to best practices.

Reference: Is MRI becoming the new CT for cervical spine clearance? Trends in MRI utilization at a Level I trauma center. J Tra publish ahead of print, DOI: 10.1097/TA.0000000000002752, 2020.

Video: Keeping Up With Your Literature

Every trauma professional at any level of training and expertise knows that it’s so important to keep up with new developments in your field. To that end, I created a video five years ago that described a super-efficient 5-step system for staying abreast.

Well, time passes and technology changes. So I’ve updated this classic with new recommendations and some refinements to the technique. I hope you enjoy! And please leave comments and recommendations on YouTube!

YouTube player

Novel Hip Reduction Technique: The Captain Morgan

I’ve spent the week writing about posterior hip dislocation. In my last post, I shared a video showing the standard way to reduce it. Here’s something novel, though. Emergency physicians and orthopedic surgeons at UCSF-Fresno have published their experience with a reduction technique called the Captain Morgan.

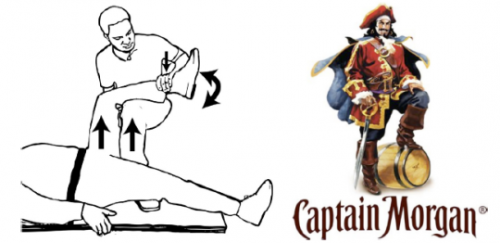
Named after the pose of the trademark pirate for Captain Morgan rum, this technique simplifies the task of pulling the hip back into position. One of the disadvantages of the standard technique is that it takes a fair amount of strength (and patient sedation) to reduce the hip. If the physician is small or the patient is big, the technique may fail.

In the Captain Morgan technique, the patient is left in their usual supine position and the pelvis is fixed to the table using a strap (call your OR to find one). The dislocated hip and the knee are both flexed to 90 degrees. The physician places their foot on the table with their knee behind the patient’s knee. Gentle downward force is placed on the patient’s ankle to keep the knee in flexion, and the physician then pushes down with their own foot, raising their calf. Gentle rotation of the patient’s hip while applying this upward traction behind the patient’s knee usually results in reduction.

Some orthopedic surgeons use a similar technique, but apply downward force on the patient’s ankle, using the leverage across their own knee to develop the reduction force needed. The Captain Morgan technique use the upward lift from their own leg to develop the reduction force. This may be gentler on the patient’s knee.

The authors report a series of 13 reductions, and all but one were successful. The failure occurred due to an intra-articular fragment, and that hip had to be reduced in the operating room.

I’m interested in hearing comments from anyone who has used this technique (or the leverage one). And does anyone have any other techniques that have worked for them?

Reference: The Captain Morgan technique for the reduction of the dislocated hip. Ann Emerg Med 58(6):536-540, 2011.

All About Posterior Hip Dislocation

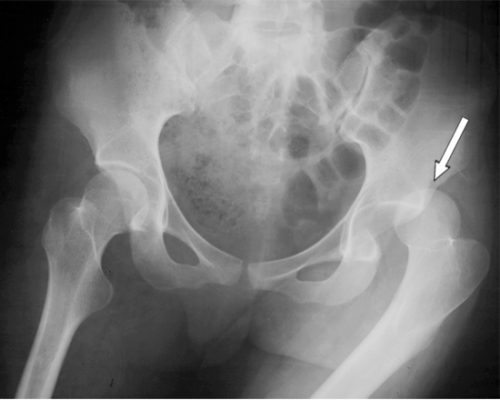
Although posterior hip dislocation is an uncommon injury, the consequences of delayed recognition or treatment can be dire. The majority are caused by head-on car crashes, and 90% of these are posterior dislocations. The femoral head is forced across the back wall of the acetabulum, either by the knee striking the dash, or by forces moving up the leg when the knee is locked. This occurs most commonly on the right side when the driver is standing on the brake pedal, desperately trying to stop.

On exam, the patient presents with the hip flexed, internally rotated and somewhat adducted. Range of motion is limited, and increasing resistance is felt when you try to move it out of position. An AP pelvic X-ray will show the femoral head out of the socket, but it may take a lateral or Judet view to tell if it is posterior vs anterior.

These injuries need to be reduced as soon as possible to decrease the chance of avascular necrosis of the femoral head. Procedural sedation is required for all reductions, since it makes the patient much more comfortable and reduces muscle tone. The ED cart needs to be able to handle both the patient’s weight and your own. I also recommend a spotter on each side of the cart.

Standing on the cart near the patient’s feet, begin to apply traction to the femur and slowly flex the hip to about 90 degrees. Then gently adduct the thigh to help jump the femoral head over the acetabular rim. You will feel a satisfying clunk as the head drops into place. Straighten the leg and keep it adducted. If you are unsuccessful after two tries, there is probably a bony fragment keeping the head out of the socket. I will show an instructional video on this technique in my next post.

Regardless of success, consult your orthopedic surgeon for further instructions. And be sure to thoroughly evaluate the rest of the patient. It takes a lot of energy to cause this injury, and it is flowing through the rest of the patient, breaking other things as well.