Category Archives: Equipment

How Does It Work? The Lowly Blood Pressure Cuff

The blood pressure cuff is one of those devices trauma professionals don’t give a second thought to. Old timers like me remember using the cuff with a sphygmomanometer and stethoscope to get manual blood pressures. I’ve had to do this twice in recent months on airplanes, and I had forgotten how much work this is.

But technology makes things easier for us. Now you just slap a cuff on the arm (or wrist), push a button, and voila! You’ve got the pressure.

But have you stopped to think about how this actually works? Why don’t we need the stethoscope any more? Here’s the scoop:

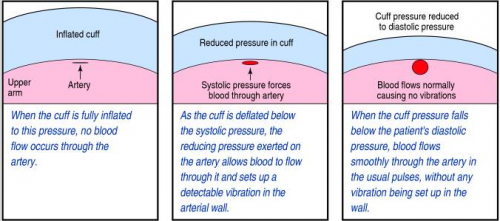
When you take a manual blood pressure, the cuff is inflated until a pulse can no longer be auscultated with the stethoscope. The pressure is slowly released using a little thumb wheel while listening for the pulse again. The pressure at which it is first audible is the systolic, and the pressure at which it softens and fades away is the diastolic.

The automatic blood pressure device consists of a cuff, tubing that connects it to the monitor, a pressure transducer in line with the tubing, a mini air pump, and a small computer. The transducer replaces the analog pressure gauge, and the pump and computer replace the human.

The transducer can “see” through the tubing and into the cuff. It is very sensitive to pressure and pressure changes. The computer directs the pump to inflate to about 20 torr above the point where pulsations in the air column cease. It then releases the pressure at about 4 torr per second, “feeling” for air column vibrations to start. When this occurs, the systolic pressure is recorded. Deflation continues until the vibrations stop, representing the diastolic pressure. Each manufacturer uses its own algorithm for this, adding or subtracting a few torr to obtain the most accurate reading for their particular device.

bpcuff

Piece of cake! But here’s the question: is it accurate? In my next post, I’ll write about how the automated cuff compares to an indwelling arterial line.

The Rise And Fall Of MAST Trousers

Remember MAST Trousers (Military Anti-Shock Trousers)? They were a staple of prehospital care starting in the 1970s and lasting through the turn of the century. But what happened after that? They seem to have disappeared. I recently received a question on the topic recently and wanted to share the real story with you readers.

The basic MAST trouser consists of three inflatable compartments: two legs and one covering the abdomen and pelvis. Each can be inflated or deflated separately. The basic concept was first described by a surgeon who wanted to increase blood pressure during neurosurgical procedures in the early 1900s. The US military embraced the concept during the Vietnam war, using it to augment systolic pressure in servicemen in shock.

Military surgeons migrated this device into civilian prehospital care during the mid-1970s, and the American College of Surgeons Committee on Trauma listed this device as essential on all ambulances in 1977. MAST trousers then came into widespread use throughout the 1980s and 1990s.

Early research in the 1970s suggested that this device could provide up to a 20% boost in volume to the upper part of the body when applied. But as occurs with so many new toys, additional research demonstrated that this auto-transfusion effect was actually only about 5% of blood volume. Some significant complications also came to light as lower extremity ischemia and compartment syndromes were described. Ben Taub Hospital published a study in 1987 which showed no improvement in mortality in patients with penetrating injury.

At the end of the century, support for MAST started to dry up. The NAEMSP published a position paper limiting use to ruptured abdominal aortic aneurysms and pelvic fractures with hypotension. The final straw was a review by the Cochrane Collaboration in 2000 that confirmed no reduction in mortality with MAST use.

Although a few older textbooks may still mention MAST trousers, they are no longer the standard of care. There are no longer any accepted indications for their use, and the few trousers that remain are gathering cobwebs in some corner of the trauma basement.

Reference: StatPearls [Internet]. Treasure Island (FL): StatPearls Publishing; 2022 Jan.

Cool EMS Stuff: The Backboard Washer!

Backboards are made to get messy. And every time your friendly EMS provider brings you a patient, they invariably have to swab it down to give the next patient a reasonably sanitary surface to lie on. But sometimes the boards get downright nasty and the cleanup job is a major production.

Enter… the backboard washer. I recently saw one of these for the first time at a Level III hospital in Ohio. Fascinating! Pop the board inside and seven minutes later it’s clean. And I mean really squeaky clean. You may think it looks clean and a good hand wash, but just take a look at the effluent water coming out of this washer!

These units use standard 100V 20A power and only require a hot water hookup and a drain. They can wash two boards at once.

Hospitals in the know need to locate one of these next to a work area for completing paperwork and some free food. What could be better?

Reference: Aqua Phase A-8000 spec sheet. Click to download.

Rapid Infusers: How Fast Can They Go?

The rapid infusion pump is a mainstay of high volume trauma resuscitation. According to the manufacturers, these devices can now deliver fluids at up to 1000 ml/minute. Or can they?

Here is a chart from the manufacturer of the Belmont rapid infuser. This shows the (theoretical) flow rates achievable for each of their two devices (max flow rate of 750 ml/min and 1000 ml/min models). The charts show the maximum flow rates for crystalloid or blood for various sizes of IV catheters that are 2″ long.

Notice two things:

  • The flow rate decreases exponentially as the size of the IV catheter decreases
  • The difference in flow rate between blood and crystalloid diminishes as the catheter size increases

These observations can be explained by something I’m sure you haven’t thought about since high school physics: Pouiseulle’s Equation. Of course you remember, right?

The equation states that the flow of a fluid (F) is proportional to the fourth power of the radius of the catheter and the pressure gradient across the two ends of it (delta P), and inversely proportional to the viscosity of the fluid (greek letter eta) and the length of the catheter (L).

What does this mean in practical terms?

  • The pressure gradient is fixed at about 300 mm Hg (the pressure bag or pump) so you can essentially ignore this factor
  • The viscosity (measured in centipoise) is based on the fluid begin given. Crystalloid (water) has a viscosity of 1. Whole blood has a viscosity of about 2.7, and packed cells are about 10. This means that our typical infusion of PRBC flows 10 times more slowly than saline.
  • The length and diameter of the IV catheter are controlled by the trauma professional who inserts it, and it has a massive impact on flow. This is particularly true for the diameter (gauge), which varies directly as the fourth power.

So let’s put all these numbers together. Let’s assume that we are using balanced resuscitation and are infusing lots of blood, not crystalloid. The choice of IV catheter is the most important factor for a successful volume resuscitation! Here’s a table I constructed that lists the approximate relative flow rates for several catheter types. I use a 9 Fr introducer as the gold standard and have defined the flow rate for that device as 1.

IV Catheter Internal Radius Length Relative flow
9 Fr Introducer 1.5 mm 10 cm 1
14 Ga IV 0.8 mm 5 cm 1/6 x
Triple lumen cath 0.3 mm 20 cm 1/1265 x

Bottom line: High-speed volume resuscitation forces us to squeeze a thick (and hopefully warm) liquid through a small straw into our patient’s vein. The smaller and longer the straw, the harder it is to do that. I think that people underestimate how much of an impact the choice of catheter makes.

Always use the largest and shortest possible access for rapid infusion. Ideally, this should be a large, straight introducer. Some have a side port (e.g. Cordis) at a right angle to the catheter, but this introduces some extra resistance and will slow the infusion rate. A large bore (14 Ga) short (2 inch) IV catheter is good, but will only flow at one sixth the rate of an introducer.

And never use anything with more than one lumen! The typical triple lumen catheter has three lines that are either 20 or 21 Ga. They are tiny and very long. Looking at the table above, you will be lucky to infuse a few cc’s per minute through one of these, compared to hundreds of cc’s via a straight introducer.

References:

So You Want Your Own Hybrid Room?!

You’re hooked! You are thinking back to a number of cases that you think might have done better with a hybrid room. And now let’s assume you already have one in your OR suite. Now what do you do? Here’s my final post in this series to give you some things to think about.

The key is to avoid jumping right in and sending your next eligible patient straight to that room. You absolutely must take some time to develop policies and guidelines to make sure things go smoothly.

Here are some important things to think about:

  • Identify which specific patients are eligible so you don’t squander this resource
  • Who calls the OR to secure the room (surgeon, resident, other)?
  • Who calls the interventional radiologist?
  • What if another case (TEVAR, etc) is already on the table?
  • What if another case is getting ready to use the OR? How are conflicts resolved?
  • Develop an initial in-room report process so all the teams know the game plan
  • Assign an extra circulator to the room. You’ll need them!
  • Make sure all retractor and positioning systems (abdomen, crani) fit the table! Remember that little asterisk in the previous section? Some retraction systems may need adaptors to work with your table. Don’t find this out at the last minute!
  • What about lithotomy position? How will this work with your hybrid table? Most don’t have sections that break away, so this will not be available to you.
  • Ensure radiation protection for all, including thyroid shields.
  • Bag the bottom x-ray detector, otherwise it will get very, very gross!
  • Create an external fixator equipment cart that can be moved into the hybrid room. This will save time over having someone go pick individual items from the central core.
  • Create an embolization cart with appropriate wires, catheters, coils, etc. This stuff may not be stocked normally in the hybrid room.
  • If embolization is needed, be sure to have a “gopher” to fetch any equipment that’s not already on the cart or in the room.

And I’m sure there are more details that I haven’t thought of. If you have some helpful suggestions, policies, or protocols, please share them with me!