Penetrating injuries of the lung come in two flavors: gunshot and stab. However, the end result for both is the same. They leak. And the leak is either air or blood. Having lower kinetic injury, stab wounds tend not to leak as much. Gunshots, on the other hand, can travel further through lung tissue and the higher energy causes more damage.
For the most part, managing these injuries is straightforward. The lung is essentially a sponge. Since most of it is air, the amount of damage done is much less than, say, to a solid organ. But bleeding and air leaks can be annoying in some cases, and even life-threatening in others.
Today, I’ll focus on injuries to the lung parenchyma. Here’s a basic primer on how to manage them.
As always, the first decision to make is to answer the question, “do we need to go to the operating room right now?” This is always determined by unstable vital signs or symptoms that cannot be controlled with simple maneuvers like a chest tube.
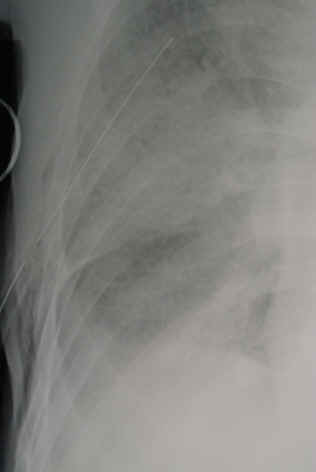
Next, determine if any treatment is needed at all. The initial chest x-ray will tell you a lot.
Is there any air or blood at all? If so, a followup chest x-ray after a set amount of hours (I use 6) will detect any progression that needs future treatment.
Is there too much blood or air? If so, insert a chest tube.
Is there too much ongoing air leak or bleeding? This indicates a problem (bronchial or chest wall / pulmonary vascular injury) that needs operative treatment.
What are your options if you go to the operating room? Generally, an open thoracotomy is the most desirable, especially in the face of gunshots and major bleeding. It is fast and allows for rapid and complete exploration. VATS might be okay in a few stab wounds where the injury is thought to be limited but is still problematic.
Find the hole(s). With a single penetration, there are usually one or two holes. But there can be up to four if the wound traverses two lobes. And if is are more than one penetration, all bets are off.
Don’t poke a skunk. If a particular wound has no obvious bleeding or air bubbles, leave it alone. Save your efforts for the ones that are really a problem.
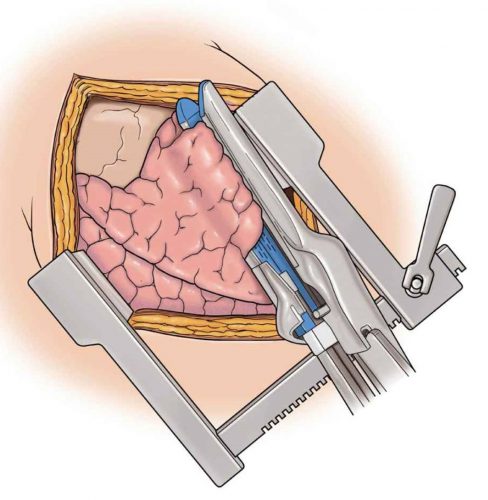
Use stapled tractotomy. Direct repair of lung wounds may lead to intra-parenchymal hematomas or air embolism. Wedge resection reduces lung volume, particular in patients with multiple injuries.
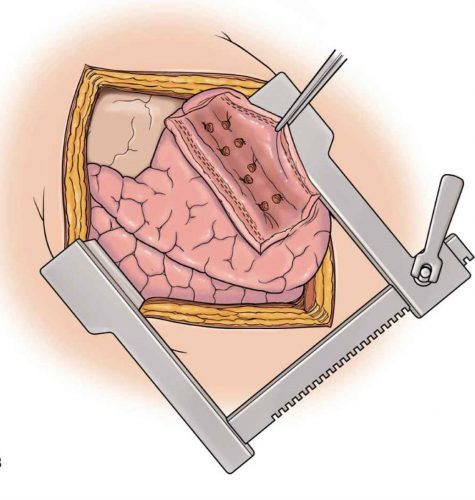
Here’s how to do it. Insert a GIA stapler through the bullet tract and fire. This will lay open the entire tract so that individual air leaks and bleeders can be individually suture ligated.
Then fully evacuate all blood from the chest and make sure there is no more bleeding. Failure to do so can result in retained hemothorax and the need for yet another operation. Insert a well-positioned chest tube to finish off the procedure.
Reference: Stapled pulmonary tractotomy: a rapid way to control hemorrhage in penetrating pulmonary injuries. JACS 185(5):467-487, 1997.
Yes, this is another one of my pet peeves. During a trauma activation, we all strive to adhere to the Advanced Trauma Life Support protocols. Primary survey, secondary survey, etc. Usually, the primary survey is done well.
But then we get to the secondary survey, and things get sloppy.
The secondary survey is supposed to be a quick yet thorough physical exam, both front and back. But all too often it’s quick, and not so thorough. There is the usual laying on of the hands, but barely. Abdominal palpation is usually done well. But little effort is put into checking stability of the pelvis. The extremities are gently patted down with the hope of finding fractures. Joints are slightly flexed, but not stressed at all.
Is it just a slow degradation of physical exam skills? Is it increasing (and misguided) faith in the utility of the CT scanner? I don’t really know. But it’s real!
Bottom line: Watch yourself and your team as they perform the secondary survey! Your goal is to find all the injuries you can before you go to imaging. This means deep palpation, twisting and trying to bend extremities looking for fractures, stressing joints looking for laxity. And doing a good neuro exam! Don’t let your physical exam skills atrophy! Your patients will thank you.
Extraperitoneal rectal injury repair has evolved considerably over the past 40 years. Way back when, this injury automatically triggered exploration, diverting colostomy with washout of the distal colon, and presacral drain insertion (remember those?).
We eventually backed off on the presacral drains (pun intended), which didn’t make a lot of sense anyway. And we gave up on dissecting down deep into the pelvis to approach the injury. This only served to contaminate an otherwise pristine peritoneal cavity. Ditto for the distal rectal washout. So we have been performing a diverting colostomy as the primary method of treatment for years.
A Brief Report in the British Medical Journal Open shows us what may very well be the next stage in treating these injuries. Whereas they were previously left to heal on their own followed by colostomy closure after a few months, these authors from Sunnybrook Health Sciences Centre in Toronto are promoting a minimally invasive approach to definitive management.
They detail two cases, one an impalement by a steel rod through the rectum and bladder, and one stab to the buttock. The authors dealt with the non-rectal injuries using conventional techniques. The rectal injuries were repaired using trans-anal minimally invasive surgery (TAMIS). Both were discharged without complications.
Here is a link to the video of the technique used in the stab victim:
Bottom line: It’s about time! As long as there is not a destructive injury to the extraperitoneal rectum, this seems like a great technique to try. It may very well eliminate the need for a diverting colostomy.
But remember, this is only a case report. We don’t know about antibiotic duration, followup imaging, longer term complications, or anything really. A larger series of cases is warranted to provide these answers. This will take some time due to the low frequency of this injury. So if you try it, build your own series and publish it so we all can learn!
Reference: Minimally invasive approach to low-velocity penetrating extraperitoneal rectal trauma. BMJ Open 5(1) epub 5/12/2020.
In my last post, I reviewed the classic, “old-timey” subxyphoid approach to the pericardial window procedure for trauma. Today, I’ll describe the operative approach if you are already in the abdomen managing injuries there.
The same considerations apply to these patients in deciding to perform the window. Either there is a suspicion of actual pericardial tamponade based on physiology or diagnostic imaging, or an injury has been noted in proximity to the heart that raises that suspicion.
If you are already exploring the abdomen, the procedure is much simpler. The instruments required are already in your laparotomy setup:
Two toothed forceps
Tissue (Metzenbaum) scissors
First, and most importantly, the upper abdomen must be evacuated of all blood. This is critically important since a positive window is solely determined by the presence of blood in the pericardial fluid. If it is contaminated with blood as it flows into the peritoneal cavity, a false positive may result leading to an unneeded thoracotomy or sternotomy.
The midline incision must extend to the xiphoid process in order to get adequate exposure of the diaphragm. The left lobe of the liver is retracted downwards by your assistant, and the two of you can then grasp an area of the pericardial portion of the diaphragm with the toothed forceps. As it is tented away from the heart, the scissors are used to dissect through both the diaphragm and pericardium. Although some use cautery for this, I’m a weenie using electricity near the heart.
The diaphragm is thick, so expect to cut through several mm of tissue before you see pericardial fluid. Watch the color of the fluid carefully. If it is the least bit blood tinged, the result is positive. And be sure to watch for 15-30 seconds. Sometimes the initial fluid is amber, but it becomes bloody as more is drained.
Bloody fluid equals positive result. This means that a thoracic procedure is indicated to evaluate the heart and repair the injury. The choice of sternotomy vs thoracotomy is determined by mechanism, foreign body trajectory, and suspected area of injury on the heart.
If the result is negative, you may close the hole with your suture of choice. If the abdomen is contaminated from a bowel injury, I recommend you use the traditional subxiphoid approach separate from the laparotomy incision to avoid contaminating the pericardial sac.
Here’s a YouTube video of a transdiaphragmatic window created laparoscopically. Since abdominal explorations for major trauma seldom lend themselves to laparoscopy, don’t get any ideas from watching this!
Home of the Trauma Professional's Blog
Do you want to get a daily email every time there’s a new post? See what I’m up to.