Tag Archives: tips

Best Practice: Laundry Basket In The Resus Room?

How do you get patients out of their clothes during a trauma resuscitation? Most of the time, I bet your answer is “with a pair of scissors.” And once they are off, what do you do with them? Admit it. You just throw them on the floor. And sometime later, someone’s job is to find it all, put it in a bag, and store it or hand it over to the police.

There are more problems than you might think with this approach. First, and most importantly to the patient, their stuff can get lost. Swept up with all the other detritus from a trauma activation. And second, their belongings may become evidence and it’s just been contaminated.

So here’s an easy solution. Create a specific place to put the clothes. Make it small, with a tiny footprint in your trauma room. Make it movable so it can be kept out of the way. And make sure it is shaped so it can contain a large paper bag to preserve evidence without contamination.

And here’s the answer:

Yes, it’s a plain old laundry basket. The perfect solution. And best of all, these are dirt cheap when you are used to seeing what hospitals charge for stuff. So your ED can buy several ($14.29 ea on Amazon.com) in case they can’t be cleaned anymore or just disappear.

The “Dang!” Factor

This tip is for all trauma professionals: prehospital, doctors, nurses, etc. Anyone who touches a trauma patient. You’ve probably seen this phenomenon in action. A patient sustains a very disfiguring injury. It could be a mangled extremity, a shotgun blast to the torso, or some really severe facial trauma. People cluster around the injured part and say “Dang! That looks really bad!”

It’s just human nature. We are drawn to extremes, and that goes for trauma care as well. And it doesn’t matter what your level of training or expertise, we are all susceptible to it. The problem is that we get so engrossed (!) in the disfiguring injury that we ignore the fact that the patient is turning blue. Or bleeding to death from a small puncture wound somewhere else. We forget to focus on the other life threatening things that may be going on.

How do we avoid this common pitfall? It takes a little forethought and mental preparation. Here’s what to do:

  • If you know in advance that one of these injuries is present, prepare your crew or team. Tell them what to expect so they can guard against this phenomenon.
  • Quickly assess to see if it is life threatening. If it bleeds or sucks, it needs immediate attention. Take care of it immediately.
  • If it’s not life threatening, cover it and focus on the usual priorities (a la ATLS, for example).
  • When it’s time to address the injury in the usual order of things, uncover, assess and treat.

Don’t get caught off guard! Just being aware of this common pitfall can save you and your patient!

Tips For Taking Care Of CSF Leaks

The management of CSF leaks after trauma remains somewhat controversial. The literature is sparse, and generally consists of observational studies. However, some general guidelines are supported by large numbers of retrospectively reviewed patients.

  • Ensure that the patient actually has a CSF leak. In most patients, this is obvious because they have clear fluid leaking from ear or nose that was not present preinjury. Here are the options when the diagnosis is less obvious (i.e. serosanguinous drainage):
    • The “halo” or “double ring sign” is a form of pillow chromatography. The blood components separate from the CSF as they move through the pillow fabric, creating a clear ring or halo surrounding a bloody spot. This is the cheapest, fastest test and is actually fairly reliable.
    • High resolution images of the temporal bones and skull base. If an obvious breach is noted, especially if fluid is seen in the adjacent sinuses, then a CSF leak is extremely likely.
    • Glucose testing. CSF glucose is low compared to serum glucose.
    • Beta 2 transferrin assay. Don’t do it!! This marker is very specific to CSF. However, the test is expensive and results may take several days to a few weeks to receive. Most leaks will have closed before the results are available, making this a poor test.
  • Place the patient at bed rest with the head elevated. The basic concept is to decrease intracranial pressure, which in turn should decrease the rate of leakage. This same technique is used for management of mild ICP increases after head injury.
  • Consider prophylactic antibiotics carefully. The clinician must balance the likelihood of meningitis with the possibility of selecting resistant bacteria. If the likelihood of contamination is low and the patient is immunocompetent, antibiotics may not be needed.
  • Ear drops are probably not necessary. They may confuse the picture when gauging resolution of the CSF leak.
  • Wait. Most tramatic leaks will close spontaneously within 7-10 days. If it does not, a neurosurgeon or ENT surgeon should be consulted to consider surgical closure.

References:

  1. Brodie HA, Thompson TC. Management of complications from 820 temporal bone fractures. Am J Otol, 1997;18:188-197.
  2. Brodie HA. Prophylactic antibiotics for posttraumatic cerebrospinal fluid fistulas. Arch Otolaryngol Head, Neck Surg. 123:749-752.

Diagnostic Tip: Nail Discoloration After Severe TBI

Occasionally, patients who have had a severe brain injury but recovered relatively quickly may present with complaints of odd nail discoloration. This may involve fingernails and/or toenails. What gives?

This is actually a byproduct of repeated exams to determine the Glasgow Coma Scale score. A common way to determine the motor component is to squeeze the fingertip or toetip. I’ve seen some neurosurgeons use a pen to apply a great deal of force to the nail.

The discoloration is a resolving subungual hematoma. You may see different colors under different nails, depending on the age of the hematoma. Amaze your colleagues with your knowledge on this one!

Trauma In Pregnancy 3: Tips & Tricks

Here is a list of practical tips for trauma professionals from prehospital and beyond:

  • Apply supplemental oxygen from the get-go, in the field if possible
  • Start an IV or IO and begin crystalloid infusion immediately
  • Bump the patient to her left. This is most easily done with the spine board in place. Just put a rolled up towel under the right side of the board.
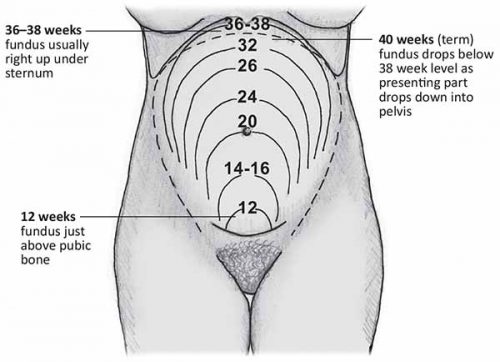
  • Quickly estimate how pregnant the patient is if she can’t tell you. Use the fundal height diagram below. Key measurements to remember:
    • Umbilicus = 20 weeks: entering the possible viability range if delivered emergently
    • Xiphoid = approaching full term

  • If the patient is 20 weeks+ pregnant, only transport to a trauma center (Level I or II).
  • At the hospital, reassess fundal height to more accurately estimate viability
  • If the fetus may be viable (23-24 weeks), call OB to the resuscitation area. But remember, they have nothing to offer until the trauma team secures the safety and stability of the mother. So don’t let them in the room until you have finished your entire evaluation.  Nothing they can do (e.g. monitor) is helpful during the acute phase of the resuscitation.
  • Once the mother is stabilized, assess fetal heart tones and apply monitors for fetal heart rate and maternal contractions.
  • Add coag studies to your lab panel. Fetal and placental injury can cause clotting problems.
  • Consider giving Rhogam in all major trauma cases if the mother is Rh negative
  • Obtain a KB test to look at the amount of fetal blood in the maternal circulation. Why do this if you are going to give Rhogam anyway? Answer: sometimes the amount of fetal blood leakage is greater than that covered by a single vial of Rhogam.
  • Plan your imaging intelligently. The next section covers this topic in more detail.
  • If needed, chest tubes should be inserted 1-2 intercostal spaces higher than usual.
  • The life-saving tetanus shot is safe in pregnant patients.