A Cool Way To Remove Embedded Foreign Bodies

Yesterday I wrote about the need to remove certain bullets or lead shot if there is any danger of lead poisoning. Unfortunately, many of us have had the experience of digging into bloody tissue for long periods of time trying to locate the object, even with fluoroscopy. Well, there’s a better way of doing this.

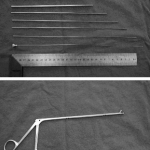
A group in China described a technique using a fancy form of needle localization. They employed a set of instruments normally used for lumbar diskectomy (see photo). This set includes a long 18 Ga needle with a removable hub, several dilators and an outer cannula with a 5.8mm diameter. A pair of 3.8mm grasping forceps is also used.

The foreign body is located using a C-arm fluoroscopy unit and the best approach is planned. The 18 Ga needle is then inserted using fluoro until it touches the object. The hub is removed and dilators are inserted over the needle, one after the other. The outer cannula is then placed over them, and the needle and dilators are then removed. The cannula is manipulated until the foreign body (or a part of it) is located within the cannula. It is then grasped and removed, along with the cannula if needed. If the object is too large to enter the cannula, the cannula is pulled back slightly and the grasper introduced past the end of it to grip and remove the foreign body.

The writers shared the details of 76 patients who had a total of 251 foreign bodies removed over a 6 year period. The depth varied from 2.5 to 8.5cm. Procedure time ranged from 8 to 15 minutes, and fluoro exposure varied from 1 to 4 minutes. Success rate was 100% (all foreign bodies were removed) and there were no complications.

Bottom line: This is a very slick technique that promises to dramatically increase the success rate and decrease complications from removing foreign bodies. The amount of time spent is much less than the brute force technique, as is the amount of soft tissue trauma. Large objects that cannot be grasped with these forceps cannot be removed with this method. Although I am a little concerned that the authors’ results were so perfect, it’s certainly worth a try!

Related post:

Reference: Percutaneous extraction of deeply-embedded radiopaque foreign bodies using a less-invasive technique under image guidance. J Trauma 72(1):302-305, 2012.

Can Lead Poisoning Occur After A Gunshot?

This is a fairly common question from victims of gunshots and their families. As you know, bullets are routinely left in place unless they are superficial. It may cause more damage to try to extract one, especially if it has come to rest in a deep location. But is there danger in leaving the bullet alone?

One of the classic papers on this topic was published in 1982 by Erwin Thal at Parkland Hospital in Dallas. The paper recounted a series of 16 patients who had developed signs and symptoms of lead poisoning (plumbism) after a gunshot or shotgun injury. The common thread in these cases was that the injury involved a joint or bursa near a joint. In some cases the missile passed through the joint/bursa but came to rest nearby, and a synovial pseudocyst formed which included the piece of lead. The joint fluid bathing the projectile caused lead to leach into the circulation.

The patients in the Parkland paper developed symptoms anywhere from 3 days to 40 years after injury. As is the case with plumbism, symptoms were variable and nonspecific. Patients presented with abdominal pain, anemia, cognitive problems, renal dysfunction and seizures to name a few.

Bottom line: Any patient with a bullet or lead shot that is located in or near a joint or bursa should have the missile(s) promptly and surgically removed. Any lead that has come to rest within the GI tract (particularly the stomach) must be removed as well. If a patient presents with odd symptoms and has a history of a retained bullet, obtain a toxicology consult and begin a workup for lead poisoning. If levels are elevated, the missile must be extracted. Chelation therapy should be started preop because manipulation of the site may further increase lead levels. The missile and any stained tissues or pseudocyst must be removed in their entirety.

Reference: Lead poisoning from retained bullets. Ann Surg 195(3):305-313, 1982.

The Societal Cost of ED Thoracotomy

ED thoracotomy can be a dramatic, life-saving procedure. From the patient’s perspective, there is only an upside to performing it; without it there is 100% mortality. But to trauma professionals, there is considerable downside risk, including accidental injury, disease transmission and wasted resources. What is the societal risk/cost if ED thoracotomy is performed for weak indications?

The trauma group at Sunnybrook in Toronto looked at this question by retrospectively reviewing 121 patients who underwent the procedure over a 17 year period. They looked at appropriateness, resource use and the safety of the trauma professionals involved. They used the following criteria to determine appropriateness:

  • Blunt trauma with an ED arrival time < 5 minutes
  • Penetrating torso injury with an ED arrival time < 15 minutes with signs of life

Most of the patients were young men (avg age 30) with 78% penetrating injury and 22% blunt. About half (51%) underwent thoracotomy for inappropriate indications. The vast majority of inappropriate cases were for penetrating injuries with long transport times. Only 3 of the inappropriate thoracotomies were for blunt trauma, yet 24 of the “appropriate” procedures were done in the face of blunt trauma.

Resource use in the 63 inappropriate cases included 433 lab tests, 14 plain images and 9 CT scans (!!!?), 6 cases in the OR, 244 units of packed red cells and 41 units of plasma. Accidental needlestick injuries occurred in 6% of the inappropriate thoracotomies. None of the patients receiving inappropriate thoracotomy survived.

Bottom line: ED thoracotomy remains a very dangerous procedure. I’ve previously written about guidelines to determine which ones are appropriate (see link below). In this study, many of the procedures were performed on patients with blunt trauma. That means that the number of inappropriate thoracotomies would have been much higher if today’s standards had been applied. So use the guidelines and save your own health, safety and hospital resources. Is it really worth it if you know the patient will not survive?

Related posts:

Reference: Societal costs of inappropriate emergency department thoracotomy. J Amer Col Surg 214(1):18-26, 2012.

CT Scan Images Simplified

Ever wonder what is going on when you drag your mouse across a CT image, or when you change the “window” settings of an image from lung to abdomen? It all has to do with the way CT generated xray information is displayed, and how your eyes and brain perceive it.

Let’s get down to basics. The first thing needed is to understand the concept of radiodensity. The CT scanner uses a set of software algorithms to determine the amount of x-radiation absorbed by every element in a plane of tissue. Each of these elements is represented by a pixel on the video display, and the density (amount of x-radiation absorbed) is measured in Hounsfield units. This scale was developed by Sir Godfrey Hounsfield, who set the radiodensity of water at 0, and air at -1000. The scale extends in the positive direction to about +4000, which represents very dense metals. See the table for the density of common substances on CT.

When you view a CT scan on a video display, two important numbers are displayed on screen. The first is the window width (W), which describes the range of Hounsfield units displayed. The maximum window width possible is usually about 2000, but our eyes are not capable of seeing this many shades. Actually, we can really only distinguish about 16 shades of gray. So the window width is divided by 16, and each group of Hounsfield values is converted to one of 16 shades of gray. The lowest Hounsfield numbers in the window range are shown as black, and the highest are white.

The second important number is the window level (L). This is the Hounsfield number in the center of the window width. So let’s look at some typical examples of W/L settings.

The abdomen contains mostly soft tissue, which is just a little denser than water. So most of the abdominal contents have Hounsfield values from 0 to 100 or so. A typical abdominal scan W/L setting is 350/50. This means that a total range of 350 different densities are displayed, centered on a density of 50 Hounsfield units ( range is -125 to 225 HU). Each difference of 22 HU will show up as a different shade of gray. So this narrow window allows us to distinguish relatively subtle differences in density.

The chest cavities are primarily air-filled, and the lungs are very low density. So it makes sense that a typical lung W/L setting is 1500/-500. The window ranges from -1250 to +250 HU, and a wider range of 94 HU represents one shade of gray. This is typical of body regions with a wider range of densities.

Finally, bone windows are usually 2000/250. This window is centered above the usual tissue densities, and is very wide so that it shows a wide range of densities in only 16 shades of gray. Thus, the contrast appears very low.

On most displays, the window width increases as you drag the mouse to the right. This increases the range of densities in a shade of gray, thus decreasing the overall amount of contrast in the image. Dragging the mouse down decreases the window level, moving it toward the air end of the spectrum. This allows you to center your window on the type of tissue you are interested in viewing and adjust your ability to distinguish objects with a lot or only a little contrast (see table above).

I apologize to my radiology colleagues in advance for this simplistic explanation. Trauma professionals have minimal exposure (pun intended) to the physics and details of radiographic imaging. We are much more interested in effectively using this technology to save our patients’ lives.

Does Initial Hematocrit Predict Shock?

Everything you know is WRONG!

The classic textbook teaching is that trauma patients bleed whole blood. And that if you measure the hematocrit (or hemoglobin) on arrival, it will approximate their baseline value because not enough time has passed for equilibration and hemodilution. As I’ve said before, you’ve got to be willing to question dogma!

The trauma group at Ryder in Miami took a good look at this assumption. They drew initial labs on all patients requiring emergency surgery within 4 hours of presentation to the trauma center. They also estimated blood loss in the resuscitation room and OR and compared it to the initial hematocrit. They also compared the hematocrit to the amount of crystalloid and blood transfused in those areas.

Patients with lower initial hematocrits had significantly higher blood loss and fluid and blood replacement during the initial treatment period. Some of this effect may be due to the fact that blood loss was underestimated, or that prehospital IV fluids diluted the patient’s blood counts. However, this study appears sound and should prompt us to question the “facts” we hear every day.

Bottom line: Starling was right! Fluid shifts occur rapidly, and initial hematocrit or hemoglobin may very well reflect the volume status of patients who are bleeding rapidly. If the blood counts you obtain in the resuscitation room come back low, believe it! You must presume your patient is bleeding to death until proven otherwise.

Reference: Initial hematocrit in trauma: A paradigm shift? J Trauma 72(1):54-60, 2012.

Home of the Trauma Professional's Blog

Do you want to get a daily email every time there’s a new post? See what I’m up to.

Click here to get details and subscribe!

[accua-form fid=”1″]

[mc4wp_form id=”2023″]