All posts by The Trauma Pro

What The Heck! You Make The Diagnosis – The Answer

In my last post, I detailed the following case:

This male patient was brought to the trauma center after a high-speed car crash. He was unresponsive with GCS 3. A bleeding facial laceration was present, as was vomitus in the airway.

Prehospital providers rapidly intubated the patient and inserted an orogastric tube. They rapidly packaged and transported him to the nearest trauma center.  The facial laceration was stapled for bleeding control. The airway was checked with a CO2 color change indicator and was positive. OG was hooked to suction with return of gastric contents.

And here was a lateral cervical spine image:

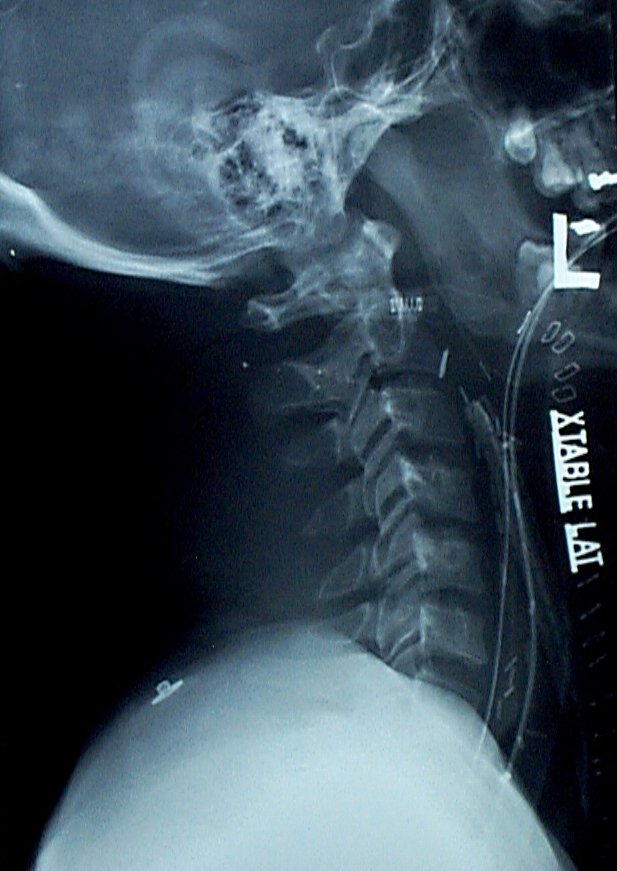
The main problem is that, if you look closely there are three tubes on the image!

Look carefully at the anterior pharynx and trace the radiopaque markers back. There are two nearly overlapping lines. One extends posteriorly, down into the esophagus. This is the orogastric tube. The distal tip of the other (an endotracheal tube which is only inserted to 12 cm at the teeth) stops where it touches another tube. Another endotracheal tube, the proximal end of which is sitting at the epiglottis!

What the heck??! The medics were interviewed, and the patient was initially intubated successfully. The intubator turned his attention to finding a tube securing device, and when he turned back the tube was gone! So he intubated again but met some resistance. This explained the shallow position of the tube.

The patient was oxygenated well and the “outside” ET tube was removed. Then ring forceps were passed under direct vision and the “inside” tube was removed. A well-positioned ET tube was then reinserted. The patient did well afterwards.

Teaching point: When inserting anything that is partially in and partially out of the body (e.g. guidewires, and now ET tubes) always anchor them with your fingers so they don’t just “disappear.” And if you need more hands, ask for assistance!

Source: personal collection. Not treated at Regions Hospital or even in Minnesota.

What The Heck! You Make The Diagnosis

Please help figure out what is wrong here. I’m not going to give you much information, though.

This male patient was brought to the trauma center after a high-speed car crash. He was unresponsive with GCS 3. A bleeding facial laceration was present, as was vomitus in the airway.

Prehospital providers rapidly intubated the patient and inserted an orogastric tube. They rapidly packaged and transported him to the nearest trauma center.  The facial laceration was stapled for bleeding control. The airway was checked with a CO2 color change indicator and was positive. OG was hooked to suction with return of gastric contents.

This case occurred in the old days when lateral cervical spine films were initially used to evaluate the c-spine in the trauma bay. Here is the image:

What is your diagnosis? And what does the team need to do?

Please post your answer in the Disqus comment box below, or email me. You might consider Twitter (or is it X now), but it seems somewhat flaky.

Answers in my next post!

Source: personal collection. Not treated at Regions Hospital or even in Minnesota.


Novel Hip Reduction Technique: The Captain Morgan

I wrote about posterior hip dislocation and how to reduce it using the “standard” technique quite some time ago (see link below). Emergency physicians and orthopedic surgeons at UCSF-Fresno have published their experience with a reduction technique called the Captain Morgan.

Named after the pose of the trademark pirate for Captain Morgan rum, this technique simplifies the task of pulling the hip back into position. One of the disadvantages of the standard technique is that it takes a fair amount of strength (and patient sedation) to reduce the hip. If the physician is small or the patient is big, the technique may fail.

In the Captain Morgan technique, the patient is left in their usual supine position and the pelvis is fixed to the table using a strap (call your OR to find one). The dislocated hip and the knee are both flexed to 90 degrees. The physician places their foot on the table with their knee behind the patient’s knee. Gentle downward force is placed on the patient’s ankle to keep the knee in flexion, and the physician then pushes down with their own foot, raising their calf. Gentle rotation of the patient’s hip while applying this upward traction behind the patient’s knee usually results in reduction.

Some orthopedic surgeons use a similar technique, but apply downward force on the patient’s ankle, using the leverage across their own knee to develop the reduction force needed. The Captain Morgan technique use the upward lift from their own leg to develop the reduction force. This may be gentler on the patient’s knee.

The authors report a series of 13 reductions, and all but one were successful. The failure occurred due to an intra-articular fragment, and that hip had to be reduced in the operating room.

Reference: The Captain Morgan technique for the reduction of the dislocated hip. Ann Emerg Med 58(6):536-540, 2011.

Posterior Hip Dislocation

Although posterior hip dislocation is an uncommon injury, the consequences of delayed recognition or treatment can be dire. The majority are caused by head-on car crashes, and 90% of these are posterior dislocations. The femoral head is forced across the back wall of the acetabulum, either by the knee striking the dash, or by forces moving up the leg when the knee is locked. This occurs most commonly on the right side when the driver is standing on the brake pedal, desperately trying to stop.

On exam, the patient presents with the hip flexed, internally rotated and somewhat adducted. Range of motion is limited, and increasing resistance is felt when you try to move it out of position. An AP pelvic X-ray will show the femoral head out of the socket, but it may take a lateral or Judet view to tell if it is posterior vs anterior.

These injuries need to be reduced as soon as possible to decrease the chance of avascular necrosis of the femoral head. Procedural sedation is required for all reductions, since it makes the patient much more comfortable and reduces muscle tone. The ED cart needs to be able to handle both the patient’s weight and your own. I also recommend a spotter on each side of the cart.

Standing on the cart near the patient’s feet, begin to apply traction to the femur and slowly flex the hip to about 90 degrees. Then gently adduct the thigh to help jump the femoral head over the acetabular rim. You will feel a satisfying clunk as the head drops into place. Straighten the leg and keep it adducted. If you are unsuccessful after two tries, there is probably a bony fragment keeping the head out of the socket. See an instructional video on this in my next post.

Regardless of success, consult your orthopedic surgeon for further instructions. And be sure to thoroughly evaluate the rest of the patient. It takes a lot of energy to cause this injury, and it is flowing through the rest of the patient, breaking other things as well.