All posts by The Trauma Pro

The Cribari Grid And Over/Undertriage

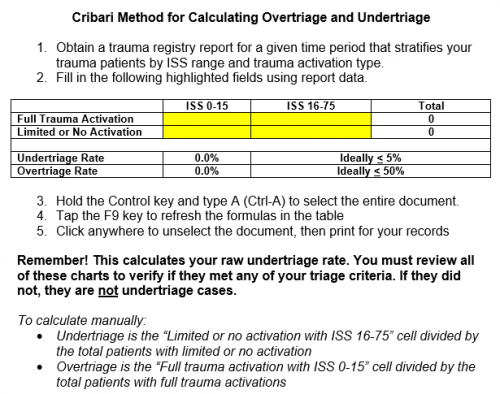
I’ve spent some time discussing undertriage and overtriage. I frequently get questions on the “Cribari grid” or “Cribari method” for calculating these numbers. Dr. Cribari is a previous chair of the Verification Review Subcommittee of the ACS Committee on Trauma. He developed a table-format grid that provides a simplified method for calculating these numbers.

But remember, the gold standard for calculating over- and undertriage is examining each admission to see if they met any of your trauma activation triage criteria. The Cribari method is designed for those programs that do not check these on every admission. It is a surrogate that allows you to identify patients with higher ISS that might have benefited from a trauma activation.

So if you use the Cribari method, use it as a first pass to identify potential undertriage. Then, examine the chart of every patient in the undertriage list to see if they meet any of your activation criteria. If not, they were probably not undertriaged. However, you must then look at their injuries and overall condition to see if they might have been better cared for by your trauma team. If so, perhaps you need to add a new activation criterion. And then count that patient as undertriage, of course.

I’ve simplified the calculation process even more and provided a Microsoft Word document that automates the task for you. Just download the file, fill in four values in the table, update the formulas and voila, you’ve got your numbers! Instructions for manual calculations are also included. Download it by clicking the image below or the link at the end of this post.

cribarigrid

Download the calculator by clicking here

Related posts:

Chest Tube Repositioning – Final Answer

So you’re faced with a chest tube that “someone else” inserted, and the followup chest xray shows that the last drain hole is outside the chest. What to do?

Well, as I mentioned, there is very little written on this topic, just dogma. So here are some practical tips on avoiding or fixing this problem:

  • Don’t let it happen to you! When inserting the tube, make sure that it’s done right! I don’t recommend making large skin incisions just to inspect your work. Most tubes can be inserted through a 2cm incision, but you can’t see into the depths of the wound. There are two tricks:
    • In adults with a reasonable BMI, the last hole is in when the tube markings show 12cm (bigger people need bigger numbers, though)
    • After insertion, get into the habit of running a finger down the radiopaque stripe on the tube all the way to the chest wall. If you don’t feel a hole (which is punched through the stripe), this will confirm that the it is inside, and that the tube actually goes into the chest. You may laugh, but I’ve seen them placed under the scapula. This even looks normal on chest xray!
  • Patients with a high BMI may not need anything done. The soft tissue will probably keep the hole occluded. If there is no air leak, just watch it.
  • If the tube was just put in and the wound has just been prepped and dressed, and the hole is barely outside the rib line, you might consider repositioning it a centimeter or two. Infection is a real concern, so if in doubt, go to the next step.
  • Replace the tube, using a new site. Yes, it’s a nuisance and requires more anesthetic and possibly sedation, but it’s better than treating an empyema in a few days.

Related posts:

Chest Tube Repositioning – Part 2

Yesterday I presented the problem of the malpositioned chest tube, specifically one that is not completely in the pleural space. This one is way out:

So what do the doctor books say? Well, the first thing you will discover if you try to look it up is that THERE IS NO LITERATURE ON THIS COMMON PROBLEM! There are a few papers on tubes placed in the fissure and tubes inserted into the lung parenchyma. But there are only a few mentions of tubes with holes still outside the chest.

I’ve gotten a number of comments, including “you can push them in a little”, “take it out and put in another”, and “never push them in.” Since we don’t have any science to guide us, we have to use common sense. But remember, I’ve shown you plenty of examples where something seems reasonable, but turns out to be ineffective or downright harmful.

There are three principles that guide me when I face this problem:

  • Prevention is preferable to intervention
  • Do no (or as little as possible) further harm
  • Be creative

Tomorrow, I’ll finish this series and provide some tips and guidelines to help manage this problem using the principles outlined above.

What To Do When The Chest Tube Is Not In The Right Place

It happens from time to time. Your patient has a hemothorax or pneumothorax and you insert a chest tube. Well done! But then the xray comes back:

The last hole in the drain is outside the chest! What to do???

Here are the questions that need to be answered:

  • Pull it out, leave it, or push it in?
  • Does length of time the tube has been in make a difference?
  • Does BMI matter?

Leave comments below regarding what you do. Hints and final answers next week!

The Trauma Activation Pat-Down?

Yes, this is another one of my pet peeves. During a trauma activation, we all strive to adhere to the Advanced Trauma Life Support protocols. Primary survey, secondary survey, etc. Usually, the primary survey is done well.

But then we get to the secondary survey, and things get sloppy.

police_frisk1

The secondary survey is supposed to be a quick yet thorough physical exam, both front and back. But all too often it’s quick, and not so thorough. There is the usual laying on of the hands, but barely. Abdominal palpation is usually done well. But little effort is put into checking stability of the pelvis. The extremities are gently patted down with the hope of finding fractures. Joints are slightly flexed, but not stressed at all.

Is it just a slow degradation of physical exam skills? Is it increasing (and misguided) faith in the utility of the CT scanner? I don’t really know. But it’s real!

Bottom line: Watch yourself and your team as they perform the secondary survey! Your goal is to find all the injuries you can before you go to imaging. This means deep palpation, twisting and trying to bend extremities looking for fractures, stressing joints looking for laxity. And doing a good neuro exam! Don’t let your physical exam skills atrophy! Your patients will thank you.