Pop Quiz: Delayed Answer!

Well, it took me a month to figure out that one of my pop quiz answers was posted to the wrong area! The link provided with the tweet would have gotten you to it, but those who were following along on tumblr may have been mystified. Here’s the answer again.

Here’s a link to the original post/quiz.

So the question was to guess the exact mechanism of injury given the x-ray below.

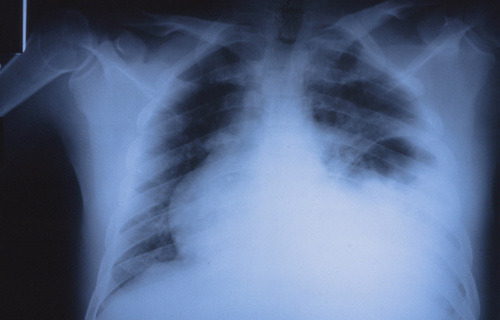
The image shows a stomach bubble located in the left chest, indicating a left sided diaphragm rupture. In countries with left sided drivers, this is a classic injury from a t-bone type impact directly on the driver side door. The arm rest is driven into the driver’s flank, or on occasion the driver is partially ejected through the window. The impact raises abdominal pressure abruptly and can push the abdominal contents (typically stomach, followed by spleen) through the weakest area of the diaphragm.

Practical tip: These patients may present with tachypnea and decreased breath sounds on the left side. The usual reflex is to insert a chest tube, which is unneeded and won’t help in this case. What the patient really needs is an NG tube to help their breathing (and an immediate trip to the OR). So if you encounter this clinical combination plus a significant left sided impact (car crash, pedestrian struck), get a chest x-ray first if the patient’s condition will tolerate it. 

And again, hats off to precordialthump for getting it exactly right!

Chest Tube Management Protocol – Pediatric

Yesterday I described a protocol for deciding when to remove a chest tube in adults. Today, I’ll go over a variant of this algorithm for children. In general, it’s very similar. The major change is in the volume criterion. In adults, we decided upon an (arbitrary) value of 150cc per three shifts. We chose a time interval of 3 shifts vs 1 day to speed up the process.

Suppose you use the 1 day rule for looking at chest tube output. Typically, this would be evaluated in the morning, and the process of pulling the tube or applying water seal, followed by delayed xrays, could lead to a very late discharge. If the output is checked every shift and the most recent three are summed, the patient could meet criteria later in the day and have the tube pulled in the evening. This would allow for an earlier discharge the following day, shaving 12 hours or more off of the hospital stay. This may not make much of a difference to the hospital (although for busy ones it does), but it’s huge for patient comfort and satisfaction.

Click this image or the link below for a full-size version.

Note that the output criterion has been changed to 2cc/kg over three shifts. This adjusts for the varying sizes of the children that we treat. Otherwise things are basically the same.

Related posts:

Chest Tube Management Protocol – Adult

Chest tubes are needed occasionally to help manage chest injuries. How do you decide when they are ready for removal?

Unfortunately, the literature is not very helpful in answering this question. To come up with a uniform way of pulling them, our group looked at any existing literature and then filled in the blanks, negotiating criteria that we could all live with. We came up with the following. Click the image to see a full-size version, or click the link below.

Removal criteria:

  • No (or a minimal, stable) residual pneumothorax
  • No air leak
  • Less than 150cc drainage over the past 3 shifts. We do not use daily numbers, as it may delay the removal sequence. We have moved away from the “only pull tubes on the day shift” mentality. Once the criteria are met, we begin the removal sequence, even in the evening or at night.

Removal sequence:

  • Has the patient ever had an air leak? If so, they are placed on water seal for 6 hours and a followup AP or PA view chest x-ray is obtained. If no pneumothorax is seen, proceed to the next step. If there was no air leak, skip this step.
  • Pull the tube. Click here to see a video demonstrating the proper technique.
  • Obtain a followup AP or PA view chest x-ray in 6 hours.
  • If no recurrent pneumothorax, send the patient home! (if appropriate)

Click here to download the full printed protocol.

Deer Hunting and Tree Stand Injuries

Deer hunting season is upon us again, so it’s time to plan to do it safely. Although many people think that hunting injuries are mostly accidental gunshot wounds, that is not the case. The most common hunting injury in deer season is a fall from a tree stand.

Tree stands typically allow a hunter to perch 10 to 30 feet above the ground and wait for game to wander by. They are more frequently used in the South and Midwest, usually for deer hunting. A recent study by the Ohio State University Medical Center looked at hunting related injury patterns at two trauma centers.

Half of the patients with hunting-related injuries fell, and 92% of these were tree stand falls. Only 29% were gunshots. And unfortunately, alcohol increases the fall risk, so drink responsibly!

Most newer commercial tree stands are equipped with a safety harness. The problem is that many hunters do not use it. And don’t look for comparative statistics anytime soon. There are no national reporting standards. No matter how experienced you are, always clip in to avoid a nasty fall!

The image on the left is a commercial tree stand. The image on the right is a do-it-yourself tree stand (not recommended). Remember: gravity always wins!

Commercial tree stand Do-it-yourself tree stand