Galleries

Dry Seal Chest Tube Suction Systems

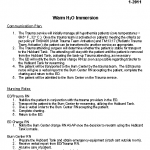
The original chest tube collection system traditionally consisted of three chambers. The picture above shows the classic three bottle system (which I actually remember using during residency). On the left is the suction control bottle that determines how much suction is applied to the patient. The middle bottle provides one way flow of air out of the patient, the so-called water seal bottle. Finally, the right bottle collects any fluid from the pleural space.

Collection systems used in hospitals are much more tidy than this, wrapping all three into one modular unit. However, if you look closely you can identify parts of the system that correspond to each of the bottles.

The problem with the older systems is that they typically require water in the “water-seal” chamber to maintain one-way flow out of the patient. If this chamber is compromised by knocking the system over (see this post), air may be able to enter the patient’s chest, giving them a big pneumothorax.

Management of chest tube collection systems by EMS is tough. It’s very easy to tip the system during air or ground ambulance runs, putting the patient at risk. Some manufacturers have developed so called “dry-seal” systems that use a mechanical one-way valve to avoid this problem.

I have not been able to use one of these systems yet. Here is my take on the pros and cons:

  • Pro – immune to tip-over and malfunction of the water-seal chamber
  • Con – more difficult to detect an air leak. Current models require either injection of a small quantity of water, tipping the system, or converting to a water-seal system.
  • Con – no literature regarding safety of this relatively new technology

Bottom line: Looks like a great idea to me, especially for EMS use. Once they get to the hospital, the unit can be changed to a water-seal system or a larger dry-seal system with the water injection port inthe dry-seal chamber.

What Next? An Inkjet Printer for Skin?

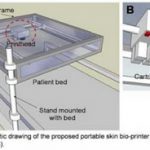
Everyone is familiar with inkjet printer technology. You’ve probably got one in your house for printing 2D page images from your computer. Engineers have already taken this one step further and created 3D printers that print objects from computer aided design (CAD) files. Instead of shooting tiny dots of ink from a cartridge, they squirt out tiny dots of molten plastic.

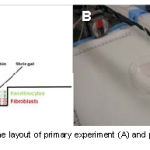
This same technology is poised to change the way we do things in medicine. James Yoo and colleagues from Wake Forest have designed a printer that can print skin. This unit has been redesigned from earlier versions and now uses a laser to scan the contours of the area to be grafted. It then prints a skin graft over the area using different layers of cells.

The Department of Defense is funding this work, which has amazing implications for the battlefield and for disaster areas. Imagine being able to print a skin graft onto a wounded soldier or civilian to reduce fluid loss and decrease infections. In these applications, cartridges of skin cells are more easily transported than freezers of cadaver skin. However, these grafts would be temporary, just like cadaver or pig skin, because the cells would be from unmatched donors. But ultimately, we should be able to prepare cartridges from our own cells for long lasting grafts.

The Wake Forest group is successfully printing 10x10cm grafts onto pigs right now. But think of the broader implications of this technology. Other groups are looking at using 3D printer technology to squirt a variety of cell types to create complete organs. This could eventually revolutionize transplant technology as we know it!

References

  1. In Situ Bioprinting of the Skin for Burns. Binder, Yoo et al. Presented at the American College of Surgeons Clinical Congress, October 5,2010, Washington DC.
  2. Presentation at the American Association for the Advancement of Science, February 16-20 2011, Vancouver BC, Canada.

Pneumomediastinum After Falling Down

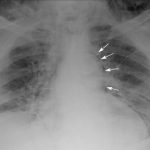
Finding pneumomediastinum on a chest xray or CT scan always gets one’s attention. However, seeing this condition after a simple fall from standing is very simple to evaluate and manage.

There are 3 potential sources of gas in the mediastinum after trauma:

  • Esophagus
  • Trachea
  • Smaller airways / lung parenchyma

Blunt injury to the esophagus is extremely rare, and probably nonexistent after just falling down. Likewise, a tracheal injury from falling over is unheard of. Both of these injuries are far more common with penetrating trauma.

This leaves the lung and smaller airways within it to consider. They are, by far, the most common sources of pneumomediastinum. The most common pattern is that this injury causes a small pneumothorax, which dissects into the mediastinum over time. On occasion, the leak tracks along the visceral pleura and moves directly to the mediastinum.

Management is simple: a repeat chest xray after 6 hours is needed to show non-progression of any pneumothorax, occult or obvious. This image will usually show that the mediastinal air is diminishing as well. There is no need for the patient to be kept NPO or in bed. Monitor any subjective complaints and if all progresses as expected, they can be discharged after a very brief stay.

Extraperitoneal Bladder Rupture

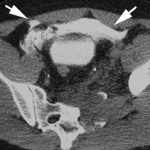
This injury is likely to occur in patients who have a full bladder and sustain anterior pelvic trauma that typically leads to fractures. They generally present with gross hematuria upon placement of the bladder catheter. This should prompt an abdominal CT scan with cystogram technique.

CT cystogram involves pressurizing the bladder with contrast prior to the study. This differs from the usual method of clamping the catheter and allowing the bladder to passively fill. The literature here is clear: failure to use cysto technique will miss 50% of these injuries.

The majority of extraperitoneal bladder injuries can be treated nonoperatively, and probably do not need Urology involvement. The bladder catheter is left in place 10-14 days (we do 10 days), and a repeat cystogram is obtained. If there is no leak, the catheter can be removed. If there is still some leakage, Urology consultation should then be obtained. 

There are a few cases where operative management is required:

  • There is some intraperitoneal component of bladder injury
  • Fixation of the pubic rami is required (bathing the orthopedic hardware with urine is frowned upon)
  • Failure of conservative management

Arrows in the photo show extraperitoneal extravasation of cystogram contrast.

Related posts:

Warm Water Immersion Policy for Hypothermia

A few days ago, I wrote about using a therapy tank for immersion to rapidly rewarm patients (click here to read it). Since this type of management usually means moving out of the ED to a separate patient care are, it is important to have a policy that spells out responsibilities for all personnel involved. 

Click here or click the image above to download a copy of the Regions Hospital Trauma Program policy.