Category Archives: Tips

What Is: Lunchothorax?

Here’s an operative tip for trauma professionals who find themselves in the OR. Heard of “lunchothorax?” I’m sure most of you haven’t. The term originated in a 1993 paper on the history of thoracoscopic surgery. It really hasn’t been written about in the context of trauma surgery, though.

Lunchothorax is an empyema caused by pleural contamination in patients with concomitant diaphragm and hollow viscus injury. This most commonly occurs with penetrating injuries to the left upper quadrant and/or left lower back. The two penetrations tend to be in close proximity (diaphragm + stomach), but may occasionally be further away (diaphragm + colon).

One of the earlier papers describing the correlation of gastric injury and empyema was written by one of my mentors, John Weigelt. Although gastric repair is usually simple and heals well, his group did note a few severe complications. Of 243 patients with this injury, 15 developed ones that were considered severe, and 10 of those were empyema! What gives?

It turns out that the combination of gastric contents and pleural space is not a good one. It’s not really clear why this is. Is it bacterial? The acid? Undigested food? I’ve seen cases with what I would consider minimal contamination go on to develop a nasty empyema. This is also borne out in a National Trauma Databank review from 2009. It looked at complications in patients with a diaphragm injury and found that a gastric injury increased the probability of empyema by 3x. Interestingly, there was no increased risk of empyema with a concomitant colon injury.

Bottom line: Lunchothorax, or empyema after even minimal contamination from a hollow viscus, is a dreaded complication of thoraco-abdominal penetrating injury. Any time the stomach and diaphragm are violated, I recommend thoroughly irrigating the chest. It’s probably a good idea for concomitant colon injury as well, but there’s less literature support.

This can be done through the diaphragm injury if it is large enough, or through a chest tube inserted separately. Most of the time, you’ll be placing the chest tube anyway because the pleural space has been violated via the abdomen. In either case, copious lavage with saline is recommended to clear all particulate material, with a few extra liters just for good measure. There’s no data on use of antibiotics, but standard perioperative coverage for the abdominal injuries should be sufficient if the lavage was properly performed.

References:

  • The history of thoracoscopic surgery. Ann Thoracic Surg 56(3):610-614, 1993.
  • Penetrating injuries to the stomach. SGO 172(4):298-302, 1991.
  • Risk factors for empyema after diaphragmatic injury: results of a National Trauma Databank analysis. J Trauma 66(6):1672-1676, 2009. 

Consultant Gives An Unusual Recommendation: What Would You Do?

I know this has happened to most of you at one point or another:

One of your trauma patients sustains an injury outside of your area of expertise. You engage a consultant to evaluate that condition and manage it. They do so, and it requires some type of invasive procedure. They return from the procedure, and as you are rounding on the patient, you find the consultant has ordered a medication that you have not seen ordered for that procedure before.

What would you do? You are now in an interesting place. Do you discontinue the order? Call up the consultant and ask, what the heck? Might you poison your relationship with them in the process? And what is the impact on your patient?

Lots of questions, but here is what I recommend:

  • Hit the lit! Always assume that they might know something you don’t. They are an expert in their field for a reason, so give them the benefit of the doubt. Thoroughly review the literature to see if this is an approved new practice. But remember, a single interesting paper should never be enough to change your (or their) practice. There needs to be a sufficient body of literature showing that the practice is sound.
  • Talk to the consultant. Now that you are armed with the current thinking, ask them what they were thinking! Let them explain their rationale. Since you have already looked at the available data, you will be able to ask appropriate questions and deflect answers like, “well that’s how we did it where I trained.”
  • Change the orders. Assuming the order was not sound, it’s time to undo the ones that started this entire debate. Get rid of them now so you’re not stepping on any toes. However, if you believed that the order/medication would have been potentially harmful, don’t wait. You should have done it even before the first step!
  • Disseminate the info. Make sure that all of your partners are aware of the issue and the correct course of action (or orders). And send a note to the consultant group summarizing the discussion so none of your consultant’s partners make the same mistake again.

In the next post, a set of guidelines to give all of your consultants to make sure they behave appropriately and interface will with the trauma service.


Management Of Penetrating Neck Trauma: The Way We Were/Are

The management of penetrating injuries to the neck has changed very little over the years. Could it be time? Today, I’ll review some of the basics of classic diagnosis and treatment. In my next post, I’ll discuss an alternative way to approach it.

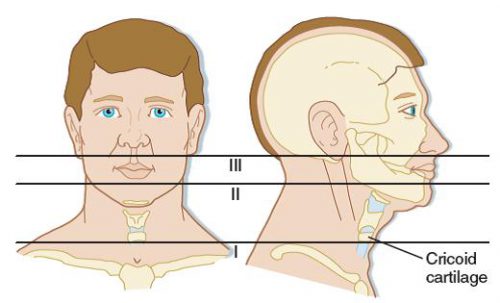
First, lets look at the time-honored zones of the neck. Here’s a nice diagram from EMDocs.net:

The zones are numbered in reverse, from bottom to top, and in Roman numerals.

The area below the cricoid cartilage is considered Zone I and contains many large vascular and aerodigestive structures that are relatively difficult to approach surgically. For this reason, diagnostic testing is recommended to assist in determining if an operation is actually needed and what the best surgical exposure would be. Obviously, this can only be considered in the stable patient. Unstable patients must go straight to the OR and the trauma surgeon will determine the surgical approach on the fly.

Similarly, the area above the angle of the mandible is Zone III, and is also difficult to expose. Injuries to this area may involve the distal carotid and vertebral arteries near the base of the skull, as well as the distal jugular vein. Surgical approach may require dislocation of or fracturing the mandible to get at this area. This is  challenging and not that desirable, and few surgeons are familiar with the technique. For this reason, imaging is very desirable and often demonstrates that no significant injury is present. And endovascular / angiographic techniques are now available that may obviate the need for surgery.

Zone II is everything in-between the mandibular angle and cricoid cartilage. This is the surgical Easy Button. Exposure is simple and the operation is fun. In the old days, an injury to this area went straight to the OR regardless of whether there were signs or symptoms of injury. Yes, there were quite a few negative explorations. But we’ve become more selective now with the advent of improved resolution of our CT scans.

Currently, we usually follow a two-step approach to penetrating neck trauma:

  1. Are there hard signs of injury present? These tell us that a structure that absolutely needs to be fixed has been injured. The patient should be taken directly to OR after control of the airway, if appropriate. Typical hard signs are:
    1. Airway compromise
    2. Active air bubbling from wound
    3. Expanding or pulsatile hematoma
    4. Active bleeding
    5. Hematemesis
  2. What zone is the injury in? And don’t just look at the obvious entry point. Gunshots (and long knives) may enter multiple zones. The zone then determines what happens next:
    1. Zone I – CT angio of neck and chest. If positive, proceed to OR for repairs, and perform EGD and/or bronchoscopy as needed
    2. Zone II – Old days: proceed to operating room for exploration, or angiogram, EGD, direct laryngoscopy, and bronchoscopy. Most chief residents chose the former. Current day: CTA of neck, followed by OR, EGD, bronchoscopy only if indicated.
    3. Zone III – CT angio of the neck. If positive, consider angiography/endovascular consultation vs operation.

Changes from old days to more current thinking have been made possible by improvements in speed and resolution of our CT scanners. But why can’t we take this another step forward and streamline this process even more? I’ll propose some changes in my next post!

Reference: Western Trauma Association Critical Decisions in Trauma:
Penetrating neck trauma. J Trauma 75(6):936-940, 2013.

Whaaat? Stuff You Sterilize Other Stuff With May Not Be Sterile??

When one works in the trauma field, or medicine in general, we deal with the need for sterility all the time. We use equipment and devices that are sterile, and we administer drugs and fluids that are sterile. In surgery, we create sterile fields in which to use this sterile stuff.

In the past few years, we’ve come to the realization that the sterility we take for granted may not always be the case. There have been several cases of contaminated implanted hardware. And a few years ago, supposedly sterile injectable steroids were found to be contaminated with fungus, leading to several fatal cases of meningitis.

An article in the New England Journal of Medicine brings a bizarre problem to light: microbial stowaways in the topical products we use to sterilize things. Most drugs and infused fluids are prepared under sterile conditions. However, due to the antimicrobial activity of topical antiseptics, there is no requirement in the US that they be prepared in this way.

A number of cases of contamination have been reported over the years:

  • Iodophor – contamination with Burkholderia and Pseudomonas occurred during manufacture, leading to dialysis catheter infection and peritonitis
  • Chlorhexidine – contaminated with Serratia, Burkholderia and Ralstonia by end users, leading to wound infections, catheter infections, and death
  • Benzalkonium chloride – contaminated with Burkholderia and Mycobacteria by end users, causing septic arthritis and injection site infections

Bottom line: Nothing is sacred! This problem is scarier than you think, because our most basic assumptions about these products makes it nearly impossible for us to consider them when tracking down infection sources. Furthermore, they are so uncommon that they frequently may go undetected. The one telltale sign is the presence of infection from weird bacteria. If you encounter these bugs, consider this uncommon cause. Regulatory agencies need to get on this and mandate better manufacturing practices for topical antiseptics.

Reference: Microbial stowaways in topical antiseptic products. NEJM 367:2170-2173, Dec 6 2012.

How To Remove A Tourniquet

Tourniquets had been banished for several decades due to the misconception that they caused more harm than good. But thanks to the experience of the US military, they have made a resurgence again in civilian use. If handled properly, they can literally be a life-saver.

More and more often, our prehospital trauma professionals are applying a tourniquet in the field. The question once they arrive in your trauma bay is “now what?”

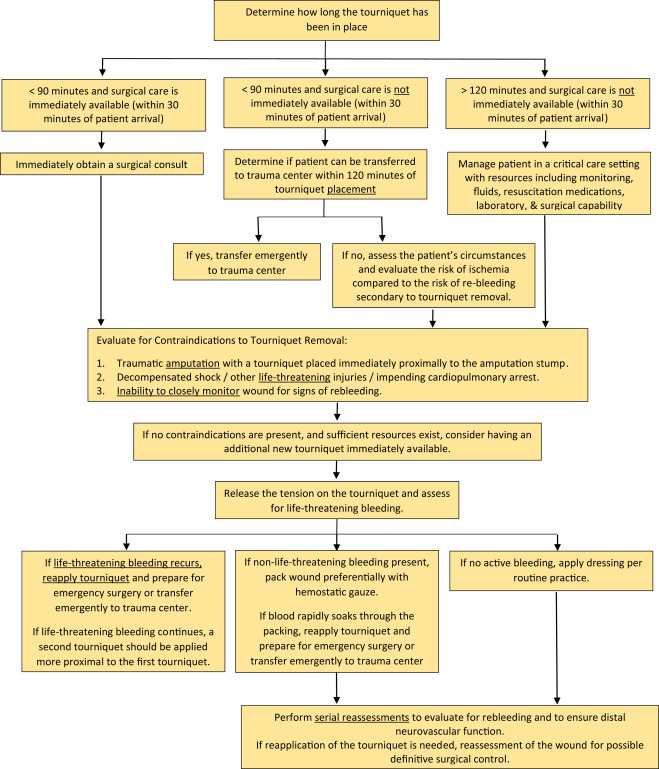
Well, obviously it’s got to come off. But there is a lot of nuance around how to do that. And I don’t just mean the technical aspects of releasing it. It’s important to understand what injuries your patient has, and what the capabilities of your trauma center are first. Here is a framework to help you think through the details.

  1. How long has the tourniquet been up? Hopefully that has been recorded somewhere, or written on the tourniquet. If you don’t know exactly, assume that medics applied it upon arrival at the scene.
    1. If < 90 minutes and you have surgical support available, call the surgeon! If they believe the patient needs to be in the OR right away, make it happen.
    2. If < 90 minutes and you do not have surgical support, transfer your patient ASAP to a center that has it. If the transfer will take more than 2 hours (due to distance / weather and not a slow transfer on your part, consider dropping the tourniquet as described below.
    3. If > 120 minutes regardless of transfer status, consider dropping the tourniquet as described below.
  2. Is there a contraindication to removal?
    1. Traumatic amputation with the tourniquet nicely placed just proximal to an amputation stump. It may slip off after releasing the tension.
    2. Decompensated shock or near arrest. The patient is trying to die and the tourniquet is helping to prevent them from doing just that.
    3. Inability to closely monitor for rebleeding. If the patient needs to be transported in a relatively unsupervised setting, new bleeding may not be treatable.

If there are no contraindications and there is a need to at least temporarily release the tourniquet, then prepare your area appropriately.  Ideally, this should be done in an OR or ICU, but that is not always practical. Otherwise, make your trauma bay look like one. Make sure you have at least one new tourniquet in case the old one can’t be reapplied for some reason. Ensure there is plenty of hemostatic gauze and dressing materials. Have the crash cart nearby and make the ACLS drugs readily available, just in case.

Then release the tension on the tourniquet and note the time. Three things can happen:

  1. There is no bleeding. This happens about 80% of the time in my experience. Either there was no surgical bleeding in the first place, or it has clotted. Place a nice dressing that can be monitored easily.
  2. There is only “non-surgical” bleeding. This is typically oozing or pesky venous bleeding. These should be controlled with sutures or hemostatic dressings. Pressure dressings are also wonderful in the situation. Craft them carefully.
  3. Life threatening bleeding resumes. Reapply the tourniquet and get the patient to definitive care ASAP (OR or another center that has one).

Bottom line: There is very little magic to dealing with tourniquets on the receiving end. But get a very clear picture of what your patient needs and what your center has to offer them. If these factors don’t match up, initiate the transfer as fast as you possibly can. Otherwise move to your OR to fix the problem!

Reference: Removal of the Prehospital Tourniquet in the Emergency Department. J Emerg Med 60(1):98-102, 2020.