This short (10 minute) video demonstrated the technique for inserting small chest tubes, also known as “pigtail catheters.” It features Jessie Nelson MD from the Regions Hospital Department of Emergency Medicine. It was first shown at the third annual Trauma Education: The Next Education conference in September 2015, for which she was a course director.
Please feel free to leave any comments or ask any questions that you may have.
There’s lots of info out there on how to put a chest tube in. But what about on taking it out? There are a few nuances that you should be aware of so you can do this as quickly and complication-free as possible.
Have a look at this 5 minute video and let me know what you think. Please leave your comments on YouTube.
Finally, the chest is open and the tamponade has been relieved. But your patient has little volume. In order to conserve any circulating blood and pump it only to the heart and the head, it’s time to cross clamp the aorta. This task is best left to the surgeon, because it is not a simple matter.
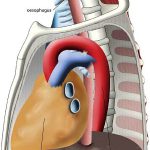
First, you have to locate the aorta, ideally somewhere just above the diaphragm. Unfortunately, if the patient is hypovolemic it’s very difficult to distinguish the aorta from the esophagus, which lie right next to each other (see picture above). In order to make them feel different, insert a gastric tube through the mouth or nose.
Next, separate the aorta and esophagus. They are both covered by pleura. The structure nearest you without the tube in it will be the aorta. Sometimes it’s possible to use a finger to dissect through the pleura and around the aorta. However, the younger the patient, the tougher this tissue is. It may be necessary to incise the pleura with scissors while your assistant holds the lung anteriorly, our of the way.
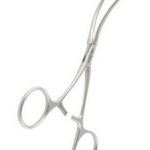
Finally, once you can pass a finger completely around the aorta, use it to guide the placement of a gently curved DeBakey type clamp (see picture on the left). Squeeze it until it clicks once, and you are done! Now rapidly infuse warmed blood into the patient and run to the OR!
Once the chest is open, the first item of business is to check the heart. In some patients, the inferior pulmonary ligament may prevent you from pushing the lung laterally and superiorly, out of the way. This ligament is a piece of pleura that attaches the lower lobe to the medial diaphragm and mediastinum. Locate it with your fingers and carefully cut it (blindly) with your scissors.
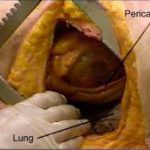
Now look at the heart. What is the rhythm? Put your hands around it. What is the patient’s volume status? If there is the possibility of a penetrating injury, open the pericardium. This structure is tough, and if tamponade is present it will be stretched tight. I find it very difficult to grab the pericardium with forceps and make the initial incision with scissors. Toothed forceps may work, but I just make a very small nick, carefully and directly, with a scalpel. The incision should be placed anterior to the phrenic nerve and vessels, which are usually plainly visible. See the picture on the left, above. The color of the pericardial fluid will immediately indicate whether a cardiac injury is present.
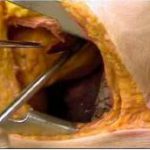
Next, extend the incision (parallel to the bed) to the top and bottom of the ventricle and eviscerate the heart. This will allow careful inspection of all but the atria. If an injury is present, a finger can be used to occlude it until preparations for a repair are made.
Holding the heart is both diagnostic and potentially therapeutic. The “fullness” of this organ is an excellent indicator of the volume status, and if a finger is being used to plug a hole, the temperature of the blood and infused fluids can be determined quickly. All volume resuscitation in this situation should be warmed fluids. And if need be, open cardiac massage is very effective for augmenting circulation.