Category Archives: General

The Cribari Grid And Over/Undertriage

I’ve spent some time discussing undertriage and overtriage. I frequently get questions on the “Cribari grid” or “Cribari method” for calculating these numbers. Dr. Cribari is a previous chair of the Verification Review Subcommittee of the ACS Committee on Trauma. He developed a table-format grid that provides a simplified method for calculating these numbers.

But remember, the gold standard for calculating over- and undertriage is examining each admission to see if they met any of your trauma activation triage criteria. The Cribari method is designed for those programs that do not check these on every admission. It is a surrogate that allows you to identify patients with higher ISS that might have benefited from a trauma activation.

So if you use the Cribari method, use it as a first pass to identify potential undertriage. Then, examine the chart of every patient in the undertriage list to see if they meet any of your activation criteria. If not, they were probably not undertriaged. However, you must then look at their injuries and overall condition to see if they might have been better cared for by your trauma team. If so, perhaps you need to add a new activation criterion. And then count that patient as undertriage, of course.

I’ve simplified the calculation process even more and provided a Microsoft Word document that automates the task for you. Just download the file, fill in four values in the table, update the formulas and voila, you’ve got your numbers! Instructions for manual calculations are also included. Download it by clicking the image below or the link at the end of this post.

cribarigrid

Download the calculator by clicking here

Related posts:

Print Friendly, PDF & Email

The Chance Fracture

Centers that take care of blunt trauma are familiar with the spectrum of injury that is directly attributable to seat belt use. Although proper restraint significantly decreases mortality and serious head injury, seat belts can cause visceral injury, especially to small bowel.

Lap belt use has been associated with Chance fracture (flexion distraction injury to the lumbar spine) since 1982. The association between seat belts and intra-abdominal injury, especially with an obvious “seat belt sign” was first described in 1987.

chance-fracture-21

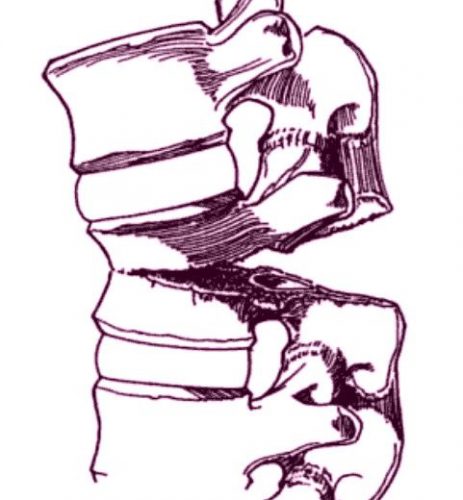
Chance fracture. The vertebra appears to split in half from posterior to anterior.

Twenty years ago, orthopedic surgeons in Manitoba finally put two and two together and reported a series of 7 cases of Chance fractures. They noted that 6 of the fractures were associated with restraint use. Seat belt sign was also present in 5 of the 6 patients with fractures and three of the six had bowel injuries.

The authors noted that many provinces were mandating seatbelt use at the time, and they predicted that the number of Chance fractures, seat belt signs and hollow viscus injuries would increase. On the positive side, the number of deaths and serious head injuries would be expected to decline.

Although this was a small series, it finally cemented the unusual Chance fracture, seat belt sign, and bowel injury after motor vehicle trauma.

Thankfully, three point restraints (lap belt + shoulder harness) has been required in the seats next to doors for a long time. And since 2007, they have been mandated in the middle seat as well. Thus, these injuries seldom occur in any but the oldest (beater) cars on the road. They are seen more frequently now with sports and extreme sports injuries.

Chance fractures are frequently unstable, involving all three columns of the spine. The anterior column fails under compression, and the middle and posterior columns fail from the distraction mechanism. Usually, this fracture pattern requires operative fixation. However, if the posterior column is intact, a TLSO brace can be tried. This fracture is at risk for non-union and development of kyphosis or a flat back, which can lead to chronic pain and an abnormal posture.

Reference: Pediatric Chance Fractures: Association with Intra-abdominal Injuries and Seatbelt Use. Reid et al. J Trauma 30(4) 384-91, 1990.


Print Friendly, PDF & Email

By Request: Submental Intubation

I’ve had a number of recent requests regarding this technique, so I’m updating and reposting today and tomorrow.

Here’s one of the weirder procedures I’ve seen in some time. Imagine that you need a definitive airway, but you can’t use the face for some reason (mouth or nose). The usual choice would be a tracheostomy, right? But what if you only need it for a few days? Typically, once placed, trachs must be kept for a few weeks before decannulation is safe.

Enter submental intubation. This technique involves passing an endotracheal tube through the anterior floor of the mouth, and then down the airway. This leaves the facial bones, mandible, and skull base untouched.

tumblr_inline_mvds1c14ye1qa4rug1


The technique is straightforward:

  • After initially intubating the patient  orotracheally, a 1.5cm incision is created just off the midline in the submental area under the chin.
  • Using a hemostat, all layers are penetrated, entering the oropharynx just lateral to the tongue.
  • A 1.5cm incision is then made at the puncture site, parallel to the gum line of the lower teeth.
  • The ET tube is removed from the ventilator circuit, and the connector at the proximal end of the tube is removed.
  • The hemostat is placed through the chin incision again. The proximal end of the ET tube is curled into the oropharynx and grasped with the hemostat, then pulled out through the skin under the chin, leaving the distal (balloon) end in the trachea.
  • The connector is reinserted, and the tube is then hooked up to the anesthesia circuit again.
  • The tube is then secured using a stitch under the chin.

After a final position check, the surgical procedure can commence. Cool!


There are a number of variations on this technique, so you may encounter slightly different descriptions. The tube can be pulled at the end of the procedure, or left for a few days to ensure safe extubation, if needed.

tumblr_inline_mvdsm0zd8b1qa4rug1

A small series of 10 patients undergoing this technique was reviewed, and there were no short or long term problems. Scarring under the chin was acceptable, and was probably less noticeable than a trach scar.

Bottom line: This is a unique and creative method for intubating patients with very short-term airway needs while their facial fractures are being fixed. Brilliant idea!

Tomorrow: Submental intubation – the video!

Reference: Submental intubation in patients with panfacial fractures: a prospective study. Indian J Anaesth 55(3):299-304, 2011.

Photo source: internet

Print Friendly, PDF & Email

Tips For Surgeons: Abdominal Packing

One of the tenets of trauma surgery, handed down for generations, is that we should pack the abdomen to help manage major abdominal hemorrhage. “All four quadrants were packed” reads the typical operative note. But how exactly do you do that? Sounds easy, right?

sponges

Well, there are nuances not found in the surgery textbooks. Here are some practical tips for the trauma surgeon:

  • Prepare. Have your scrub nurse fluff up about 20 laparotomy pads in advance. The point of packing is two-fold: soak up blood, and stop bleeding. Fluffed up pads work better than the flat, rolled up pads shown above. And you will need them fast, so have a supply ready.
  • Do you really need to pack? Your patient is hypotensive, and you are convinced the abdomen is the source. You run to the OR, open it and… no blood. So don’t pack. It won’t slow down the (lack of) bleeding, but it is possible to cause serosal tears or worse. Just figure out where the bleeding is really coming from.
  • Be careful. Don’t just jam them in there. Carefully place pads over and under the liver. Carefully place a hand on the spleen and push toward the hilum so you can place pads between spleen and body wall. Try not to cause more damage than is already there.
  • Penetrating trauma: Pack where you know (or think) the penetrations are first. Basically, if it’s not bleeding there, don’t pack there.
  • Blunt trauma: Pack the upper quadrants first. This is where the money is, because the liver and spleen are the top culprits. Then pack the lower quadrants to soak up shed blood.
  • Once packed, check for successful control. If bleeding has stopped (or at least decreased significantly) stop and wait for anesthesia to catch up and continue your massive transfusion protocol. If bleeding continues, remove packs from the offending area and try to obtain definitive control. This is now the patient’s only chance, since you have now determined that you can’t stop the bleeding with packing.
  • Remove packs in the proper order. In blunt trauma, remove the lower quadrant packs first. They’re not doing anything and just take up valuable space. In penetrating trauma remove the packs in the area of the injury first.
  • Get an xray to confirm that all packs are out at the end of the case. Self explanatory. It’s easy to lose a few in the heat of the moment. I’ve seen two bundles (10 pads) left over the liver in one case decades ago!

On Monday, I’ll write about the importance of the final x-ray when the abdomen is closed.

Related post:

Print Friendly, PDF & Email