Category Archives: General

A Cool Way To Look At Injury Data

Governmental agencies everywhere collect trauma related data. The US federal government maintains a number of databases, such as the Fatal Accident Reporting System (FARS), the Census of Fatal Occupational Injuries (CFOI) and many others. States collect similar but smaller datasets. Even towns and municipalities collate injury information in the form of prehospital run sheets.

But reams of data are of no use unless you can learn something from it. Unfortunately, most of this data is tucked away in database management systems, or in some cases just stacks of paper forms locked up somewhere. In order for humans to make sense of it and do useful things with it, we need to transform it into forms that we can easily interpret and make sense of. 

Fortunately, there are lots of visual, electronic tools available to help us do just that. One of the most helpful tools is the programmable geographic information system (GIS). An example of this is Google Maps. Most of us have used this or a similar tool in some form, usually to get directions from here to there. But you may not be aware that Google provides a programming interface so a savvy user can place any type of geography-related data on the map, creating what is called a mashup.

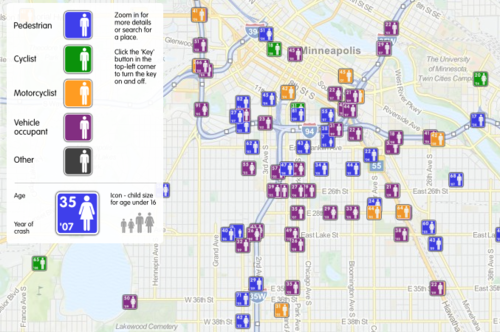
Imagine crossing the FARS database, which contains extensive data points on every fatal road accident in the US, with a mapping system. This would allow creation of a map showing where every person lost their life in a road accident, along with additional pertinent information about the event. A great example of this is demonstrated below. It was created by ITO World Ltd., based in the UK. They crossed fatality information with geographic map data in both the US and the UK.

This map shows fatal road events around Minneapolis from 2001 to 2009. The type of event (pedestrian struck, motor vehicle crash, etc.) is displayed along with age, year and sex. It is movable and zoomable so it can be viewed it in great detail. Click on the map above to open a new window to the full map.

Bottom line: Using trauma data / map mashups is a great way to visualize complex information. It also allows us to plan meaningful prevention activities based on local information (a requirement for ACS trauma center verification). Imagine looking over such a map of your city, and identifying a cluster of pedestrian fatalities. Then you notice that this cluster is 2 blocks away from an elementary school. This could prompt you to work with the school to implement automobile awareness programs for the children, have the city review signage and obstructions to view in the area, and optimize the number and placement of crossing guards. Then redo the map afterwards to judge the impact. Wow!

Website: http://map.itoworld.com/road-casualties-usa#fullscreen 

Reference: Using geographic information systems in injury research. J Nurs Scholarsh 39(4):306-311, 2007.

The Passing Of The Repeat Head CT Scan?

Head CT after blunt head trauma is routine. And in many hospitalized patients, repeat head CT scan is also routine. Sometimes the routine includes many repeat CT scans. But when is the last time you’ve gotten that repeat scan on a neurologically normal patient and found “actionable” pathology? By that, I mean a finding that needs some type of intervention, not just “serial monitoring?”

An interesting paper published by neurosurgeons at McMaster University in Canada looked at the value of repeat head scans in patients with mild TBI, defined as a GCS of 13-15. I wrote about this one several months ago when it was just an abstract. Now, the full paper has been published so we can scrutinize it more closely.

The authors looked at their own experience, but also did a meta-analysis of 15 other studies in the literature. They grouped the patients into those who underwent intervention (hyperosmolar infusions, ICP monitor insertion, surgery) based on clinical findings vs findings on repeat head CT. Papers included in the meta-analysis were limited to larger studies (>30 subjects), and ones in which repeat head CT was performed and the reason for intervention was clear.

In their own series, they identified 445 patients who underwent repeat head CT. This generally occurred within 24 hours, but was done more urgently if neurologic changes occurred. Interesting findings included:

  • Intracranial hemorrhage was unchanged in 80% of patients and increased in 20%
  • 25 patients (6%) had a change in management after the repeat head CT
  • Of these, 23 had the change based on deterioration of the neurologic exam, not the CT
  • Only 2 had an intervention based on the repeat head CT ( mannitol administration due to increased edema, despite no change in exam)
  • The meta-analysis showed similar findings

Bottom line: This is one of several recent studies questioning the usefulness of the “routine” repeat head CT. It’s time to work with our neurosurgeons and agree that a repeat CT is not needed in low-risk, hospitalized patients who can have regular neurologic exams. I would suggest that we limit this course of management to patients with a GCS of 15 only. Repeat head CT should still be used in patients who are on any type of medication that interferes with clotting, as these can lead to insidious bleeds. But to really make this work, we need to figure out how long the patient needs to be monitored, and the cost/benefit analysis of a longer hospital stay vs repeat scan and early discharge.

Related posts:

Reference: The Value of Scheduled Repeat Cranial Computed Tomography After Mild Head Injury: Single-Center Series and Meta-analysis. Neurosurgery 72(1):56-64, 2013.

More On The “Passing” Of The Rectal Exam

I’ve gotten quite a few comments on my recent post on the “passing” of the rectal exam. One theme has come up that I want to clarify: proper position. Both yours and the patient’s, to be specific.

Precordial Thump commented:

“I have concerns about performing the rectal exam with the patient supine in frog leg position if a pelvic fracture is present. Any further comment?”

This was in regards to my opinion about the proper postion, noted at the very end of my post. Unfortunately, it was a bit too simplistic. As noted, the exam should be performed while the patient is supine, and not on their side, in order to reduce unexpected movement on their part.

The legs have to be moved apart somewhat, because it’s very important to examine the perirectal area before placing a finger. On occasion, blood from elsewhere (IV stick gone wild, bloody clothing) has contaminated the area. If the examiner just blindly inserts a finger and it comes back bloody due to contamination, they have just created a need for some additional, unnecessary diagnostic tests. If the area is bloody before the exam, take a moment to wipe it clean.

There are two ways to get the needed exposure. One thigh can be gently abducted enough to see the perineum. However, most ED carts are not very wide, so the amount of movement allowed is usually small. I usually find it necessary to slightly flex the hip and externally rotate it (half frog-leg), but only enough for exposure. Hopefully you would have detected any significant pelvic fractures with your physical exam before this point, and can plan the rectal exam accordingly.

My final comment deals with examiner position, which nobody ever talks about. One common error I see is that the wrong hand/wrong side problem. People do their best exam with their dominant hand. But if they’re on the wrong side of the patient, they turn at all kinds of angles to try to do it. I call it the “reverse english” exam (billiard reference). The ideal way is to stand next to the patient, looking toward their head, with your dominant hand next to them. Reach across and move their thigh with your nondominant hand, and examine with the dominant. So if you’re right handed, stand on their right side and use your right hand to do the exam.

Related post:

Advanced Needle Thoracostomy

I’ve recently written about the merits of needle vs finger thoracostomy. One of the arguments against needle thoracostomy is that it may not reach into the chest cavity in obese patients. As I mentioned yesterday, use the right needle!

Obviously, the one on top isn’t going to get you very far. The bottom one (10 gauge 3 inch) should get into most pleural spaces.

But what if you don’t have the right needle? Or what if the patient is massively obese and the longer needle won’t even reach? Pushing harder may seem logical, but it doesn’t work. You might be able to get the needle to reach to the pleural space, but the catheter won’t stay in it.

Here’s the trick. First, make the angiocatheter longer by hooking it up to a small (5 or 10cc) syringe. Now prep the chest over your location of choice (2nd intercostal space, mid-clavicular line or 5th intercostal space, anterior axillary line) and make a skin incision slightly larger than the diameter of the syringe. Now place the syringe and attached needle into the chest via your incision. It is guaranteed to reach the pleura, because you can now get the hub of the catheter down to the level of the ribs. Just don’t forget to pull out the catheter once you’ve placed the chest tube!

Related posts: