In The Next Trauma MedEd Newsletter: Update On Spleen Injury

The next issue of Trauma MedEd will be sent out to subscribers over the weekend, and will provide an update on what’s new with spleen injury. Topics will include:

  • Update To Spleen Injury Scaling / Grading
  • Overwhelming Post-Splenectomy Infection
  • Spleen Vaccines
  • Early Mobilization In Solid Organ Injury
  • Decreasing Unneeded Blood Draws

As always, this month’s issue will go to all of my subscribers first. If you are not yet one of them, click this link right away to sign up now and/or download back issues.

Unfortunately, non-subscribers will have to wait until I release the issue on this blog, in mid-June. So sign up now!

Management Of Penetrating Neck Trauma: The Way We Were/Are

The management of penetrating injuries to the neck has changed very little over the years. Could it be time? Today, I’ll review some of the basics of classic diagnosis and treatment. In my next post, I’ll discuss an alternative way to approach it.

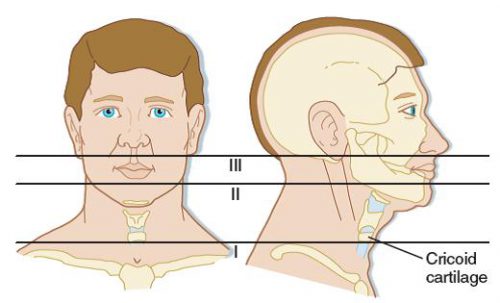
First, lets look at the time-honored zones of the neck. Here’s a nice diagram from EMDocs.net:

The zones are numbered in reverse, from bottom to top, and in Roman numerals.

The area below the cricoid cartilage is considered Zone I and contains many large vascular and aerodigestive structures that are relatively difficult to approach surgically. For this reason, diagnostic testing is recommended to assist in determining if an operation is actually needed and what the best surgical exposure would be. Obviously, this can only be considered in the stable patient. Unstable patients must go straight to the OR and the trauma surgeon will determine the surgical approach on the fly.

Similarly, the area above the angle of the mandible is Zone III, and is also difficult to expose. Injuries to this area may involve the distal carotid and vertebral arteries near the base of the skull, as well as the distal jugular vein. Surgical approach may require dislocation of or fracturing the mandible to get at this area. This is  challenging and not that desirable, and few surgeons are familiar with the technique. For this reason, imaging is very desirable and often demonstrates that no significant injury is present. And endovascular / angiographic techniques are now available that may obviate the need for surgery.

Zone II is everything in-between the mandibular angle and cricoid cartilage. This is the surgical Easy Button. Exposure is simple and the operation is fun. In the old days, an injury to this area went straight to the OR regardless of whether there were signs or symptoms of injury. Yes, there were quite a few negative explorations. But we’ve become more selective now with the advent of improved resolution of our CT scans.

Currently, we usually follow a two-step approach to penetrating neck trauma:

  1. Are there hard signs of injury present? These tell us that a structure that absolutely needs to be fixed has been injured. The patient should be taken directly to OR after control of the airway, if appropriate. Typical hard signs are:
    1. Airway compromise
    2. Active air bubbling from wound
    3. Expanding or pulsatile hematoma
    4. Active bleeding
    5. Hematemesis
  2. What zone is the injury in? And don’t just look at the obvious entry point. Gunshots (and long knives) may enter multiple zones. The zone then determines what happens next:
    1. Zone I – CT angio of neck and chest. If positive, proceed to OR for repairs, and perform EGD and/or bronchoscopy as needed
    2. Zone II – Old days: proceed to operating room for exploration, or angiogram, EGD, direct laryngoscopy, and bronchoscopy. Most chief residents chose the former. Current day: CTA of neck, followed by OR, EGD, bronchoscopy only if indicated.
    3. Zone III – CT angio of the neck. If positive, consider angiography/endovascular consultation vs operation.

Changes from old days to more current thinking have been made possible by improvements in speed and resolution of our CT scanners. But why can’t we take this another step forward and streamline this process even more? I’ll propose some changes in my next post!

Reference: Western Trauma Association Critical Decisions in Trauma:
Penetrating neck trauma. J Trauma 75(6):936-940, 2013.

You’ve Been Pimped! Origins And How To Survive It!

What exactly is pimping? If you have ever been a medical student or resident in any discipline, you probably already know. It’s ostensibly a form of Socratic teaching in which an attending physician poses a (more or less) poignant question to one or more learners. The learners are then queried (often in order of their status on the seniority “totem pole”) until someone finally gets the answer. But typically, it doesn’t stop there. Frequently, the questioning progresses to the point that only the attending knows the answer.

So how did this time honored tradition in medical education come about? The first reference in the literature attributes it to none other than William Harvey, who first described the circulatory system in detail. He was disappointed with his students’ apparent lack of interest in learning about his area of expertise. He was quoted as saying “they know nothing of Natural Philosophy, these pin-heads. Drunkards, sloths, their bellies filled with Mead and Ale. O that I might see them pimped!”

Other famous physicians participated in this as well. Robert Koch, the founder of modern bacteriology, actually recorded a series of “pümpfrage” or “pimp questions” that he used on rounds. And in 1916, a visitor at Johns Hopkins noted that he “rounded with Osler today. Riddles house officers with questions. Like a Gatling gun. Welch says students call it ‘pimping.’ Delightful.”

So it’s been around a long time. And yes, it has some problems. It promotes hierarchy, because the attending almost always starts questions at the bottom of the food chain. So the trainees come to know their standing in the eyes of the attending. And they also can appreciate where their fund of (useful?) knowledge compares to their “peers.” It demands quick thinking, and can certainly create stress. And a survey published last year showed that 50% of respondents were publicly embarrassed during their clinical rotations. What portion of this might have been due to pimping was not clear.

Does pimping work? Only a few small studies have been done. Most medical students have been involved with and embarrassed by it. But they also responded that they appreciated it as a way to learn. A 2011 study compared pimping (Socratic) methods to slide presentations in radiology education. Interestingly, 93% preferred pimping, stating that they felt their knowledge base improved more when they were actively questioned, regardless of whether they knew the answer.

So here are a few guidelines that will help make this technique a positive experience for all:

For the “pimpers”:

  • Make sure that the difficulty level of questions is reasonable. You are testing your learners’ knowledge, not spotlighting your own mental encyclopedia
  • Build the level of difficulty from questions that most can answer to one or two that no one knows, then switch to didactice teaching of the esoterica
  • Don’t let one learner dominate the answers; gently exclude them and solicit answers from others so they get a chance to participate
  • Provide positive reinforcement for correct answers, but don’t resort to negative reinforcement (insults) when they are wrong
  • Go Socratic when the answer is not known. Step back and review the basic concepts involved that helps your learners arrive at the correct answer.

For the “pimpees”:

  • Read, read, read! You are in this to learn, so study all the clinical material around you.
  • Talk to your seniors to find out your attending’s areas of interest. There’s a lot of stuff to learn, and this may help you focus your rounding preparation a bit. It still doesn’t absolve you from learning about all the other stuff, though.
  • Don’t be “that guy (or gal)” who tries to dominate and answer every question
  • If all else fails, and it’s one of those “percentage” questions, use my
    “85/15 rule.”
    If the issue you are being asked about seems pretty likely, answer “85%.” If it seems unlikely, go with “15%.” It’s usually close enough to the real answer to satisfy.

Bottom line: Pimping is a time-honored tradition in medicine, but should not be considered a rite of passage. There is a real difference in attitudes and learning if carried out properly. Even attendings have a thing or two to learn about this!

Reference: The art of pimping. JAMA. 262(1):89-90, 1989.

You’ve Been Pimped!

You know what I’m talking about. It’s a mainstay of medical education for physicians. It starts in medical school, and generally never stops. And when you finish your residency,  you graduate from being pimped to being the pimper.

How did this all come to be? Is it good for education? Bad? Tune in tomorrow to learn more. In the meantime, enjoy this algorithm on how to get through a pimping session. Click to view full-size.

pimping

Source: Posted by Dr. Fizzy on The Almost Doctor’s Channel

Best Practice: Use of CT Scan In Trauma Activations – Part 2

In my last post, I described how the unscheduled and random use of CT scan in trauma activations can interfere with normal radiology department workflow, creating access problems for other emergency and elective patients. Today, I’ll detail a project implemented at my hospital to analyze the magnitude of this problem and try to resolve it.

We started with a detailed analysis of how the scanner was being used for trauma activation patients. Regions Hospital has a single-tier trauma activation system, with no mechanism of injury criteria other than penetrating injury to the head, neck, and torso. There are usually about 850 activations per year, and traditionally the CT scanner has been “locked down” when the activation is announced. The CT techs would complete the current study on the table, then hold the scanner open until called or released by the trauma team.

Since we are a predominantly blunt trauma institution, we scan most stable patients. Our average time in the trauma bay is a bit less than 20 minutes. Add this time to the trauma activation prenotification time of up to 10 minutes, and the scanner has the potential to sit idle for up to half an hour. And in some cases when scan is not needed (minor injuries, rapid transport to OR) the techs were not notified and were not aware they could continue scanning their scheduled cases.

A multidisciplinary group was created and started with direct observation of the trauma activation process and a review of chart documentation and radiology logs. On average it was calculated that the scanner was held idle for an average of 17.9 minutes too long. This is more than enough time to complete one, or even two studies!

A new process was implemented that required the trauma team leader to call out to the ED clerk placing orders for the resuscitation 5 minutes before the patient would be ready for scan. I still remember the first time this happened to me. I was so used to just packing up and heading to scan, I got a little irritated when told that I hadn’t made the 5-minute call. But it’s a good feedback loop, and I never forgot again!

We studied our workflow and results over a 9-week period. And here are the factoids:

  • The average CT idle time for trauma activations before the project was 17.9 minutes
  • This decreased to an average idle time of 6.4 minutes during the pilot project
  • Total idle time for all activations was 8.3 hours, but would have been 36 hours under the old system
  • A total of 28.6 hours were freed up, which allowed an additional 114 patients to be scanned while waiting for the trauma activation patients

This was deemed a success, and the 5-minute rule is now part of the routine flow of our trauma activations. We rarely ever have to wait for CT, and if we do it’s usually due to the team leader not thinking ahead.

Bottom line: This illustrates the processes that should be used when a quality problem surfaces in your program:

  • Recognize that there is a problem
  • Convene a small group of experts to consider the nuances
  • Generate objective data that describes the problem in detail
  • Put on your thinking caps to come up with creative solutions
  • Test the solutions until you find one that shows the desired improvement
  • Be prepared to modify your new systems over time to ensure they continue to meet your needs