Galleries

ED Thoracotomy Part 1: Getting In

Performing a proper emergency thoracotomy is more difficult than you think. There are lots of details to consider, and the learning curve is steep. I’m going to split the process into three parts: getting in, dealing with the heart, and clamping the aorta.

The most important part of getting in is setting up your team. Someone has to be assigned to make sure the chemical and volume resuscitation part is carried out, because the person actually doing the thoracotomy is going to be busy. The most experienced person in the room will actually perform the procedure, or assist the physician who will be learning the procedure.

Next, protect yourself! This is a dangerous procedure. Emotions run high, and people are holding sharp objects. You don’t know where your patient has been or what is circulating in the little blood they may have left, so be careful and make sure you are wearing your personal protective equipment.

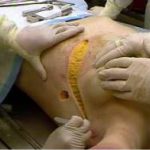
Finally, make the incision. This is usually placed along the fifth intercostal space, which is just under the nipple in men. Don’t start too close to the sternum, or you may cut the internal mammary artery. This won’t bleed until circulation is restarted, but it takes some effort to stop it later. Some people prefer a straight incision down toward the table, but I prefer a curved incision that follows the ribs, as illustrated.

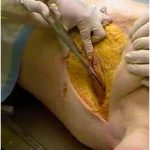
Use the scalpel to incise skin, subcutaneous tissue and muscle. However, stop short of the pleura while you are incising the intercostal muscles. If you try to cut through the pleura with the knife, it’s alarmingly easy to injure the lung, or even the diaphragm. Use scissors instead.

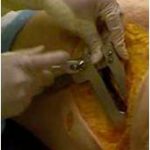
Now it’s time to insert the retractor. I prefer to place it with the handle pointing down toward the feet so it doesn’t get jammed against the arm. This is not nice, polite thoracic surgery. You don’t open it a few turns and wait, trying to avoid rib fractures. Open it fast and all the way. Ribs will break, so be careful from this point onward so you don’t cut yourself on their sharp edges.

Related posts:

Tomorrow, I’ll describe what you need to do with the heart.

Image from my personal archive. Not treated at Regions Hospital.

Explain This! The Answer

This patient was running from an assailant at top speed and fell, tumbling for several feet. Medics found him in this position and pondered how to secure him for transport. eventually they just used straps and belts to hold him on a backboard.

The injury is an interesting one. He has a femur fracture, but there is a twist (literally). If he was a contortionist and had found a way to bend his knee toward his head, his toes would point to his face. If you look at the thigh, twisted muscle bellies can be seen.

The diagnosis is a mid-shaft femur fracture with a 180 degree rotation of the distal portion.

When Can You Close That Stab Wound?

I find that many trauma professionals are nervous about closing stab wounds. They seem to worry a lot about infections and lean toward leaving the wound open to heal by secondary intention. But is this warranted?

The answer is: probably not. Most knives used for assaults are clean, but not quite sterile. Yes, there are a few bacteria on the blade, but not very many. So if the usual wound management guidelines are followed, the patients generally do quite well. 

The guidelines are:

  • No gross contamination. If the knife was used to cut raw chicken or to stir up manure, that’s a problem. Leave it open.
  • No devitalized tissue. Complex lacerations with dusky skin bridges may get infected. Debride or leave open.
  • Don’t let the wound get fully colonized with skin bacteria. There is no good literature on this, but more than 12 hours for most of the body and 24 hours for the face is a reasonable guideline.

If any of these guidelines have been violated, it’s probably best to leave the wound open. Otherwise the default should be to try to close it as soon and as cleanly as possible. This means irrigating with saline to decrease any bacterial counts. Either sutures or staples are acceptable.

The most important part of this process is patient education. They must be informed about what signs of a wound infection to look for so they can return earlier rather than later to have you deal with it.

Related posts:

What’s The Diagnosis #1?

Okay, time for the answer. This 12 year old crashed his moped, taking handlebar to the mid-epigastrium. Over the next 3 days, he felt progressively worse and finally couldn’t keep food down.

Mom brought him to the ED. The child appeared ill, and had a WBC count of 18,000. The abdomen was firm, with involuntary guarding throughout and a hint of peritonitis. The diagnosis was made on the single abdominal xray shown yesterday. A closeup of the good stuff is above.

Emergency docs, your differential diagnosis list with this history is a pancreatic vs a duodenal injury based on the mechanism.

Classic findings for duodenal injury:

  • Scoliosis with the concavity to the right. This is caused by psoas muscle irritation and spasm from retroperitoneal soiling by the duodenal leak.
  • Loss of the psoas shadow on the right. Hard to see on this xray, but the left psoas shadow is visible, the right is not. This is due to fluid and inflammation along this plane.
  • Air in the retroperitoneum. In this closeup, you can actually see tiny bubbles of leaked air outlining the right kidney. There are also bubbles along the duodenum and a few along the right psoas.

We fluid resuscitated first (important! dehydration is common and can lead to hemodynamic issues upon induction of anesthesia) and performed a laparotomy. There was a  blowout in the classic position, at the junction of 1st and 2nd portions of the duodenum. The hole was repaired in layers and a pyloric exclusion was performed, with 2 closed drains placed in the area of the leak.

The child did well, and went home after 5 days with the drains out. Feel free to common or leave questions!

To see the full-size abdominal xray, click here.