Tag Archives: intubation

“Pull The Tube Back 2 Centimeters”

How often do trauma professionals hear that? Patients intubated in the ED (or before) almost universally have a chest x-ray taken to check endotracheal tube position. And due to variations in body habitus (and sometimes number of teeth), the tube may not end up just where we want it. So look at how deep or shallow it is and adjust it by the number of centimeters out of the correct position it should be, right?

Not so fast! A small, prospective study from Yale looked at endotracheal tube adjustment in ICU patients using tube markings and the patients incisors. Their “ideal” tube position has the tip between 2 and 4 cm from the carina. Any patients with an ET tube outside these parameters was included in the study. Here are the interesting tidbits:

  • There were only 55 patients who met criteria for the study. No denominator information was give, so we can’t tell how good or bad the intubators were initially.
  • Most tubes that needed adjustment were too far out. The median starting position was at 7cm above the carina (!),
  • A smaller number were too deep (median position 0.7cm). These were mostly in women.
  • The usual intended adjustment was 2cm. The actual distance moved after manipulation was half that (1.1cm).

Bottom line: Endotracheal tube repositioning based on tube markings at the incisors is not as accurate as you may think. Patient body habitus and reluctance to pull a tube out too far probably are factors here. So be prepared to readjust a second time unless you intentionally add an extra centimeter to your intended tube movement.

Related post:

Reference: Repositioning endotracheal tubes in the intensive care unit: Depth changes poorly correlate with postrepositioning radiographic location. J Trauma 75(1):146-149, 2013.

How To: Secure An Endotracheal Tube To… Nothing!

Several decades ago I took care of a patient who posed an interesting challenge. He had been involved in an industrial explosion and had sustained severe trauma to his face. Although he was able to speak and breathe, he had a moderate amount of bleeding and was having some trouble keeping his airway clear.

Everyone frets about getting an airway in patients who have severe facial trauma. However, I find it’s usually easier because the bones and soft tissue move out of your way. That is, as long as you can keep ahead of the bleeding to see your landmarks.

In this case, the intubation was easy. The epiglottis was visible while standing above the patient’s head, so a laryngoscope was practically unnecessary! But now, how do we secure the tube so it won’t fall out? Sure, there are tube-tamer type securing devices available, but what if they are not available to you? Or this happened in the field? Or it was in the 1980’s and it hadn’t been invented, like this case?

The answer is, create your own “skin” to secure the tube to. Take a Kerlix-type stretchable gauze roll and wrap it tightly around their head. Remember, they are sedated already and they can breathe through the tube. This also serves to further slow any bleeding from soft tissue. Once you have “mummified” the head with the gauze roll, tape the tube in place like you normally would, using the surface of the gauze as the “skin.”

Be generous with the tape, because the tube is your patient’s life-line. Now it’s time for the surgeons to surgically stabilize this airway, usually by converting to a tracheostomy.

Related posts:

WTF? Submental Intubation? (Best Of)

By request, I’m republishing this interesting post.

Here’s one of the weirder procedures I’ve seen in some time. Imagine that you need a definitive airway, but you can’t use the face for some reason (mouth or nose). The usual choice would be a tracheostomy, right? But what if you only need it for a few days? Typically, once placed, trachs must be kept for several weeks before decannulation is safe.

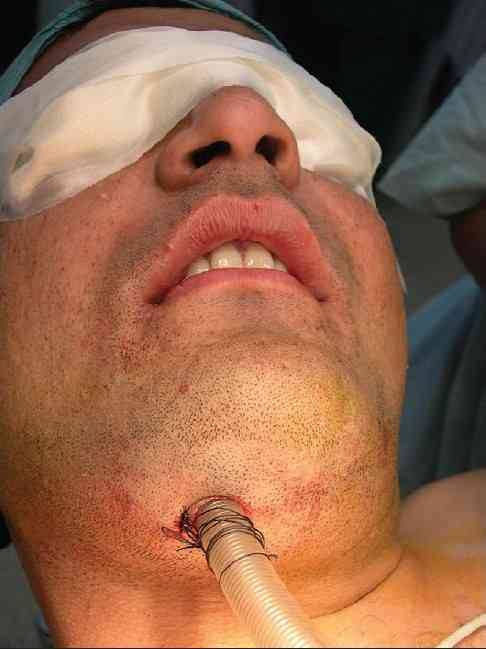
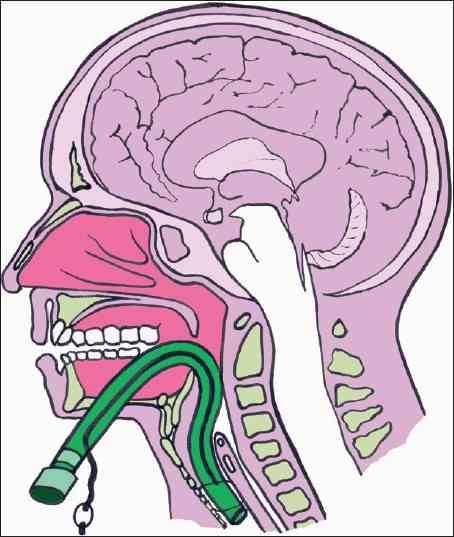
Enter submental intubation. This technique involves passing an endotracheal tube through the anterior floor of the mouth, and then down the airway. This leaves the facial bones, mandible, and skull base untouched.

image

The technique is straightforward. After initially intubating the patient  orotracheally, a 1.5cm incision is created just off the midline in the submental area. Using a hemostat, all layers are penetrated, entering the oropharynx just lateral to the tongue. A 1.5cm incision is then made parallel to the gum line of the lower teeth. The connector at the proximal end of the endotracheal tube is removed, and a hemostat is placed through the chin incision again. The proximal end of the ET tube is grasped from within the pharynx and pulled out through the skin, leaving the distal (balloon) end in the trachea. The connector is reinserted, and the tube is then hooked up to the anesthesia circuit again. The tube is secured using a stitch under the chin. After a final position check, the surgical procedure can commence.

image

There are a number of variations on this technique, so you may encounter slightly different descriptions. The tube can be pulled at the end of the procedure, or left for a few days to ensure safe extubation, if needed.

A small series of 10 patients undergoing this technique was reviewed, and there were no short or long term problems. Scarring under the chin was acceptable, and was probably less noticeable than a trach scar.

Bottom line: This is a unique and creative method for intubating patients with very short-term airway needs while their facial fractures are being fixed. Brilliant idea!

Reference: Submental intubation in patients with panfacial fractures: a prospective study. Indian J Anaesth 55(3):299-304, 2011.

Photo source: internet

Tongue Piercings And Emergency Intubation

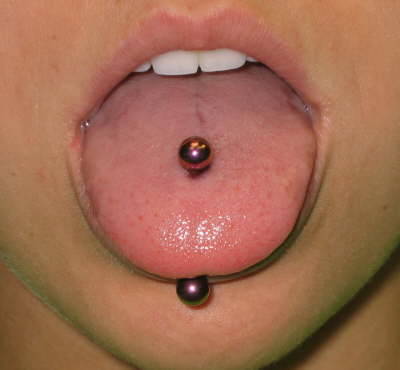
Urgent and emergent intubation is challenging enough, but what if your patient is sporting some type of tongue piercing? Does it make a difference? Do you need to do anything differently?

Obviously, the jewelry may physically impede the process of intubating the patient, impairing visualization of structures or getting in the way of inserting the tube. It can also cause complications later down the road, such as pressure necrosis from the tube coming into contact with it.

The anesthesia literature recommends removing all oral jewelry prior to elective intubation, or declining to do the case if the patient refuses. Unfortunately, trauma professionals do not have that option when the patient needs an emergency airway.

Here are some pointers for dealing with oral jewlry:

  • Is the item going to impede insertion of the airway? Is it large, or obstructing the usual tube pathway? If so, remove it quickly (see below).
  • Sweep the tongue well to the side during tube insertion to avoid the jewelry. You may need an assistant to grasp it with gauze to keep it out of the way.
  • Once the airway is secured, remove the item. This takes two people! The ET tube should be moved to the side, and one person will grasp the tongue with a gauze pad and extend it. The other person can then grasp the jewelry with gloved fingers, and unscrew the ball on one side. It can then be removed and saved in an envelope.

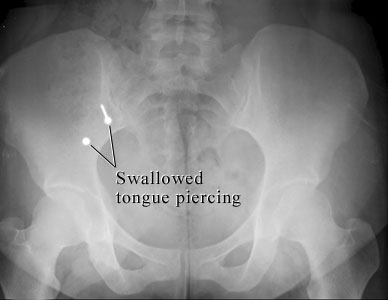
Note: both hands must always be in contact with the jewelry at all times! It is slippery, and if the pieces are not controlled, this can happen!

A. Abdominal x-ray shows sharp stud foreign body in the bowel from tongue piercing that came apart and was swallowed (arrow). Images courtesy of Intermountain Medical Imaging, Boise, Idaho.


The Three Strikes And You’re Out Airway Rule

Rapid airway control is key in critically injured trauma patients. But too many times, I’ve seen trauma professionals take far too much time to establish one. Here’s a good rule of thumb to use in these situations.

After pre-oxygenating the patient, your first pro gets a crack at it. They generally have the most time available, often 3-5 minutes before sats begin to drop.

In the unlikely situation that they are not successful, strike 1. Stop trying and resume bagging the patient. At this point, someone (trauma surgeon, lead medic) must get the crich set out. Then the next most experienced intubator gets a shot.

If they are not successful, strike 2. Resume bagging and open the crich set.

The most experienced intubator now gets their chance, using any advanced technology available. No success even now? Strike 3, use the crich set!

Bottom line: We should never allow more than 3 airway attempts, and sometimes clinical conditions will dictate fewer tries. Examples that come to mind are severe brain injury patients (hypoxia is bad) and patients who do not recover from oxygen desaturation when they are bagged. Don’t lose track of time and the number of attempts!