Tag Archives: intubation

COVID-19 Thinking Cap: How To Protect Personnel During Intubation (Video)

There is a fascinating letter in the New England Journal of Medicine submitted by authors from the Boston Medical Center and Brigham and Women’s Hospital. Like all trauma professionals, they were concerned with droplet contamination produced during the intubation process. Most hospitals have modified their intubation procedures to try to protect personnel as much as possible.

The authors designed a Plexiglas box with two holes for the arms of the intubator that is placed over the patient’s head. This should serve to shield them, and other personnel in the room if the patient unexpectedly coughs during the process. They tested this concept using an intubation mannequin. First, they placed a balloon filled with fluorescent dye in its mouth and slowly inflated until it burst. Here was the result when viewed under ultraviolet light. Sputum everywhere!

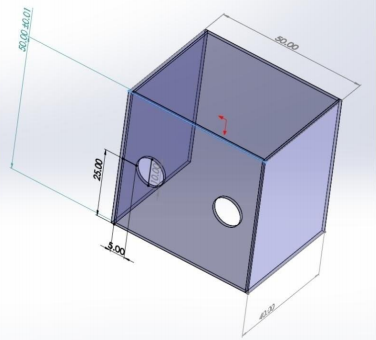
Next, they placed the intubation shield over the patient. Here is a drawing of its dimensions.

The device is open on the bottom and on the side away from the intubator. The arm holes are 10cm in diameter.

The authors then repeated the balloon experiment with the shield in place and the intubator’s arms inserted through the holes. The resulting contamination was limited to their hands and forearms, and the inside of the shield.

Bottom line: This is a very interesting yet simple and cheap device that can be built by just about anyone and should protect personnel from droplet contamination. It will not have much effect on aerosols escaping into the room, but that’s what our other PPE are for! It’s a great example of how creativity is key in keeping us all safer during this pandemic.

You can view the video on the NEJM website at:
https://www.nejm.org/doi/full/10.1056/NEJMc2007589

Reference: Barrier Enclosure during Endotracheal Intubation. NEJM DOI: 10.1056/NEJMc2007589, April 4 2020.

Mainstem Intubation In Pediatric Patients: How To Avoid It

In my last post, I reviewed a simple technique utilizing a reminder card and provider feedback loops to reduce deep intubations in pediatric patients. Today, I’ll review three other techniques and discuss a paper that compared their efficacy.

A variety of techniques for determining and/or confirming endotracheal tube position exist. Use of one or more of them is important in children due to their short trachea and increased likelihood of deep intubation. Some, like the confirmatory chest x-ray, are obvious. However, it’s more desirable to apply techniques during the intubation in order to avoid deep intubation in the first place. Hyperinflation of one lung, especially in very small children, can cause a host of impairments and complications that may compound their other injuries.

A paper from the University Hospital Basel in Switzerland evaluated three techniques: bronchoscopic insertion to a specific depth, cuff palpation in the sternal notch, and intentional right mainstem intubation followed by slow withdrawal during auscultation.  Each of 68 children ranging in age from 0 to 4 years were studied using all three techniques.

Each endotracheal tube was marked at the ideal insertion point that would ideally be placed just beyond the vocal cords. The distance from this mark to the mouth end of the tube was measured so actual intubation depths could be compared.

Bronchoscopic insertion was always performed first to obtain a baseline depth measurement, essentially the gold standard. The other two techniques were performed in random order. For the cuff palpation technique, the trachea was palpated while the balloon was intermittently partially inflated until it could be felt at the suprasternal notch. For the mainstem intubation technique, the uninflated tube was advanced until breath sounds in the left axilla disappeared. It was then slowly withdrawn until sounds reappeared.

Distances from the tip of the tube to the carina was calculated using the insertion depth at the incisors and the initial ideal intubation depth mark. Here are the factoids:

  • Insertion to a depth mark on the tube via bronchoscope technique resulted in the highest tube tip with respect to the carina, and also with the greatest depth variability
  • The cuff palpation technique resulted in less distance to the carina (about 19mm vs 36 for the mark technique) and less variability
  • Use of the mainstem intubation with pullback technique resulted in the tube tip resting within just a few mm of the carina, but tube depth was very consistent

Bottom line: What to make of all this? Which technique is “best?” First, it’s not practical or advisable to use a bronchoscope for every pediatric intubation. It’s invasive and adds complexity and time to a critical procedure. The cuff palpation technique also takes additional time due to the repeated cuff inflation/deflation that is required. However, the tube position is fairly accurate and safe.

The intentional right mainstem intubation with pull-back seems a bit sketchy. It requires some type of ongoing ventilation while the tube is being inserted, as well as someone who can listen to the left chest. Additionally, it results in a tube position that is so low that neck positioning may move it into the mainstem bronchus again.

In my mind, estimation of the proper depth pre-intubation is probably the best. Strict attention must be paid to the final depth of the tube once it is inserted, as measured by the distance marker at the incisors. This number must match the one decided upon at the start of the procedure. A good exam of the chest should be carried out to quickly identify an inadvertent mainstem intubation. And finally, a quick confirmatory chest x-ray should always be obtained for objective information on tube position. 

The fancy techniques described in this paper add too much time and complexity for intubation in a trauma situation. They may very well have a place in the OR where the situation is more controlled and there is more advanced equipment and support. But stick to the basics when intubating children in your trauma bay!

Reference: Assessment of three placement techniques for individualized positioning of the tip of the tracheal tube in children under the age of 4 years. Ped Anesthesia 25:379-285, 2014.

Mainstem Intubation In Pediatric Patients: How Common?

Mainstem intubation in the pediatric patient is a common problem. There are two major issues: the trachea is shorter than in an adult, and the angles are different making intubation of the right mainstem bronchus much easier. Frequently, the intubator watches the balloon slide between the cords, then pushes the tube in “just a little further.”

Unfortunately, that “little bit” can vary significantly. An abstract from my hospital was presented at the Pediatric Trauma Society in 2016. Subjectively, we noticed that mainstem intubation was occurring with some regularity in our pediatric trauma patients.  It seemed as though insufficient attention was being paid to the depth of the tube.

A major difference between adult and pediatric intubations is that in adults, optimal tube depth is locked into a relatively narrow range. In children, the depth varies considerably based upon child age and size. And small variances in depth can have major implications for tube position.

We decided to implement a PI project to change our intubation policy. In order to focus the entire team on tube depth, a color coded card was attached to each size of endotracheal tube. This card listed the optimal depth for insertion. Once the provider inserted the tube, the final depth was called out for the team and documentation scribe to hear. This had the added advantage of allowing multiple team members confirm the appropriateness of tube depth. A chest x-ray was immediately obtained to confirm position.

We retrospectively reviewed our seven year experience with pediatric intubations, from 2009-2015. Here are the factoids:

  • Nearly 2,000 pediatric trauma patients were admitted during the study period
  • 94 patients (5%) required intubation in the ED
  • Prior to implementation of the new protocol, 6 of 68 patients (8.8%) had confirmed right mainstem intubation 
  • After the change, only one further mainstem intubation occurred in 26 procedures (3.8%)

Bottom line: Unfortunately, this series is too small to determine statistical significance. There is a definite trend toward fewer mainstem intubations. It appears that by calling more attention to the proper tube depth, fewer deep placements occur. Our numbers  have remained low since this change.

Are there other methods to ensure proper ET tube placement in small patients? In my next post, I’ll review a paper that compares three additional different techniques that can be used.

Reference: Eliminating the Preventable Occurrence of Right Mainstem Intubation in the Pediatric Trauma Patient: A Quality Performance Improvement (PI) Initiative. Pediatric Trauma Society Poster Abstract #1, 2016.

Submental Intubation – The Video!

Yesterday, I described a novel technique for providing a secure yet short-term airway tailored to patients who can’t have a tube in their mouth or nose. Patients undergoing multiple facial fracture repair are probably the best candidates for this procedure.

A picture may be worth a thousand words, but a video is even better. Please note that it is explicit and shows the blow by blow surgical procedure. Of note, it is a quick and relatively simple advanced airway technique. Note the cool music!

Related post:

By Request: Submental Intubation

I keep getting requests regarding this technique, so I’m reposting  this updated article today and tomorrow.

Here’s one of the weirder procedures I’ve seen in some time. Imagine that you need a definitive airway, but you can’t use the face for some reason (mouth or nose). The usual choice would be a tracheostomy, right? But what if you only need it for a few days? Typically, once placed, trachs must be kept for a few weeks before decannulation is safe.

Enter submental intubation. This technique involves passing an endotracheal tube through the anterior floor of the mouth, and then down the airway. This leaves the facial bones, mandible, and skull base untouched.

tumblr_inline_mvds1c14ye1qa4rug1


The technique is straightforward:

  • After initially intubating the patient  orotracheally, a 1.5cm incision is created just off the midline in the submental area under the chin.
  • Using a hemostat, all layers are penetrated, entering the oropharynx just lateral to the tongue.
  • A 1.5cm incision is then made at the puncture site, parallel to the gum line of the lower teeth.
  • The ET tube is removed from the ventilator circuit, and the connector at the proximal end of the tube is removed.
  • The hemostat is placed through the chin incision again. The proximal end of the ET tube is curled into the oropharynx and grasped with the hemostat, then pulled out through the skin under the chin, leaving the distal (balloon) end in the trachea.
  • The connector is reinserted, and the tube is then hooked up to the anesthesia circuit again.
  • The tube is then secured using a stitch under the chin.

After a final position check, the surgical procedure can commence. Cool!


There are a number of variations on this technique, so you may encounter slightly different descriptions. The tube can be pulled at the end of the procedure, or left for a few days to ensure safe extubation, if needed.

tumblr_inline_mvdsm0zd8b1qa4rug1

A small series of 10 patients undergoing this technique was reviewed, and there were no short or long term problems. Scarring under the chin was acceptable, and was probably less noticeable than a trach scar.

Bottom line: This is a unique and creative method for intubating patients with very short-term airway needs while their facial fractures are being fixed. Brilliant idea!

Tomorrow: Submental intubation – the video!

Reference: Submental intubation in patients with panfacial fractures: a prospective study. Indian J Anaesth 55(3):299-304, 2011.

Photo source: internet