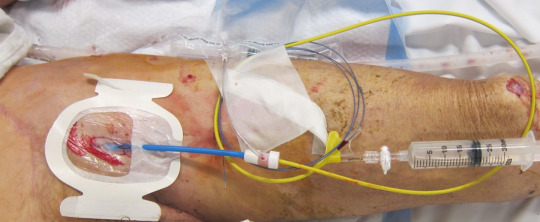
First off, this is 2-person procedure, minimum. It is possible with just one, but it’s a hell of a ride that way.
Also note that the technology continues to evolve. Earlier versions of his catheter required a 12 Fr sheath in the artery, but newer models have reduced this to 7 Fr. Older systems used a separate wire, whereas the newest model has a fused wire and catheter construct.
There are six separate steps in the process. So let’s discuss them, one by one.
Step 1. Access the artery
Sounds simple, but there are a number of considerations in this step. The end result is that a guidewire must end up in a large artery somewhere. The common femoral artery (CFA) is the vessel of choice, as anything more distal will rupture during the next step.
There are several ways to access the CFA. In some cases, a femoral arterial line may have already been inserted for other indications. Or maybe “just in case” REBOA might be needed. However, it’s important that the catheter is in the common femoral artery, not the superficial. This means that it must be inserted very close to the inguinal ligament.
If the patient still has vital signs, an arterial line may be inserted quickly, preferably with ultrasound guidance. However, if vitals have been lost, only a cutdown will assure rapid access to the artery.
Step 2. Insert and position the balloon.
First, make sure an x-ray unit is available, and position a plate underneath the patient’s body, from nipples downward. This is helpful for confirming positioning of the guidewire, if used. If not readily available, the wire and balloon can be marked based on external landmarks on the patient’s body.
For external marking, hold the REBOA next to the patient. For Zone I mark the catheter measuring from the groin to the xiphoid. Zone III should be marked with the balloon just above the umbilicus.
Now convert the existing wire to the appropriate size sheath for the REBOA catheter using the manufacturer’s instructions. Insert the REBOA unit, again following the directions for a wired or wireless catheter. Smoothly insert until your catheter mark is at the level of your sheath. Lock everything into place.

Step 3: Inflate the balloon!
Whereas the previous steps only require some degree of technical skill, this one requires good judgment. The key is to get good occlusion without rupturing a vessel (the aorta!). This means inflating until you feel the pressure needed to add more volume start to increase disproportionately. Kind of like adjusting the cuff pressure on an endotracheal tube by feel.
I recommend inflating the balloon, not with plain saline, but saline with a bit of IV contrast mixed in. This allows you to verify balloon position using that x-ray unit and plate you so thoughtfully placed in the last step, or with fluoroscopy in the OR.
Tomorrow: Part 3b, more on how you do it.
Direct links to the REBOA series:

