Category Archives: Equipment

How To Design Your Trauma Bay

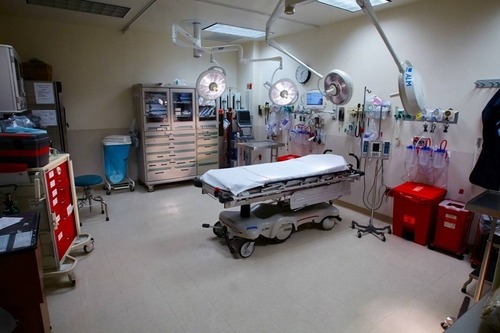
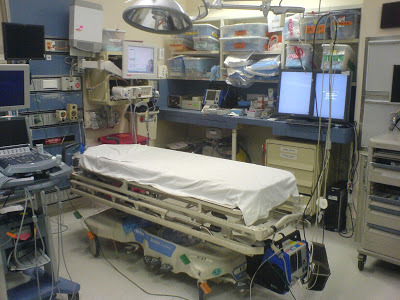
I spent the last two posts discussing the size of your trauma bay and how to measure it. This can obviously be helpful if you are updating or building new resuscitation rooms. But what about all the stuff that goes into it? Where is the best place to put it? If you are in the enviable position of being able to stock a brand new room, here are some tips.

Figure out what you really need in the trauma bay. You don’t have to put everything and the kitchen stove in there. It’s fine to have less commonly used equipment somewhere else, but it must be close! You don’t want someone to have to walk 50 yards to look for something you need right now.

Here’s a list of the critical stuff:

  • Temperature and light controls.  These must be inside the room for easy and rapid access. And the doors should close to contain the heat. Resus rooms that are used frequently should be kept warm, doors closed, at all times.
  • Personal protective equipment. This should be located just inside the room (if space is available) or just outside. It absolutely must be near the entrance and easily accessible or no one will wear it.
  • Airway cart and video laryngoscope. These items must always be located near the head of the bed for immediate availability.
  • Difficult airway cart. These are not used frequently, so need not be placed inside the room. But make sure it is close by.
  • Travel ventilator. This can be stored outside unless you have lots of space available.
  • IV start/blood draw carts. One of these should be stationed on either side of the patient.
  • Rapid infuser. This may be located inside or outside of your trauma room based on the number of times it is typically needed.
  • Procedure packs. These should be located inside the trauma bay, and clearly organized inside cabinets.
  • Medication dispenser. This must be inside the room. Period.
  • Other commonly used equipment/supplies.  These should be placed intuitively in the bay and/or cabinets depending on frequency of usage of each item. Clear marking is essential.
  • Scribe stand. Don’t forget the scribe. They obviously have to be in the room, and need some space for the (preferably) paper trauma flow sheet.
  • Pediatric cart. This can be stored inside or outside the resus room, but should be nearby. Make sure that the measuring card that translates child size into equipment size is easily located.
  • Blood refrigerator. This item is optional, but is becoming more common. It can be located inside or close outside the trauma bay depending on space available.
  • Blanket and sheet warmer. These are nice to have, wherever you have room to put one. The patients will appreciate it.
  • Procedure lights. Ceiling mounted are best because they don’t take up floor space. However, these are notorious for developing a mind of their own as they age. After a while, they never seem to stay focused on your field.
  • Forced air warming blanket unit. This is important here in Minnesota, but also anywhere your patients can get cold. Which is pretty much everywhere. The airflow unit itself is relatively small and can usually be tucked under a counter somewhere. Otherwise, keep it nearby.
  • Linens hamper. You need to get rid of that gown / those sheets and blankets / or whatever. There’s no reason to take up space in the room for this. Park it outside.
  • Laundry basket. This is a valuable item that is generally overlooked. What do you usually do with all that stuff you cut off the patient? Drop it on the floor, right? This is setting you up to lose your patient’s stuff. Get a cheap plastic laundry basket from Target and put it under one of the counters. Toss clothing, shoes, etc in it as they are removed.
  • Cast cart. These are typically huge. They can be anywhere else but inside the trauma bay. Roll it outside the door when needed.

Now where do you put all this stuff? Most trauma centers already have an established layout and flow in their existing trauma bays. When you are moving to a new one, plan ahead! Hopefully you will have more room, so you’ll have some additional flexibility as to where to place everything.

But designing the placement and flow on paper alone is of limited use. You must try it out in advance! How do you do this? Have your contractor mock up a space exactly the size of your new resuscitation room. Move actual carts, cabinets, and equipment into it. If it’s not possible to cart the exact stuff into it, have the contractor build mock-ups of them and place them in the bay.

Now have actual trauma team members practice simulations of common types of resuscitation: basic no frills, basic with intubation, basic with splinting/casting, advanced with all of the above plus multiple procedures. Take careful notes of flow and any glitches that arise. Then move your stuff around to fix any problems, and try again!

Print Friendly, PDF & Email

How To Measure Your Trauma Bay

Yesterday I detailed some standard info on trauma bay size. Today, I’ll describe what I found when I brought in my trusty tape measure today to check out my trauma bays at Regions Hospital. I came up with several helpful measurements to help gauge the relative utility of the rooms.

Here are the indices that I came up with:

  • TBTA: Trauma Bay Total Area. This is the total square footage (meterage?) measured wall to wall.
  • TBWA: Trauma Bay Working Area. This is the area that excludes equipment carts next to a wall, and areas under countertops that extend away from the wall.
  • TBAA: Trauma Bay Available Area. This is the TBWA less any other unusable areas in the room. We have an equipment post near one corner that eats up 16.5  sq ft of space. Also remember to subtract the area taken up by the patient bed, as this area is not available to the trauma team, either.
  • TBSI: Trauma Bay Space Index. This value is derived by dividing the TBAA by the number of team members in the room. It gives an indication of how much space is available for each trauma team member to work in.

Values in my trauma center:

  • TBTA: 291 sq ft
  • TBWA: 220.5 sq ft
  • TBAA: 186.5 sq ft
  • TBSI: 15.5

What does it all mean? Hard to say without more info from you for comparison. For my team, it means we each have a 4×4 foot square to move around in, on average. This is fairly tight, I would say.

Why don’t you generate some comparison data? Tomorrow is “take a tape measure to work” day! Calculate these constants in your own resuscitation room. Then post them by leaving comments below, or tweet/email me the values for the metrics listed above. If I get enough, I’ll post the data here!

Print Friendly, PDF & Email

How Big Should Your Trauma Bay Be?

I recently received a reader request regarding trauma bay design. Today, I’ll rerun my article on trauma bay size. Tomorrow, I’ll describe my system for quantifying the space in your trauma bay. Finally, next week I will address equipment layout in the resuscitation room.

Trauma resuscitation rooms vary tremendously. They can range from very spacious…

to very tight…

Most trauma bays that I have visited were somewhere between 225 and 300 square feet (21-28 sq meters), although some were quite large (Rashid Hospital in Dubai at nearly 50 sq meters!).

Interestingly, I did manage to find a set of published guidelines on this topic. The Facility Guidelines Institute (FGI) develops detailed recommendations for the design of a variety of healthcare facilities. Here are their guidelines for adult trauma bays:

  • Single patient room: The clear floor area should be 250 sq ft (23 sq m), with a minimum clearance of 5 feet on all sides of the patient stretcher.
  • Multiple patient room: The clear floor area should be 200 sq ft (18.5 sq m) with curtains separating patient areas. Minimum clearance of 5 feet on all sides of the patient stretcher should be maintained.

The FGI “clear floor area” corresponds to my “Trauma Bay Working Area”, which is the area that excludes all the carts, cabinets, and countertops scattered about the usual trauma room. California’s guideline of 280 sq feet seems pretty reasonable as the “Trauma Bay Total Area”, if you can keep your wasted space down to about 30 sq feet.

Bottom line: Once again, don’t try to figure out everything from scratch. Somebody has probably already done it (designed a trauma bay, developed a practice guideline, etc). But remember, a generic guideline or even one developed for a specific institution may not completely fit your situation. In this case, the FGI guidelines say nothing about the trauma team size, which is a critical factor in space planning. Use the work of others as a springboard to jump start your own efforts at solving the problem.

Related posts:

Print Friendly, PDF & Email

The Lowly Blood Pressure Cuff: Is It Accurate?

Yesterday, I described how the typical automated oscillometric blood pressure cuff works. We rely on this workhorse piece of equipment for nearly all pressure determinations outside of the intensive care unit. So the obvious question is, “is it accurate?”

Interestingly, there are not very many good papers that have ever looked at this! However, this simple question was addressed by a group at Harvard back in 2013. This study utilized an extensive ICU database from 7 ICUs at the Beth Israel Deaconess Medical Center. Seven years of data were analyzed, including minute by minute blood pressure readings in patients with both automated cuffs and indwelling arterial lines. Arterial line pressures were considered to be the “gold standard.”

Here are the factoids:

  • Over 27,000 pairs of simultaneously recorded cuff and arterial line measurements from 852 patients were analyzed
  • The cuff underestimated art line SBP for pressures at or above 95 torr
  • The cuff overestimated SBO for pressures below 95 torr (!)
  • Patients in profound shock (SBP < 60) had a cuff reading 10 torr higher
  • Mean arterial pressure was reasonably accurate in hypotensive patients

sbp-cuff-v-aline

Bottom line: The good, old-fashioned automated blood pressure cuff is fine for patients with normal pressures or better. In fact, it tends to understimate the SBP the higher it is, which is fine. However, it overestimates the SBP in hypotensive patients. This can be dangerous! 

You may look at that SBP of 90 and say to yourself, “that’s not too bad.” But really it might be 80. Would that change your mind? Don’t get suckered into thinking that this mainstay of medical care is perfect! And consider peeking at the mean arterial pressure from time to time. That may give you a more accurate picture of where the patient really is from a pressure standpoint.

Related posts:

Reference: Methods of blood pressure measurement in the ICU. Crit Care Med Journal, 41(1): 34-40, 2013.

Print Friendly, PDF & Email

How Does It Work? The Lowly Blood Pressure Cuff

The blood pressure cuff is one of those devices trauma professionals don’t give a second thought to. Old timers like me remember using the cuff with a sphygmomanometer and stethoscope to get manual blood pressures. I’ve had to do this twice in recent months on airplanes, and I had forgotten how much work this is.

But technology makes things easier for us. Now you just slap a cuff on the arm (or wrist), push a button, and voila! You’ve got the pressure.

But have you stopped to think about how this actually works? Why don’t we need the stethoscope any more? Here’s the scoop:

When you take a manual blood pressure, the cuff is inflated until a pulse can no longer be auscultated with the stethoscope. The pressure is slowly released using a little thumb wheel while listening for the pulse again. The pressure at which it is first audible is the systolic, and the pressure at which it softens and fades away is the diastolic.

The automatic blood pressure device consists of a cuff, tubing that connects it to the monitor, a pressure transducer in line with the tubing, a mini air pump, and a small computer. The transducer replaces the analog pressure gauge, and the pump and computer replace the human.

The transducer can “see” through the tubing and into the cuff. It is very sensitive to pressure and pressure changes. The computer directs the pump to inflate to about 20 torr above the point where pulsations in the air column cease. It then releases the pressure at about 4 torr per second, “feeling” for air column vibrations to start. Using a manufacturer specific computer algorithm, the mean arterial pressure is measured. A little more proprietary calculation results in an estimated systolic and diastolic pressure.

bpcuff

Piece of cake! But here’s the question: is it accurate? Tomorrow, I’ll write about how the automated cuff compares to an indwelling arterial line.

Related post:

Print Friendly, PDF & Email