Tag Archives: REBOA

REBOA Part 3a: How Do You Do It?

First off, this is 2-person procedure, minimum. It is possible with just one, but it’s a hell of a ride that way.

Also note that the technology continues to evolve. Earlier versions of his catheter required a 12 Fr sheath in the artery, but newer models have reduced this to 7 Fr. Older systems used a separate wire, whereas the newest model has a fused wire and catheter construct.

There are six separate steps in the process. So let’s discuss them, one by one.

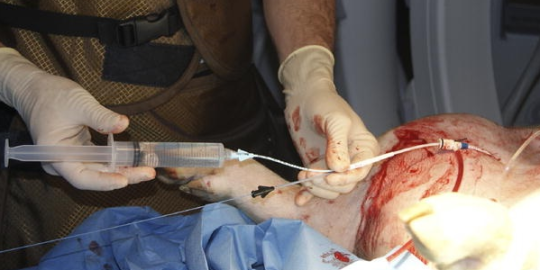
Step 1. Access the artery

Sounds simple, but there are a number of considerations in this step. The end result is that a guidewire must end up in a large artery somewhere. The common femoral artery (CFA) is the vessel of choice, as anything more distal will rupture during the next step.

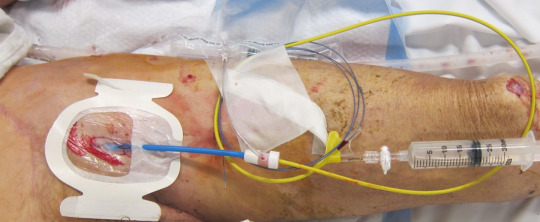
There are several ways to access the CFA. In some cases, a femoral arterial line may have already been inserted for other indications. Or maybe “just in case” REBOA might be needed. However, it’s important that the catheter is in the common femoral artery, not the superficial. This means that it must be inserted very close to the inguinal ligament.

If the patient still has vital signs, an arterial line may be inserted quickly, preferably with ultrasound guidance. However, if vitals have been lost, only a cutdown will assure rapid access to the artery.

Step 2. Insert and position the balloon.

First, make sure an x-ray unit is available, and position a plate underneath the patient’s body, from nipples downward. This is helpful for confirming positioning of the guidewire, if used. If not readily available, the wire and balloon can be marked based on external landmarks on the patient’s body.

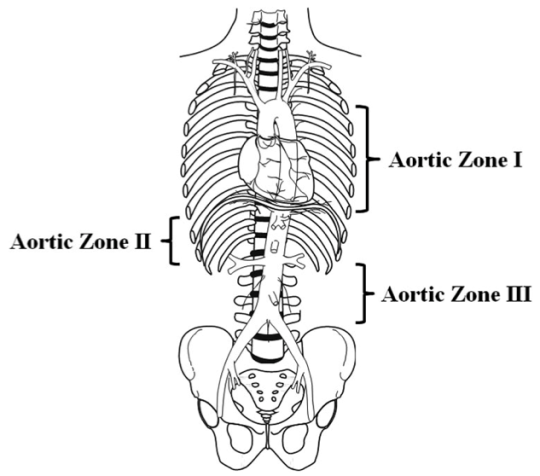
For external marking, hold the REBOA next to the patient. For Zone I mark the catheter measuring from the groin to the xiphoid. Zone III should be marked with the balloon just above the umbilicus.

Now convert the existing wire to the appropriate size sheath for the REBOA catheter using the manufacturer’s instructions. Insert the REBOA unit, again following the directions for a wired or wireless catheter. Smoothly insert until your catheter mark is at the level of your sheath. Lock everything into place.

image

Step 3: Inflate the balloon!

Whereas the previous steps only require some degree of technical skill, this one requires good judgment. The key is to get good occlusion without rupturing a vessel (the aorta!). This means inflating until you feel the pressure needed to add more volume start to increase disproportionately. Kind of like adjusting the cuff pressure on an endotracheal tube by feel.

I recommend inflating the balloon, not with plain saline, but saline with a bit of IV contrast mixed in. This allows you to verify balloon position using that x-ray unit and plate you so thoughtfully placed in the last step, or with fluoroscopy in the OR.

Tomorrow: Part 3b, more on how you do it.

Direct links to the REBOA series:

REBOA Part 2: Who Will Benefit?

First, I would like to state that REBOA is not for the faint of heart. Hmm, not a very good idiom. It actually might be, if you are the patient.

I say this because REBOA has a definite learning curve from a technical standpoint. But it does use standard trauma and vascular surgical techniques, which makes it a little easier to grasp. At this point, it should primarily be performed by surgeons, since it frequently creates a vascular injury that requires surgical repair at the end of the procedure. However, to be fair, emergency physicians can and do initiate the procedure here and in some countries outside the US, such as Japan. Terminating it is another matter.

From a patient selection standpoint, think of it as a way of keeping your patient alive until you can get them to the OR for definitive control of their hemorrhage. You are trading 5 to 10 more minutes in the trauma bay inserting it for a (potentially) safer trip to the OR suite, and lets the surgeons start the case with some modicum of vascular control already in place.

The abdomen is divided into 3 REBOA zones, depending on where the hemorrhage is located. Here’s the map:

image

For bleeding in the abdominal cavity, the REBOA balloon is placed in Zone I. For practical purposes, we try to occlude the distal aorta at the diaphragm, where we would normally place the crossclamp for an ED thoracotomy.

For pelvic bleeding, generally from branches of the iliac arteries, the balloon is placed in the distal aorta, Zone III. Zone II is not used currently.

So who will benefit from REBOA? The answers to this question are still being teased out of the small series that are being produced by a number of centers. The general rule is that any patient with exsanguinating hemorrhage originating below the diaphragm should be considered for this procedure.

Does that mean all patients? Patients who still have vital signs? How good or bad do they need to be? Unfortunately, we don’t know yet. But we are working on it.

Monday: How is REBOA performed?

Direct links to the REBOA series:

REBOA Part 1: What Is It?

Technically, REBOA is the acronym for Resuscitative Endovascular Balloon Occlusion of the Aorta. It is a relatively new tool in our armamentarium for use in patients with uncontrolled hemorrhage. Essentially, it allows the surgeon to crossclamp the aorta at just about any level, without opening the chest or abdomen.

But as with anything new, it is usually derived from something old. And REBOA is no exception. Case reports surfaced in the Korean war, and continued through the 1980s. The technique was then adopted by vascular surgeons and used for controlling hemorrhage above a ruptured abdominal aortic aneurysm. As with most major trauma “discoveries”, military conflict also tends to foster the development of new and the refinement of existing techniques.

The early part of this decade was actually the heyday for animal testing of this technique. Numerous pigs were sacrificed in order to show that 1) it could be done relatively safely, 2) it definitely increased blood flow to the brain and heart, and 3) it decreased mortality. Finally, the technique was shown to have similar effects and outcomes to pig thoracotomy with cross-clamping.

image

The first small human series was published just a year ago, so our experience is relatively short and limited to small series. But it continues to grow steadily, and more and more trauma centers are beginning to dabble with the technique.

Tomorrow: Who would benefit from REBOA?

Direct links to the REBOA series:

Everything You Always Wanted To Know About: REBOA!

REBOA has become one of the hot topics that everyone seems to be talking about (and writing about). As with any hot new trend, it’s important to understand the facts, as much as they’ve been worked out. The enthusiasts are, by definition, always very enthusiastic, and sometimes the hype overshadows the reality.

During the next week, I’m going to methodically make my way through the basics, like what it is, how we came up with the idea, and what it entails. Then I’ll look through the literature as we know it. Finally, I’ll try to put it all together and make some recommendations about what you should be doing with it.

Tune in, starting Tomorrow!

Direct links to the REBOA series:

Trauma MedEd Newsletter: REBOA!

The March newsletter is now available! Click the link below to download. 

The newest, hottest thing these days seems to be REBOA. Curious? This issue explores the things you always wanted to know about it.

In this issue you’ll find articles on:

  • What Is REBOA?
  • Who is REBOA For?
  • How Is REBOA Performed?
  • What Are The Results For REBOA?
  • What’s The Bottom Line?

Subscribers received the newsletter last Sunday . If you want to subscribe to get early delivery in the future (and download back issues), click here.

Click here to download newsletter.