Tag Archives: chest tube

Managing Chest Tube Air Leaks

There are a lot of opinions and not so much literature on how to manage chest tube air leaks. Here is some practical advice on how to deal with this occasional problem.

Most air leaks are an alveolar-pleural fistula, representing a connection between a very small airspace and the pleura. This should not be confused with a bronchopleural fistula, which involves larger airways and is much more challenging to manage.

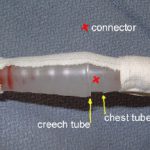
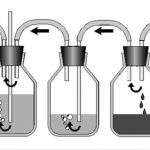
First, identify what kind of leak it is. Remember, dry seal chest tube systems will not show an air leak unless it has a fluid chamber that can be filled with water (see related post below).

  • Expiratory – occurs during normal expiration only
  • Forced expiratory – occurs only with coughing
  • Inspiratory – occurs during inspiration in ventilated patients
  • Continuous

Inspiratory leaks are rare and should be managed conservatively with maneuvers to minimize airway pressures. Continuous air leaks can be monitored, but may indicate a bronchopleural fistula.

Expiratory and forced expiratory types account for about 98% of all air leaks. Small air leaks should be managed with water seal, not with increased suction. The main concept is to reduce air flow through the fistula so it can heal. A prospective study has shown that this technique stops small to moderate size leaks sooner than leaving on suction.

Larger air leaks will probably not seal on their own and are probably not safe to place on water seal. They will likely require pleurodesis, either chemical or mechanical via a VATS procedure. Blood and fibrin patches have also been tried.

Any air leak that extends hospital stay should be evaluated for appropriateness of discharge with a Heimlich valve or VATS pleurodesis.

References:

  • A prospective algorithm for the management of air leaks after pulmonary resection. Ann Thoracic Surg 66:1726-1731, 1998.
  • Prospective randomized trial compares suction versus water seal for air leaks. Ann Thoracic Surg 71:1613-1617, 2001.

Related posts:

How To Troubleshoot Air Leaks in Chest Tube Systems

An air leak is a sure-fire reason to keep a chest tube in place. Fortunately, many air leaks are not from the patient’s chest, but from a plumbing problem. Here’s how to locate the leak.

To quickly localize the problem, take a sizable clamp (no mosquito clamps, please) and place it on the chest tube between the patient’s chest and the plastic connector that leads to the collection system. Watch the water seal chamber of the system as you do this. If the leak stops, it is coming from the patient or leaking in from the chest wall.

If the leak persists, clamp the soft Creech tubing between the plastic connector and the collection system itself. If the leak stops now, the connector is loose.

If it is still leaking, then the collection system is bad or has been knocked over.

Here are the remedies for each problem area:

  • Patient – Take the dressing down and look at the skin entry site. Does it gape, or is their obvious air hissing and entering the chest? If so, plug it with petrolatum gauze. If not, the air is actually coming out of your patient and you must wait it out.
  • Connector – Secure it with Ty-Rap fasteners or tape (see picture). This is a common problem area.
  • Collection system – The one-way valve system is not functioning, or the system has been knocked over. Click here for an example. Replace it immediately.

Note: If you are using a “dry seal” system (click here for more on this) you will not be able to tell if you have a leak until you fill the seal chamber with some water.

Pulmonary Edema After Chest Tube Insertion

Re-expansion pulmonary edema is an uncommon event after chest tube insertion. Typically, patients have had symptoms of pneumothorax for several days, usually 3 or more. It occurs most often if a large amount of air (or blood) is evacuated at once. The patient will typically become symptomatic within an hour, with decreased oxygen saturation and subjective breathing difficulty.

Although the mechanism is not entirely clear, it appears that the small blood vessels in the lung become more permeable if they are collapsed for an extended period. Mechanical stress from rapid re-expansion further damages the vessels, allowing them to leak. This leads to oxygenation and ventilation problems if severe. 

Practical tips:

  • Check the history. Most of these patients have had their pneumothorax for 3 or more days.
  • Check the xray. Complete pneumothorax (or large hemothorax) puts the patient at high risk.
  • Modify your chest tube insertion technique. Clamp the distal end of the tube so the pneumothorax is not evacuated suddenly as the tube goes in.
  • Modify the collection system. Do not use suction initially; only set up for water seal. Clamp the tubing on the patient side. Every 10-15 minutes release the clamp and briefly let some of the air out of the chest, then reclamp. Repeat this until all air has bubbled through the water seal chamber. 
  • Watch your patient. If they cough excessively, start to desaturate or become dyspneic, get your respiratory adjuncts. Give higher inspired oxygen by appropriate means, and consider BiPap or CPAP. In extreme cases intubation may be needed. If the patient does not have any difficulties after about an hour, connect the collection system to suction and proceed as you normally would.

Reference: Reexpansion pulmonary edema. Ann Thoracic Cardiovasc Surg 14:205-209, 2008.

Dry Seal Chest Tube Suction Systems

The original chest tube collection system traditionally consisted of three chambers. The picture above shows the classic three bottle system (which I actually remember using during residency). On the left is the suction control bottle that determines how much suction is applied to the patient. The middle bottle provides one way flow of air out of the patient, the so-called water seal bottle. Finally, the right bottle collects any fluid from the pleural space.

Collection systems used in hospitals are much more tidy than this, wrapping all three into one modular unit. However, if you look closely you can identify parts of the system that correspond to each of the bottles.

The problem with the older systems is that they typically require water in the “water-seal” chamber to maintain one-way flow out of the patient. If this chamber is compromised by knocking the system over (see this post), air may be able to enter the patient’s chest, giving them a big pneumothorax.

Management of chest tube collection systems by EMS is tough. It’s very easy to tip the system during air or ground ambulance runs, putting the patient at risk. Some manufacturers have developed so called “dry-seal” systems that use a mechanical one-way valve to avoid this problem.

I have not been able to use one of these systems yet. Here is my take on the pros and cons:

  • Pro – immune to tip-over and malfunction of the water-seal chamber
  • Con – more difficult to detect an air leak. Current models require either injection of a small quantity of water, tipping the system, or converting to a water-seal system.
  • Con – no literature regarding safety of this relatively new technology

Bottom line: Looks like a great idea to me, especially for EMS use. Once they get to the hospital, the unit can be changed to a water-seal system or a larger dry-seal system with the water injection port inthe dry-seal chamber.

When To Remove a Chest Tube

Chest tubes are needed occasionally to help manage chest injuries. How do you decide when they are ready for removal?

Unfortunately, the literature is not very helpful in answering this question. To come up with a uniform way of pulling them, our group looked at any existing literature and then filled in the blanks, negotiating criteria that we could all live with. We came up with the following.

Removal criteria:

  • No (or a minimal, stable) residual pneumothorax
  • No air leak
  • Less than 150cc drainage over the past 3 shifts. We do not use daily numbers, as it may delay the removal sequence. We have moved away from the “only pull tubes on the day shift” mentality. Once the criteria are met, we begin the removal sequence, even in the evening or at night.

Removal sequence:

  • Has the patient ever had an air leak? If so, they are placed on water seal for 6 hours and a followup AP or PA view chest x-ray is obtained. If no pneumothorax is seen, proceed to the next step.
  • Pull the tube. Click here to see a video demonstrating the proper technique.
  • Obtain a followup AP or PA view chest x-ray in 6 hours.
  • If no recurrent pneumothorax, send the patient home! (if appropriate)

Click here to download the full printed protocol.