Treating Bile Leaks After Liver Trauma

Nonoperative management is the standard of care for most solid organ injuries, including the liver. More serious injury may require operative intervention. Unlike the spleen, however, the liver has a higher complication rate when managed nonoperatively or operatively. One of the more troubling problems is the persistent bile leak. Our radiology colleagues do a great job a draining collections, but what should we do if the bile keeps pouring out?

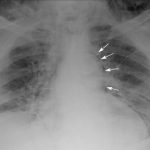
ERCP seems like a reasonable choice. But does it work? The Shock Trauma Center looked at their experience over a 6 year period. They included both blunt and penetrating injuries to the liver, and found a total of 26 patients in their database. All but 2 underwent an initial attempt at operative control of the bile leak. All but one had ERCP performed within 3 weeks of admission.

They found that ERCP resulted in decreased drain output within 2 days. All bile leaks stopped within 7 months, with an average closure time of 47 days. There were no complications from ERCP itself.

Bottom line: consider ERCP part of your armamentarium when dealing with major liver injuries. Depending on patient condition, it might even be used as the initial approach to controlling a bile leak. If the leak does not decrease significantly or close in a reasonable period of time (not yet defined), operative intervention will still be required.

Reference: Endoscopic retrograde cholangiopancreatography is an effective treatment for bile leak after severe liver trauma. J Trauma, in press, 2011.

What Next? An Inkjet Printer for Skin?

Everyone is familiar with inkjet printer technology. You’ve probably got one in your house for printing 2D page images from your computer. Engineers have already taken this one step further and created 3D printers that print objects from computer aided design (CAD) files. Instead of shooting tiny dots of ink from a cartridge, they squirt out tiny dots of molten plastic.

This same technology is poised to change the way we do things in medicine. James Yoo and colleagues from Wake Forest have designed a printer that can print skin. This unit has been redesigned from earlier versions and now uses a laser to scan the contours of the area to be grafted. It then prints a skin graft over the area using different layers of cells.

The Department of Defense is funding this work, which has amazing implications for the battlefield and for disaster areas. Imagine being able to print a skin graft onto a wounded soldier or civilian to reduce fluid loss and decrease infections. In these applications, cartridges of skin cells are more easily transported than freezers of cadaver skin. However, these grafts would be temporary, just like cadaver or pig skin, because the cells would be from unmatched donors. But ultimately, we should be able to prepare cartridges from our own cells for long lasting grafts.

The Wake Forest group is successfully printing 10x10cm grafts onto pigs right now. But think of the broader implications of this technology. Other groups are looking at using 3D printer technology to squirt a variety of cell types to create complete organs. This could eventually revolutionize transplant technology as we know it!

References

  1. In Situ Bioprinting of the Skin for Burns. Binder, Yoo et al. Presented at the American College of Surgeons Clinical Congress, October 5,2010, Washington DC.
  2. Presentation at the American Association for the Advancement of Science, February 16-20 2011, Vancouver BC, Canada.

Arms Up or Arms Down In Torso CT Scans?

CT scan is a valuable tool for initial screening and diagnosis of trauma patients. However, more attention is being paid to radiation exposure and dosing. Besides selecting patients carefully and striving for ALARA radiation dosing (as low as reasonably achievable) by adjusting technique, what else can be done? Obviously, shielding parts of the body that do not need imaging is simple and effective. But what about simply changing body position?

One simple item to consider is arm positioning in torso scanning. There are no consistent recommendations for use in trauma scanning. Patients with arm and shoulder injuries generally keep the affected upper extremity at their side. Radiologists prefer to have the arms up if possible to reduce scatter and provide clearer imaging.

A recently published article looked at arm positioning and its effect on radiation dose. A retrospective review of 690 patients used dose information computed by the CT software and displayed on the console. Radiation exposure was estimated using this data and was stratified by arm positioning. Even though there are some issues with study design, the results were impressive.

The dose results were as follows:

  • Both arms up: 19.2 mSv (p<0.0000001)
  • Left arm up: 22.5 mSv
  • Right arm up: 23.5 mSv
  • Arms down: 24.7 mSv

Bottom line: Do everything you can to reduce radiation exposure:

  1. Be selective with your imaging. Do you really need it?
  2. Work with your radiologists and physicists to use techniques that reduce dose yet retain image quality
  3. Shield everything that’s not being imaged.
  4. Think hard about getting CT scans in children
  5. Raise both arms up during torso scanning unless injuries preclude it.

Reference: Influence of arm positioning on radiation dose for whole body computed tomography in trauma patients. J Trauma 70(4):900-905, 2011.

Retained Foreign Objects After Penetrating Injury

Recently, a Chinese man was in the news after having a four inch knife blade removed from his head after four years. What is the best way to deal with a problem like this?

First, get in the habit of imaging any body part with a penetrating injury. Retained objects can be as simple as gravel or as complicated as the knife blade above. And remember, some patients who have been stabbed present with a simple laceration but don’t want to tell you how they got it. Image before you close it!

Next, don’t remove it. This is common knowledge, but innocent looking objects (pencils, nails) can penetrate arteries and keep them from bleeding while embedded. Unpleasant and sometimes fatal bleeding can ensue if pulled out.

If you do not have specialists versed in the body regions involved in the injury, transfer immediately with the object secured in place. For objects penetrating minimally complex areas like the extremities, surgeons may opt to carefully remove it in the emergency department, or may elect to do so in the operating room.

Injuries to complex areas should undergo high resolution CT scanning so that 3D reconstruction can be performed if needed. The surgical specialists can then plan the operative approach. This is dictated by the anatomy of the area(s) involved and the architecture of the object (think about hooks and barbs). For objects located near critical areas, an operative exposure must be selected that provides access to all portions of it, and allows for rapid vascular control if needed.

This patient had a knife blade break off after he had been stabbed under the chin. It remained partly within the nasopharynx and the tip came to rest behind his left eye. His symptoms included headaches, stuffy nose and bad breath. The picture below shows the badly corroded blade in front of some of his radiographic images.

Knife in head

Pneumomediastinum After Falling Down

Finding pneumomediastinum on a chest xray or CT scan always gets one’s attention. However, seeing this condition after a simple fall from standing is very simple to evaluate and manage.

There are 3 potential sources of gas in the mediastinum after trauma:

  • Esophagus
  • Trachea
  • Smaller airways / lung parenchyma

Blunt injury to the esophagus is extremely rare, and probably nonexistent after just falling down. Likewise, a tracheal injury from falling over is unheard of. Both of these injuries are far more common with penetrating trauma.

This leaves the lung and smaller airways within it to consider. They are, by far, the most common sources of pneumomediastinum. The most common pattern is that this injury causes a small pneumothorax, which dissects into the mediastinum over time. On occasion, the leak tracks along the visceral pleura and moves directly to the mediastinum.

Management is simple: a repeat chest xray after 6 hours is needed to show non-progression of any pneumothorax, occult or obvious. This image will usually show that the mediastinal air is diminishing as well. There is no need for the patient to be kept NPO or in bed. Monitor any subjective complaints and if all progresses as expected, they can be discharged after a very brief stay.

Home of the Trauma Professional's Blog

Do you want to get a daily email every time there’s a new post? See what I’m up to.

Click here to get details and subscribe!

[accua-form fid=”1″]

[mc4wp_form id=”2023″]