How To: Flexion / Extension Views of the Cervical Spine

Clearance of the cervical spine can often be done using clinical criteria alone (see this video at http://youtu.be/NhjF9kDOcjE). If this is not possible, a combination of radiologic and clinical evaluation is usually carried out. 

In some cases, radiographic studies (usually CT) are normal, but there is pain on clinical exam. Our next step is to send the patient to xray for flexion and extension views. This exam is performed by removing the collar while the patient is sitting, so the thoracic and lumbar spines must be clear before ordering this. The patient then gently flexes and extends the neck to their limits of comfort. Images are then obtained at the limits of flexion and extension. The premise is that a normal, awake patient cannot and will not move their neck beyond their comfort level to the point where they could cause themselves neurologic injury. 

It is very important that you look at the images yourself. The radiologist may review the images and will report that “there is no evidence of subluxation at the limits of flexion and extension.” But the patient may have barely moved their neck!

The question is: how much flexion and extension do you need to have to clear the spine?

The answer is not easy to find, and is buried in literature from the 1980s and 90s. According to the EAST guidelines, the ideal amount is 30 degrees from neutral for both flexion and extension. This is not always achievable in elderly patients, so in those cases you must use your judgment. Talk to the patient to find out if they stopped moving their neck forward or backward due to pain, or because they just can’t move it that far.

Trouble signs to look for are:

  • Subluxation of more that 2mm at any level
  • Angulation of more than 11 degrees

Any abnormality should prompt a spine consult.

If the study is not abnormal but the amount of flexion and/or extension is not adequate, there are two options. First, just leave the collar in place and try again in a week or so and try again. This will allow any soft tissue injuries to get better and may allow a successful repeat study. The alternative is a more costly and less well-tolerated MRI.

References:

  1. EAST Practice Guidelines, Identifying Cervical Spine Injuries Following Trauma – Update (2000).
  2. Defining radiographic criteria for flexion-extension studies of the cervical spine. Robert Knopp et al. Ann Emerg Med. 2001 Jul;38(1):31-5.

How To: Stop Scalp Bleeding

Bleeding from scalp wounds may seem like a trivial problem, but I have personally seen someone die from unrecognized hemorrhage over time from one. All too often, these are covered up with a crude dressing when the patient arrives in the ED and is not looked at for some time.

Here are some tips to stop scalp bleeding:

  • Use direct pressure. This seems obvious but is frequently done incorrectly. Direct pressure involves a small diameter piece of gauze (stack of 2x2s or double folded 4×4) and only one or two fingers. Larger dressings or the palm of the hand do not provide enough pressure to stop all the bleeding. Direct pressure for 5 minutes (no peeking) will stop all bleeding that doesn’t need more advanced techniques.
  • Inject local anesthetic with epinephrine. This increases vasoconstriction and helps the direct pressure work even better. Be cautious if there is a large skin flap that does not have a nice pink color. Degloved skin has been crushed and small vessel vascular injury has occurred. Further reducing blood flow with epinephrine may kill the skin flap in this type of injury.
  • Apply Raney clips. Neurosurgeons use these to stop scalp bleeding during brain procedures. Caution! Only apply to unconscious patients, and only to the scalp (not face)! These hurt!
    Raney clips
  • Oversew the scalp. Use a large silk or nylon suture and insert a large running stitch to close the wound. This will stop all bleeding from the skin edges. However, any arterial bleeders underneath will continue to be a problem.
  • Ligate individual bleeders. Use a small absorbable suture and attack each small arterial bleeder with a figure of 8 stitch. Don’t suture large chunks of tissue; make sure that you are attacking just the artery and not any adjacent nerves.

Pelvic Binder Orthosis vs Pelvic External Fixation

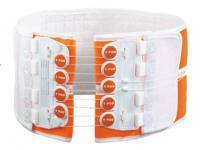
In the “old” days, the recommended management for an unstable pelvis was application of an external fixator. In some textbooks, it was even suggested that this should be done (by orthopedics) in the resuscitation room. High volume trauma centers with ortho residents could actually pull this off, but not many others.

As the idea of pelvic orthotic binders caught on (T-POD, sheeting, etc) and was adopted by prehospital providers, and then trauma teams, the use of initial external fixation dropped off. But the idea that external fixation was the most desirable or most effective lingered on. A study from Memphis finally sheds some light on the answer to this question.

A 10 year retrospective review was carried out on patients presenting with multiple or severe pelvic ring fractures who had early stabilization of the pelvis. Stabilization consisted of external fixation early on, and gradually shifted to pelvic orthotic devices over the study period. They ultimately analyzed outcomes for 93 patients in each treatment group.

The authors found that transfusion needs were dramatically reduced with the orthotic devices (5 units vs 17 units at 24 hours) compared to the orthotics. About a quarter of patients in each group went to angiography, and even in those patients the transfusion need remained lower in the orthotic device group. Hospital length of stay was also significantly shorter in this group (17 vs 24 days). There was no difference in mortality.

Bottom line: Although this is a small, retrospective study it easily showed significant results and will probably never be repeated. Use of a pelvic orthotic device (POD) resulted in less blood replacement and shorter stays in hospital. This technique is simple, cheap and quick, an ideal combination. But does a sheet count as an orthotic device? We don’t know. It’s really cheap, but probably a bit less controlled than a POD. If you have a real POD in your ED or your ambulance, use it. If not, apply the sheet as described below.

Reference: Emergent pelvic fixation in patients with exsanguinating pelvic fractures. JACS 204:935-942, 2007.

Trauma Patient Stability

EMS in the field and physicians in the ED are faced with rapidly assigning some degree of stability to the patients they treat. What exactly are the shades of stability, and what considerations are there for each degree?

In my mind, there are three levels of “stability”:

  • Unstable – this one is easy to figure out. The patient has obvious physiologic compromise, which may be objective (low blood pressure, low GCS or poor neuro exam, etc) or subjective (just plain looks bad). 
    EMS: These patients need transport to an appropriate level trauma center (I or II) immediately. If they need airway control or IV access that can’t be obtained in the field, stop at the nearest Level III or IV for assist, then continue on your way FAST. 
    ED: These patient must be a trauma activation. If not activated as your top-tier trauma, activate or upgrade now! These patients must be seen by a trauma surgeon immediately, and can only go to the OR. No diagnostics outside the resuscitation room are allowed unless they can be converted into one of the two stability levels below.
  • Stable – this one is usually easy to figure out, too. These patients look good, have good vitals, and a low to moderate energy mechanism for their trauma. Look out for those few patients that may be hiding something like moderate bleeding into some body cavity.
    EMS: Follow your usual transport protocols to select the closest, appropriate hospital.
    ED: Follow your standard protocols for trauma activation if needed. Transport for standard imaging is fine.
  •  Metastable – this is a term I invented. It describes patients who have evidence of ongoing volume loss that can be controlled with infusion of crystalloid and/or blood products. It is possible to maintain a certainly level of stability using higher than normal volume infusions. This allows physicians to consider diagnostics or interventions outside of an OR.
    EMS: Ensure adequate IV access and give fluids and/or blood per your local protocols. Transport to a Level I or II trauma center as quickly as possible.
    ED: Activate or upgrade to your highest level of trauma activation. The trauma surgeon needs to be present to help direct diagnostics or interventions. These patients may go to CT, IR or other appropriate areas with nurse and physician accompaniment to diagnose and possibly treat bleeding. If the patient changes to unstable at any point, they must immediately be taken to the OR.

Pop Quiz: The Answer!

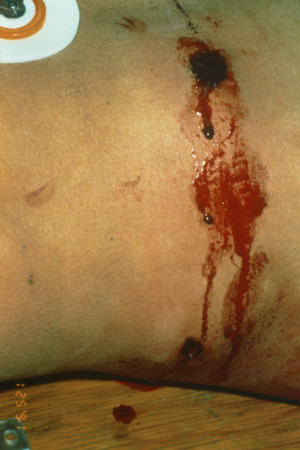
There were lots of interesting guesses regarding this photo! Some were very creative, and thought I might be throwing a curve ball. Alas, this was much more straightforward.

What you see is a pair of wounds located just at or slightly above the iliac crest on the right side. If you look carefully, you will see a powder burn around the anterior wound, indicating a close range gunshot. So this would appear to be a run of the mill gunshot to the abdomen; just run to the OR, right?

Not so fast! There are some nuances when dealing with this type of wound. The first things to look at are the vital signs. If they’re not stable, then there is major bleeding present and the patient needs to go to the OR now. Next, do a good exam. As always, stick to the ATLS protocol to make sure you’re not focusing on the abdomen and missing other significant findings. If the abdominal exam is abnormal (tenderness, peritoneal signs) there is either bleeding or contamination and once again it’s time to go to OR. About 98 times out of 100, that’s where you’ll be with a picture like this.

However, if you’ve gotten to this point with none of the above, there is the small possibility that this might be a tangential injury. The flanks (“love handles”) tend to be fairly fatty in some men, especially the obese. And since most civilian gunshots are low velocity, there is less likelihood of deeper injury from blast effect. Local wound exploration is tough in this area due to the amount of fat and the deeper musculature. 

My preferred method for evaluating this (rare) type of patient is a quick CT scan of the abdomen and pelvis. The pelvic part is important, because you are looking for obvious penetration and blood in the pelvis. If you see either, it’s time to head to the OR. Very rarely (on the right side) you may see a contusion or superficial laceration of the liver, meaning that there was penetration. However, if there is no possible way the bowel was injured, it is acceptable to closely observe the patient.

Oh, and the board? Back in the day before everything was made of plastic, they actually made backboards out of fairly nice wood!

Home of the Trauma Professional's Blog

Do you want to get a daily email every time there’s a new post? See what I’m up to.

Click here to get details and subscribe!

[accua-form fid=”1″]

[mc4wp_form id=”2023″]