All posts by The Trauma Pro

What The Heck? CT Imaging Problem: The Answer

I received some good guesses about this image yesterday, but no one got the right answer.

The patient had sustained blunt trauma and was undergoing CT imaging. The scout for the abdominal CT showed some kind of weird debris that interfered with the image, but when we uncovered and looked at the patient, nothing was visible:

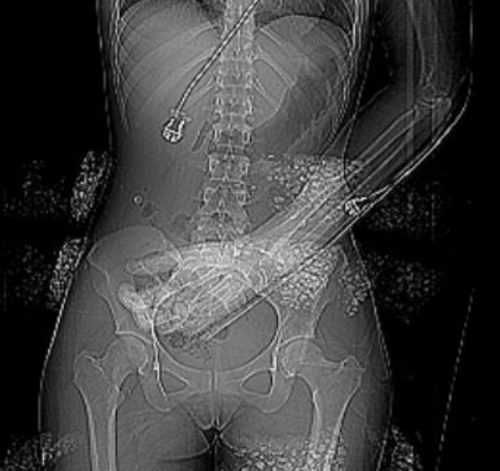
What the heck? If you look carefully at the left side of the image, you can see that the “debris field” is on the surface of the patient. We can’t see in 3-D on images, but the difference in appearance on the left and right sides looks like it this stuff is wrapping around the patient.

She was brought in by EMS with a warming blanket in place. On closer inspection, this was a thin, disposable blanket that heats up when removed from an airtight plastic pouch. These blankets contain thin pockets of a mineral mixture that looks like gravel. When exposed to air it heats up.

But on CT it looks like bone density material! When we looked at the patient, we were just lifting off the blanket that contained the offending material. Hence, we couldn’t find it.

Here’s a picture of one of these products. Note the six mineral pouches embedded in it., Don’t let this happen to you!


What The Heck? CT Imaging Problem

Here’s one for you. A patient is brought to you after a motor vehicle crash. You’ve completed your evaluation in the trauma resuscitation room, and you move off to CT for some imaging.

As the techs are preparing to do the abdominal CT, they perform the scout image to set up the study. This is what you see:

The arm was left down due to a fracture (note the splint along the forearm). But what is all that debris on the image? Other than a few abrasions here and there, nothing is visible on the skin in those areas.

What the heck? What do you think these are? Will they interfere with imaging? And what can you do about it?

Tweet or comment with your answers. I will explain all tomorrow.

The July Trauma MedEd Newsletter Is Coming Soon: The Receiving Trauma Center

I’m going to send out the next edition of the Trauma MedEd newsletter over the holiday weekend. This is a follow-on newsletter to the previous one on hospitals that have to transfer patients out to other trauma centers. The emphasis in this one is on the receiving trauma center.

Here are some of the topics:

  • CT scans: to repeat or not
  • Reducing radiation exposure
  • Radiologist reinterpretation of imaging from referring hospitals
  • Providing feedback to your referring hospitals
  • And more!

And I’ll provide a Word document of a sample feedback form that you can adapt to your needs.

As always, this issue will go to all of my subscribers first. If you are not yet one of them, click this link to sign up and/or download back issues.

Unfortunately, non-subscribers will have to wait until I release the issue on this blog, about 10 days later. So sign up now!

Practical Tip: Making Sure The Last Chest Tube Hole Is In The Chest

I recently wrote about how the completion chest x-ray can lie after insertion of a chest tube. The chest x-ray image is a 2-D representation of the patient, but you really can’t tell where the tube lies in the third dimension (front to back). That’s how a trauma professional can get suckered into thinking they just put a perfect chest tube in, when in reality they have not.

How can you be sure of the position as you are putting it in? It’s a nuisance to have to reposition it after you’ve taken down your sterile field. Here are a few suggestions, but pay particular attention to the last one. I think it’s the best.

  • Make the incision large enough so that you can visually confirm that the last hole is inside the thoracic cavity. This option is somewhat okay for thinner patients. But it leads to a larger than necessary incision, especially in patients who are obese. Not a great idea.
  • Estimate proper depth before insertion.  Hold the tube over the patient’s chest, and note the distance mark printed on the tube when the tip is placed halfway across the hemithorax (just medial to the nipple). This does take into account the amount of soft tissue on the lateral chest, but is not terribly accurate and you may accidentally contaminate the tube. The usual depth for a patient with normal body habitus is 12-14 cm at the skin. A better choice.
  • Use the “bamboo flute” technique. Once you have entered the pleural space and placed the end of the tube into it, locate and place your finger firmly over the last hole, like you were playing a flute. Keep it there as you slide the tube in until your finger contacts the ribs around the insertion point. It should be at a right angle to the chest wall. Then push it in another 2-4 cm. As long as you have performed a nice dissection down to the chest wall, this technique is close to foolproof. And double-check by making sure that the tube is at least 12-14 cm at the skin. IMHO, this is the best technique.

This is not a chest tube!

Related posts:

Tongue Piercings And Emergency Intubation

Urgent and emergent intubation is challenging enough, but what if your patient is sporting some type of tongue piercing? Does it make a difference? Do you need to do anything differently?

Obviously, the jewelry may physically impede the process of intubating the patient, impairing visualization of structures or getting in the way of inserting the tube. It can also cause complications later down the road, such as pressure necrosis from the tube coming into contact with it.

The anesthesia literature recommends removing all oral jewelry prior to elective intubation, or declining to do the case if the patient refuses. Unfortunately, trauma professionals do not have that option when the patient needs an emergency airway.

Here are some pointers for dealing with oral jewlry:

  • Is the item going to impede insertion of the airway? Is it large, or obstructing the usual tube pathway? If so, remove it quickly (see below).
  • Sweep the tongue well to the side during tube insertion to avoid the jewelry. You may need an assistant to grasp it with gauze to keep it out of the way.
  • Once the airway is secured, remove the item. This takes two people! The ET tube should be moved to the side, and one person will grasp the tongue with a gauze pad and extend it. The other person can then grasp the jewelry with gloved fingers, and unscrew the ball on one side. It can then be removed and saved in an envelope.

Note: both hands must always be in contact with the jewelry at all times! It is slippery, and if the pieces are not controlled, this can happen!

Sharp stud foreign body in the bowel from tongue piercing that came apart and was swallowed (arrow). Images courtesy of Intermountain Medical Imaging, Boise, Idaho.