Tag Archives: policy

MRI And External Fixators

MRI is an indispensable tool for evaluation of spine and soft tissue trauma. However, a great deal of effort was be made to ensure that any patient scheduled for this test is “MRI compatible.” The fear is that any retained metallic fragments may move or heat up once the magnets are activated.

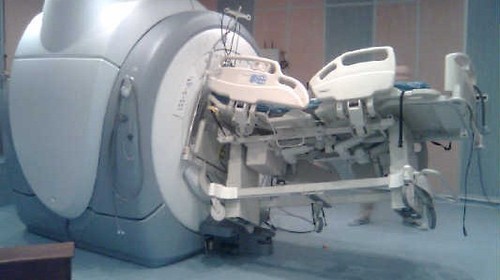
But what about trauma patients with external fixators? That is one big hunk of metal that is inserted deep into your patient. There are three major concerns:

  • Is the material ferromagnetic? If so, it will move when the magnets are activated and may cause internal injury. These days, there are many fixator sets that are not ferromagnetic, avoiding this problem.
  • Can currents be induced in the material, causing heating? This is not much of a problem for small, isolated objects. However, external fixators are configured in such a way that loops are created. The fluctuating magnetic fields can induce currents that in turn will heat the surrounding tissue. And thinner materials (narrow pins) result in more current and more heating.
  • Will the metal degrade image quality?

The biggest challenge is that there is no standard ex-fix configuration. Our orthopaedic colleagues get to unleash their creativity trying to devise the appropriate architecture to hold bones together so they can heal properly. This makes it difficult to develop standardized guidelines regarding what can and can’t go into the scanner.

However, there is a growing body of literature showing that the heating effects are relatively small, and get smaller as the distance from the magnet increases. And non-ferromagnetic materials move very little, if at all, and do not interfere with the image. So as long as nonferromagnetic materials are used, the patients are probably safe as long as basic principles are adhered to:

  • Other diagnostic options should be exhausted prior to using MRI.
  • Informed consent must be obtained, explaining that the potential risks are not completely understood.
  • The fixator must be tested with a handheld magnet so that all ferromagnetic components can be identified and removed.
  • All traction bows must be removed.
  • Ice bags are placed at all skin-pin interfaces.
  • The external fixator must remain at least 7cm outside the bore at all times.

Bottom line: MRI of patients with external fixators can be safely accomplished. Consult your radiologists and physicists to develop a policy that is specific to the scanners used at your hospital. 

Related posts:

Warm Water Immersion Policy for Hypothermia

A few days ago, I wrote about using a therapy tank for immersion to rapidly rewarm patients (click here to read it). Since this type of management usually means moving out of the ED to a separate patient care are, it is important to have a policy that spells out responsibilities for all personnel involved. 

Click here or click the image above to download a copy of the Regions Hospital Trauma Program policy.

Nursing Policy: Cervical Spine Immobilization

The following is a sample nursing policy for c-spine immobilization.

Purpose: 

To outline the procedure for applying immobilizing the upper spine, including application of a cervical collar and “boarding” the patient. 

Policy: 

Application of a cervical collar and placing the patient on a backboard may be indicated for trauma patients with mechanisms of injury that place the patient at risk for spinal injury. This will not be necessary for patients with all of the following:

  • no posterior midline cervical tenderness
  • no evidence of intoxication
  • normal level of alertness (GCS 15)
  • no focal neurological deficit
  • no painful distracting injuries
  1. The MD or RN will maintain manual stabilization of the cervical spine until cervical collar is applied and patient is placed on backboard.
    * talk to the patient and tell them what you are doing- and not to move their head and neck
  2. Place hands on both sides of patient’s head with thumbs along mandible and fingers holding back of head. 
  3. Assistants will help with the rest of the application of the cervical collar and backboard. 
  4. Perform a baseline CMS assessment of the extremities. 
  5. Remove jewelry from the neck and ears. 
  6. Choose an appropriately sized collar by measuring the distance (with fingers) between the top of the shoulder where the collar will rest and the chin. This same number of fingers will fit between the fastener on the collar and the bottom edge of the rigid plastic of the collar. 
  7. Cervical collar is assembled by snapping the fastener into the hole on the side of the collar 
  8. Adjustable rigid cervical collars are measured from the bottom edge of the rigid plastic to the red circle denoting the size of the collar (red circle will move up or down as size of the collar is adjusted) 
  9. Slide the back of the collar behind the right side of the neck until the Velcro tab is visible on the left side of the neck. 
  10. Slide the chin portion up the chest until the chin fits in the collar. 
  11. Secure the Velcro when the collar is on straight (nose, circle on chin portion of collar, and umbilicus are in alignment). 
  12. Place the patient on a slide board with all team members working in a smooth fashion which moves the patient’s spine as little as possible. Patients already in bed will be log rolled and slider board inserted.
    * Do not obtain a rectal temperature while the patient is turned unless the MD specifically requests this.
  13. Recheck CMS. 
  14. The MD or RN can now remove hands from head. 
  15. Document both CMS checks and procedure in patient’s record.