Category Archives: How to

Retained Foreign Objects After Penetrating Injury

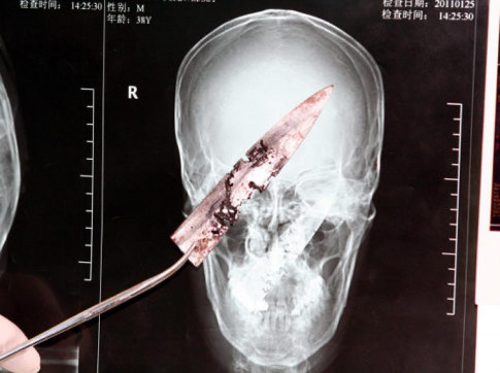
A Chinese man was in the news a few years back after having a four inch knife blade removed from his head. It had been there for four years!  The knife blade broke off after he had been stabbed under the chin. Unfortunately, he was unaware that any part of the knife had been retained. It remained partly within the nasopharynx and the tip came to rest behind his left eye. His symptoms included headaches, stuffy nose and bad breath. The picture below shows the badly corroded blade in front of some of his radiographic images.

See the video at the bottom of this post for more details and images.

knife-in-head

What is the best way to deal with a problem like this? Here are some practical tips:

First, get in the habit of imaging any body part with a penetrating injury. Retained objects can be as simple as gravel or as complicated as the knife blade above. And remember, some patients who have been stabbed present with a simple laceration but don’t want to tell you how they got it. Image before you close it!

Next, don’t remove it. This is common knowledge, but innocent looking objects (pencils, nails) can penetrate arteries and keep them from bleeding while embedded. Unpleasant and sometimes fatal bleeding can ensue if pulled out.

If you do not have specialists versed in the body regions involved in the injury, transfer immediately with the object secured in place. For objects penetrating minimally complex areas like the extremities, surgeons may opt to carefully remove it in the emergency department, or may elect to do so in the operating room.

Injuries to complex areas should undergo high resolution CT scanning so that 3D reconstruction can be performed if needed. The surgical specialists can then plan the operative approach. This is dictated by the anatomy of the area(s) involved and the architecture of the object (think about hooks and barbs). For objects located near critical areas, an operative exposure must be selected that provides access to all portions of it, and allows for rapid vascular control if needed.

YouTube player
Print Friendly, PDF & Email

How To: Secure An Endotracheal Tube To… Nothing!

Several decades ago I took care of a patient who posed an interesting challenge. He had been involved in an industrial explosion and had sustained severe trauma to his face. Although he was able to speak and breathe, he had a moderate amount of bleeding and was having some trouble keeping his airway clear.

Everyone frets about getting an airway in patients who have severe facial trauma. However, I find it’s usually easier because the bones and soft tissue move out of your way. Or are already gone. As long as you can keep ahead of the bleeding to see your landmarks, things will go fine.

In this case, the intubation was easy. The epiglottis was visible while standing above the patient’s head, so a laryngoscope was practically unnecessary! But now, how do we secure the tube so it won’t fall out? Sure, there are tube-tamer type securing devices available, but what if they are not available to you? Or this happened in the field? Or their face was missing or falling off? Or it was in the 1980’s and it hadn’t been invented, like this case?

The answer is, create your own “skin” to secure the tube. Take a Kerlix-type stretchable gauze roll and wrap it tightly around their face, and their head if needed. Remember, they are sedated already and they can breathe through the tube. This also serves to further slow any bleeding from soft tissue. Once you have “mummified” the head with the gauze roll, tape the tube in place like you normally would, using the surface of the gauze as the “skin.”

Be generous with the tape, because the tube is your patient’s life-line. Now it’s time for the surgeons to surgically stabilize this airway, usually by converting to a tracheostomy.

Print Friendly, PDF & Email

Percutaneous Tracheostomy Without The Bronchoscope

It’s always nice to find an article that supports your biases. I’ve been doing percutaneous tracheostomy since the 1990’s, and have used a variety of kits and equipment over the years. Some of these turned out to be rather barbaric, but the technique is now quite refined.

A routine part of the procedure involved passing a bronchoscope during the procedure to ensure that the initial needle was placed at the proper level and in the tracheal midline. It was also rather frightening to watch the trachea collapse when the dilators were inserted.

I abandoned using the bronchoscope in this procedure about 15 years ago. It was an annoyance to get the bronchoscope cart and a respiratory therapist to help run it. And to find someone available to pass the scope while I did the trach. So I added a little extra dissection to the technique, directly visualizing the trachea at the desired location. From then on, I had no need to see the puncture from the inside because I could see it quite well from the outside!

An article in the Journal of Trauma demonstrated that this technique works just as well without the scope. The authors looked at their own series of 243 procedures; 32% were done with the bronchoscope, 68% without. There were 16 complications overall, and the distribution between the bronch and no-bronch groups was equal.

Bottom line: In general, the bronchoscope is not needed in most percutaneous tracheostomy procedures. It adds complexity and expense. However, there are select cases where it can be helpful. Consider using it in patients in a Halo cervical immobilizer, the obese, or in patients with known difficult airway anatomy. And always do the more difficult ones in the OR, not the ICU.

Reference: Percutaneous tracheostomy: to bronch or not to bronch – that is the question. J Trauma 71(6):1553-1556, 2011.

Print Friendly, PDF & Email