All posts by The Trauma Pro

How To Craft A Clinical Practice Guideline

All US trauma centers verified by the American College of Surgeons are required to have clinical practice guidelines (CPG). Trauma centers around the world generally have them, but may not be required to by their designating authority. But don’t confuse a policy about clinical management, say for head injury, with a real CPG. Policies are generally broad statements about how you (are supposed to) do things, whereas a CPG is a specific set of rules you use when managing a specific patient problem.

  1. Look around; don’t reinvent the wheel! This is the first mistake nearly every center makes. It seems like most want to spend hours and hours combing through the literature, trying to synthesize it and come up with a CPG from scratch. Guess what? Hundreds of other centers have already done this! And many have posted theirs online for all to see and learn from. Take advantage of their generosity. Look at several. Find the one that comes closest to meeting your needs. Then “borrow” it.
  2. Review the newest literature. Any existing CPG should have been created using the most up to date literature at the time. But that could have been several years ago. Look for anything new (and significant) that may require a few tweaks to the existing CPG.
  3. Create your draft, customizing it to your hospital. Doing things exactly the same as another center doesn’t always make sense, and it may not be possible. Tweak the protocols to match your resources and local standards of care. But don’t stray too far off of what the literature tells you is right.
  4. Make sure it is actionable. It should not be a literature summary, or a bunch of wishy-washy statements saying you could do this or consider doing that. Your CPG should spell out exactly what to do and when. (see examples below)
  5. Create a concise flow diagram. The fewer boxes the better. This needs to be easy to follow and simple to understand. It must fit on one page!
  6. Get buy-in from all services involved. Don’t try to implement your CPG by fiat. Use your draft as a launching pad. Let everyone who will be involved with it have their say, and be prepared to make some minor modifications to get buy-in from as many people as possible.
  7. Educate everybody! Start a campaign to explain the rationale and details of your CPG to everyone: physicians, nurses, techs, etc. Give educational presentations. You don’t want the eventual implementation to surprise anyone. Your colleagues don’t like surprises and will be less likely to follow along.
  8. Roll it out. Create processes and a timeline to roll it out. Give everyone several months to get used to it.
  9. Now monitor it! It makes no sense to implement something that no one follows. Create a monitoring system using your PI program. Include it in your reports or dashboards so providers can see how they are doing. And if you really want participation, let providers see how they are doing compared to their colleagues. Everyone wants to be the top dog.

In my next post, I’ll pontificate a bit about guidelines vs protocols, and the difference between evidence-based vs evidence-informed.

Why Create Practice Guidelines?

Practice guidelines are everywhere. More and more organizations have developed processes to create high quality ones. But why should we care? Do they improve what we already do?

Here are my reasons for using practice guidelines:

  • They provide a consistent way of approaching a clinical issue. Everybody working with the patient knows how things will be done, so they don’t have to remember the nuances that particular doctors or providers like.
  • They (hopefully) use the best and most valid scientific data to address the care issue, thus giving trauma professionals the opportunity to provide the best care we know of.
  • They decrease errors and complications by narrowing the number of choices available to providers.
  • They decrease waste for the same reason. For example, drawing blood every 6 hours vs daily for solid organ injuries can add up to three unneeded tests every day.
  • They provide our trainees with one good way to deal with the clinical issue. This is important when they move on to independent practice, and sometimes when taking standardized tests (boards).

Bottom line: If 10 trauma professionals deal with a given clinical problem 10 different ways, then none of them are doing it right! Develop a guideline that all of them can live with, based on current literature (if any). That way they can all be right for once, and our patients will reap the benefits.

In my next post, I’ll describe how to craft a good practice guideline.

How To: The Serial Abdominal Exam

How often have you seen this in an admitting history and physical exam note? “Admit for observation; serial abdominal exams.” We say it so often it almost doesn’t mean anything. And during your training, did anyone really teach you how to do it? For most trauma professionals, I believe the answer is no.

Yet the serial abdominal exam is a key part of the management of many clinical issues, for both trauma patients as well as those with acute care surgical problems.

Here are the key points:

  • Establish a baseline. As an examiner, you need to be able to determine if your patient is getting worse. So you need to do an initial exam as a basis for comparisons.
  • Pay attention to analgesics. Make sure you know what was given last, and when. You do not need to withhold pain medications. They will reduce pain, but not eliminate it. You just need enough information to determine if the exam is getting worse with the same amount of medication on board.
  • Perform regular exams. It’s one thing to write down that serial exams will be done, but someone actually has to do them. How often? Consider how quickly your patient’s status could change, given the clinical possibilities you have in mind. In general, every 4 hours should be sufficient. Every shift is not. And be thorough!
  • Document, document, document. A new progress note should be written, dated and timed, every time you see your patient. Leave a detailed description of how the patient looks, vital signs, pertinent labs, and of course, exact details of the physical exam.
  • Practice good handoffs. Yes, we understand that you won’t be able to see the patient shift after shift. So when it’s time to handoff, bring the person relieving you and do the exam with them. You can describe the pertinent history, the exam to date, the analgesic history, and allow them to establish a baseline that matches yours. And of course, make sure they can contact you if there are any questions.

What Does A Retained Surgical Sponge Look Like?

Surgeons and surgical residents rarely see these. And because it’s so uncommon, they frequently don’t recognize the telltale findings on radiographic studies. The TSA runs into the same problem in screening passengers for weapons and other hazards at airports. But it’s the bane of any surgeon’s existence. And it’s a major reason why OR personnel take such great pains to account for everything in the room. It is a catastrophe, and always a preventable one, when some piece of equipment goes missing and ends up left inside a patient.

A number of methods have been developed to try to eliminate this problem. They include careful counts, having someone record anytime anything is placed inside, x-rays, and most recently, RFID tags.

After counting, x-ray is the most common way to try to find missing objects. One would think that these foreign bodies would be easy to see. Metallic instruments are rather easy to spot. But many trauma professionals, even those who work in the OR, have never seen what a positive image of a sponge actually looks like. So here they are. You should never miss one on an xray now.

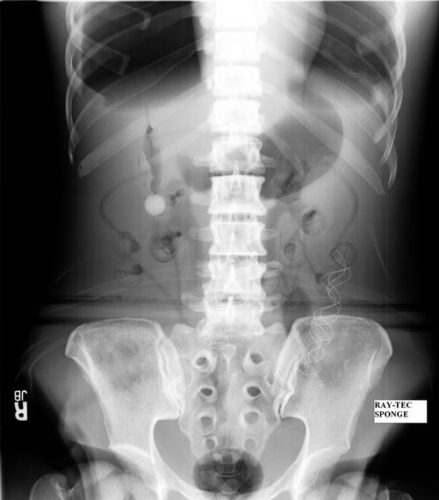
Surgeons typically use two types of sponges in the OR: Ray-Tec sponges and standard lap pads. Ray-Tecs look like a 4×8 piece of gauze with a mysterious blue string woven throughout it. The string is the only part that shows up on x-ray, and it is very thin and somewhat hard to see. Here are some Ray-Tec sponges outside the body:

And here’s one that was left inside. Note the little squiggle in the left lower quadrant and how easy it is to overlook.

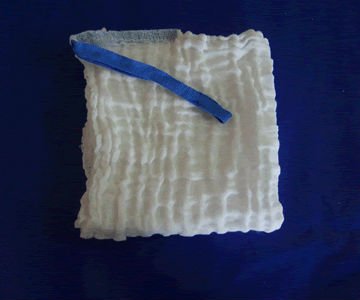
On the other hand, a laparotomy pad is a 4×4 folded cloth pad that unfolds into a larger pad. It has a blue radiopaque tag sewn in the corner, extending along one edge of the pad. Here’s what they look like outside the body:

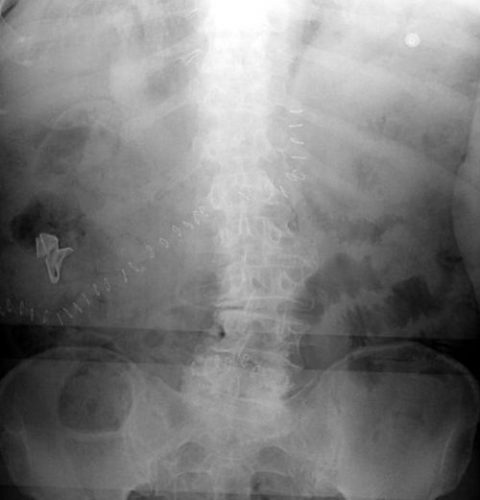
And here’s one inside a patient. Note the irregular object in the right upper quadrant. Many times the tag is scrunched up and doesn’t look like one.

Bottom line: It’s important for anyone who works in the OR on any body part to be familiar with the appearance of these tags on x-rays. Since it’s generally impossible to get accurate counts before or after a trauma procedure, always image the involved body cavity looking for these telltale signs before closing the patient.

Note: These images  were taken from the internet. Patients were not treated at Regions Hospital.

Thoughts On Traumatic Hematuria: Part 2

Yesterday, I discussed blood in the urine from a urethra. As I mentioned, there is typically not much from that particular injury. Today, I’ll dig into the three causes of real hematuria.

All of these tubes show gross hematuria except the one on the right.

  • Bladder injury. This can occur with either blunt or penetrating injury. The degree of hematuria is variable with stabs or gunshots, but tends to be much darker in blunt injury. This happens because the size of the bladder injury tends to be greater with blunt force. The bladder injury is not necessarily full-thickness with blunt trauma. It may just be some wall contusion and underlying mucosal injury. But frequently, with seat belt injury and/or A-P compression injuries to the pelvis (“open book”), the injury is full thickness.
    • Tip: If less than 50cc of very dark urine flow from the catheter upon insertion, it is likely that your patient has an intraperitoneal bladder rupture!
  • Ureteral injury. This injury is very rare. The most common mechanism is penetrating, but this structure is so small and deep that it seldom gets hit by naything. Patients with multiple lumbar transverse process fractures will occasionally have a small amount of hematuria, probably from a minor contusion. More often than not, the hematuria is microscopic, so we should never know about it.
  • Kidney injury. The most important fact regarding renal injury is that the degree of injury has no correlation with the amount of hematuria. The most devastating injury, a devascularized kidney, frequently has little if any gross hematuria. And conversely, a very minor contusion can produce very red urine.

So what about diagnosis? It’s easy! If you see gross hematuria, insert a foley catheter (if not already done) and order a CT of the abdomen/pelvis with contrast, as well as a CT cystogram. The latter must not be done using passive filling of the bladder with a clamped catheter. Contrast must be infused into the bladder under pressure to ensure a bladder injury can be identified.

CT scan is an excellent tool for defining injuries to kidney, ureter, and bladder, and will identify extravasation into specific places and allow grading. Specific management will be the topic of future posts.