All posts by The Trauma Pro

CT Contrast Via Intraosseous Catheter

The standard of care in vascular access in trauma patients is the intravenous route. Unfortunately, not all patients have veins that can be quickly accessed by prehospital providers. Introduction of the intraosseous device (IO) has made vascular access in the field much more achievable. And it appears that most fluids and medications can be administered via this route. But what about iodinated contrast agents via IO for CT scanning?

Physicians at Henry Ford Hospital in Detroit published a case report on the use of this route for contrast administration. They treated a pedestrian struck by a car with a lack of IV access sites by IO insertion in the proximal humerus, which took about 30 seconds. They then intubated using rapid sequence induction, with drugs injected through the IO device. They performed full CT scanning using contrast injected through the site using a power injector. Images were excellent, and ultimately the patient received an internal jugular catheter using ultrasound. The IO line was then discontinued.

This paper suggests that the IO line can be used as access for injection of CT contrast if no IV sites are available. Although it is a single human case, a fair amount of studies have been done on animals (goats?). The animal studies show that power injection works adequately with excellent flow rates.

The authors prefer using an IO placement site in the proximal humerus. This does seem to cause a bit more pain, and takes a little practice. A small xylocaine flush can be administered to reduce injection discomfort in awake patients. Additionally, the arm cannot be raised over the head for the torso portion of the scan.

Bottom line: CT contrast can be injected into an intraosseous line (IO) with excellent imaging results. Insert the IO in a site that you are comfortable with. I do not recommend power injection at this time. Although the marrow cavity can support it, the connecting tubing may not. Have your radiologist hand-inject and time the scan accordingly. And don’t be surprised if your radiology department doesn’t have a protocol for this!

Note: long term effects of iodinated contrast in the bone marrow are not known. For this reason, and because of smaller marrow cavities, this technique is not suitable for pediatric patients.

Related posts:

Reference: Intraosseous injection of iodinated computed tomography contrast agent in an adult blunt trauma patient. Annals Emerg Med 57(4):382-386, 2011.

How To: Manage Extraperitoneal Bladder Rupture

Extraperitoneal bladder rupture is a relatively uncommon injury, but is easily managed in most cases. It is associated with a blunt mechanism, and concomitant fracture of the pubic rami or spreading of the symphysis pubis is nearly always present. In the old days, we used to think that the bladder injury was due to penetration anteriorly by bony fragments, but this is probably an old wives tale. It’s more likely due to hydraulic forces occurring within the bladder at the same time the pelvic ring is being deformed or spread apart by blunt forces.

If you obtain a pelvic x-ray during the initial trauma evaluation and see any fractures or diastasis around the symphysis, think bladder injury. Placement of a urinary catheter will typically drain plenty of urine, which will usually be grossly bloody.

Once the injury is suspected, the diagnostic test of choice is a CT cystogram. Don’t confuse this with the images seen when the bladder passively fills with contrast when the catheter is clamped. There is not enough pressure in the bladder to guarantee that contrast will leak out, so this type of study may be falsely negative.

True CT cystogram technique requires filling the bladder with at least 350cc of dilute contrast under pressure by hanging it on an IV pole, then clamping the catheter. Once the bladder is filled, the scan can proceed as usual. But after it is complete, a second limited scan through the pelvis must be performed after the contrast has been evacuated by unclamping the catheter. This allows visualization of small contrast leaks that might otherwise be masked by all the contrast in the bladder.

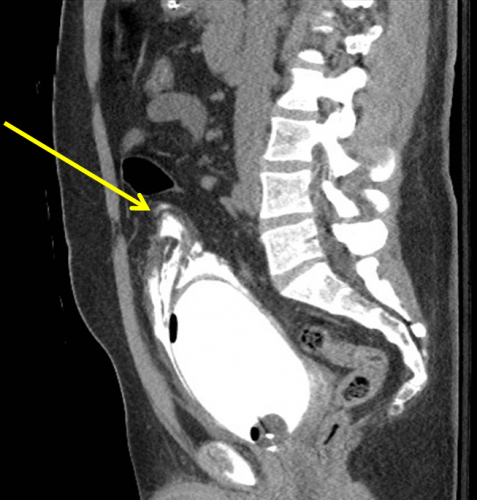
Here’s a nice sagittal image of an extraperitoneal injury from radiologypics.com:

Note how the contrast dissects around the bladder but does not enter the peritoneal cavity.

Extraperitoneal injuries usually do not require repair and will heal on their own. However, if the symphysis pubis needs instrumentation to restore anatomic position, concomitant repair of the bladder is frequently necessary to keep the hardware from being contaminated by urine.

Bottom line:

  • Suspect an extraperitoneal bladder injury in anyone with bony injuries involving the symphysis pubis.
  • Don’t order a urinalysis in trauma patients!
  • Use CT cystogram technique to make the diagnosis.
  • Treatment is simple: leave the urinary catheter in place for 10 days. No urology consult is needed.
  • Then repeat the CT cystogram to confirm healing, and remove the catheter.

Related posts:

ABI vs API For Vascular Trauma

In general, the first maneuver in evaluating for possible vascular injury in an extremity is the good old physical exam. Is there a pulse or isn’t there? You can then subdivide that into: is the pulse weaker than normal. The problem is, what is “normal?” In most cases, we just compare it to another pulse somewhere and make a subjective judgment.

But we love to be more objective about things. Over the years, two simple, noninvasive techniques for evaluating pulses have been developed. The first is the ankle brachial index (ABI) , which was first described in 1930 and was used for diagnosis of peripheral vascular disease in 1950. It is performed by dividing the systolic pressure at the ankle of the affected extremity by the systolic pressure of one of the brachial arteries in the arms.

The new(er) kid on the block is the arterial pressure index (API), first described in 1991. This value is calculated by dividing the systolic pressure in the affected extremity by the systolic pressure in the contralateral uninjured extremity.

Many trauma professionals use the ABI when evaluating for potential vascular trauma. The typical threshold for pursuing further evaluation is 0.9, and several papers have been published on this topic. The API has also been critically evaluated, and the same threshold is used.

However, I believe that the API is more relevant and accurate than ABI. Why? Patients with atherosclerotic disease typically manifest it in their lower extremities. This serves to falsely elevate the ABI to a value greater than 1.0. It becomes more difficult to get down to that critical value of 0.9 that might indicate a vascular injury. Thus, the ABI may not detect a true injury, especially one in the lower extremities.

The API, on the other hand, relies on the fact that the amount of atherosclerotic disease is usually symmetric between the two lower extremities or the two upper extremities. Thus, the value will not be falsely elevated and will more accurately reflect the presence or absence of a vascular injury.

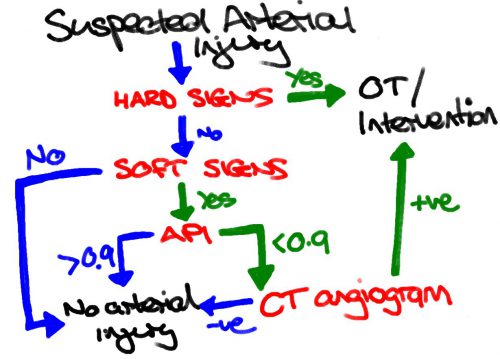
Bottom line: I recommend that you use the API when evaluating extremity vascular injury. Calculate the ratio by dividing the systolic pressure in the injured extremity with the pressure in the contralateral uninjured extremity (if there is one). A value < 0.9 indicates the need for angiographic evaluation, usually by CT scan.

And here’s a nice algorithm for managing peripheral vascular trauma from Life in the Fastlane:

Reference: Can Doppler Pressure Measurement Replace “Exclusion” Arteriography in the Diagnosis of Occult Extremity Arterial Trauma? Ann Surg 214(6):737-741, 1991.

Don’t Repeat Trauma Activation X-rays!!

You are in the middle of a fast-paced trauma activation. The patient is awake, and mostly cooperative. The x-ray plate is under the patient and everyone stands back as the tech gets ready to fire the x-ray machine. At that very moment, your patient reaches up and places his hand on his chest. Or one of the nurses reaches over to check an IV site.

The x-ray tech swears, and offers to re-shoot the image. What do you do? Is it really ruined? They have an extra plate in hand and are ready to slide it under the patient bed.

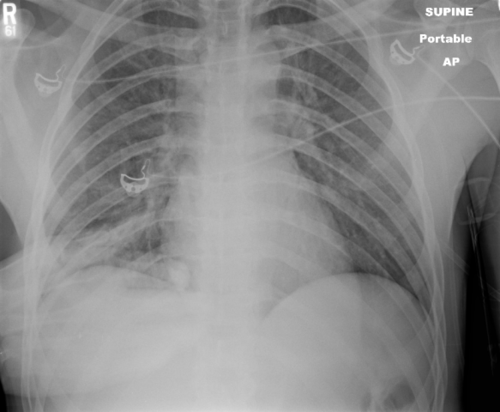
The decision tree on this one is very simple. There are two factors in play: what do you need to see, and how hard is it to see? The natural reaction is to discard the original image and immediately get a new one. It’s so easy! Plus, the techs will take heat from the radiologist because of the suboptimal image. But take a look at this example of a “ruined” chest xray.

It’s just the patient’s hand! You can still see everything that you really need to.

Bottom line: You are looking for 2 main things on the chest x-ray: big air and big blood. Only those will change your management in the trauma bay. And they are very easy to see. Couple that with the fact that an arm overlying the image does not add a lot of “noise” to the image. So look at the processed image first. 99% of the time, you can see what you need, and will almost never have to repeat. [Hint: the same holds true for the pelvic x-ray, too. You are mainly looking for significant bony displacements, which are also easy to see.]

Related posts: