All posts by The Trauma Pro

The Tertiary Survey for Trauma

Major trauma victims are evaluated by a team to rapidly identify life and limb threatening injuries. This is accomplished during the primary and secondary surveys done in the ED. The ATLS course states that it is more important for the team to identify that the patient has a problem (e.g. significant abdominal pain) than the exact diagnosis (spleen laceration). However, once the patient is ready for admission to the trauma center, it is desirable to know all the diagnoses.

This is harder than it sounds. Physical examination tends to direct diagnostic testing, and some patients may not be feeling pain, or be awake enough to complain of it. Injuries that are painful enough may distract the patient’s attention away from other significant injuries. Overall, somewhere between 7-13% of patients have injuries that are missed during the initial evaluation.

A well-designed tertiary survey helps identify these occult injuries before they are truly “missed.” This survey consists of a structured and comprehensive re-examination that takes place within 48-72 hours, and includes a review of every diagnostic study performed. Ideally, it should be carried out by two people: one familiar with the patient, and the other not. It is desirable that the examiners have some experience with trauma (sorry, medical students).

The patients at highest risk for a missed injury are those with severe injuries (ISS>15) and/or impaired mental status (GCS<15). These patients are more likely to be unable to participate in their exam, so a few injuries may still go undetected despite a good exam.

I recommend that any patient who triggers a trauma team activation should receive a tertiary survey. Those who have an ISS>15 should also undergo the survey. Good documentation is essential, so an easy to use form should be used. Click here to get a copy of our original paper form. We have changed over to an electronic record, and have created a dot phrase template, which you can download here.

Tomorrow: Does the tertiary survey actually work?

Detecting Rib Fractures In The Elderly

It’s well known that our elders do less well than younger folks after injury. The number of complications is higher, there tends to be more loss of independence during recovery, and mortality is increased. This is not only true of high energy trauma like car crashes, but also much lower energy events such as a fall from standing.

Rib fractures are common after falls in the elderly and contribute to significant morbidity if not treated adequately. Traditionally, they are identified through a combination of physical exam and chest x-ray. Unfortunately, only half of rib fractures are visible on x-ray. It falls to the physical exam to detect the rest.

A group at Beth Israel Hospital in Boston explored the utility of using chest CT in an attempt to determine if this would result in more appropriate and cost-efficient care in the elderly. They performed a retrospective study of 3 years of their own data on patients aged 65 or more presenting after a mechanical fall and receiving a rib fracture diagnosis. Imaging was ordered at the discretion of the physician. A total of 330 patients were elderly, fell, and had both chest x-ray and chest CT obtained. This was a very elderly group, with a mean age of 84 years!

Here are the factoids:

  • Rib fractures were seen on chest x-ray in 40 patients (12%) and on CT in an additional 56 ; 234 patients had no fractures on either
  • When fractures were seen on both studies, CT identified a median of 2 more fractures than chest x-ray
  • Patients with fractures not seen on chest x-ray were admitted significantly more often than those without fractures (91% vs 78%)
  • Mortality, admission to ICU, ICU length of stay, and hospital length of stay were not different if fractures were seen only on CT
  • CT scan identified new issues or clarified diagnoses suggested by chest x-ray in 14 cases, including one malignancy
  • Rib detail images were obtained in 13 patients and proved to be better than chest x-ray, but not quite as good as CT scan

Conclusion: use of CT for rib fracture diagnosis resulted in a few more admissions, but no change in hospital resource utilization, complications, or mortality.

Bottom line: Hmm…, read the paper closely. The authors conclude that more patients with CT-only identified rib fractures are admitted. But compared to what? Unfortunately, patients without rib fractures on CT. What about comparing to patients who had fractures seen on chest x-ray too? If that number is the same, then of what additional use is CT? Identifying a few incidentalomas?

Given that there is no change in the usual outcome measures listed here, it doesn’t seem like there is any additional benefit to adding CT. And I can see a lot of downsides: cost, radiation, and possible exposure to IV contrast. In my mind, there is still nothing that beats a good physical exam and a chest x-ray. Skip the CT scan. And don’t even think about ordering rib detail images! That’s so 1990s. And even if no rib fractures are seen on imaging, physical exam is the prime determinant for admitting your patient for aggressive pain management and pulmonary toilet.

Reference: Chest CT imaging utility for radiographically occult rib fractures in elderly fall-injured patients. J Trauma ePub ahead of print, Jan 23, 2019.

MTP Week Part 4: How To Build Your Massive Transfusion Protocol

Massive Transfusion Protocol (MTP) week continues! I’m releasing the next Trauma MedEd newsletter to subscribers at the end of the week, which deals with advanced MTP topics. So leading up to that, I am reviewing the basics for the next several days. I’ll continue today with MTP activation triggers.

What criteria should trigger your massive transfusion protocol? Sometimes, it’s obvious. The EMS report indicates that your incoming patient is in shock. Or there was notable blood loss at the scene. Or they have a mangled extremity and will need blood products in the OR, if not sooner.

But sometimes the need for ongoing and large quantities of blood sneaks up on you. The patient is doing well but has an unexplained pressure dip. And it happens again. You give one of your  uncrossmatched units of blood. It happens again. At some point, you come to the realization that you’ve given six units of blood and no plasma or other products! Ouch!

Many trauma centers have adopted MTP criteria like:

  • More than 4 units given over 4 hours
  • More that 10 units to be given over 24 hours
  • Loss of half a blood volume over 24 hours

I call these the “psychic power” criteria, because one must surely be prescient to know this information just shortly after the patient arrives. Don’t include criteria like these at your center!

Instead use some sort of objective criteria. A simple one is the use of any of your blood refrigerator products or emergency release blood, or a calculated score such as the ABC score or shock index (SI).

ABC score is the Assessment of Blood Consumption score and gives one point each for a heart rate > 120, SBP < 90, positive FAST, penetrating mechanism.  ACS score > 2 was predictive of requiring MTP with sensitivity and specificity of about 85%. Overtriage was about 15%.

Shock index (SI) is defined as the heart rate divided by the SBP. Normal values are in the range of 0.5 to 0.7. Need for MTP was found to increase to 2x for SI of 0.9, 4x with an SI of 1.1, and 7x with SI 1.3.

A recent paper compared these two systems retrospectively on 645 trauma activations over a 5-year period. They found that they both worked well with the following results:

  • Shock index > 1 – 68% sensitive 81% specific
  • ABC > 2 – 47% sensitive, 90% specific

The study suggests that shock index is more sensitive, and takes less technical skill to calculate. Bottom line: just pick the some objective criterion you are most comfortable with and use it!

Reference: Accuracy of shock index versus ABC score to predict need for massive transfusion in trauma patients. Injury 49(1): 15-19, 2018

Well folks, that’s it for MTP week! Hope you enjoyed it.

And don’t forget to subscribe to TraumaMed if you want to get a full newsletter discussing advanced MTP topics tomorrow. Otherwise, you’ll be reading a post on CT scans and rib fractures in the elderly! Subscribe and download back issues by clicking here.

Links: (note – future links will not be live until 9am the day they are published)

MTP Week Part 3: How To Build Your Massive Transfusion Protocol

Massive Transfusion Protocol (MTP) week continues! I’m releasing the next Trauma MedEd newsletter to subscribers at the end of the week, which deals with advanced MTP topics. So leading up to that, I am reviewing the basics for the next several days. I’ll continue today with information on deactivating and analyzing your MTP.

Deactivation. There are two components to this: recognizing that high volume blood products are no longer needed, and communicating this with the blood bank. As bleeding comes under surgical control, and CBC and clotting parameters (and maybe TEG/ROTEM) normalize, the pace of transfusion slows, and ultimately stops. Until this happens, the MTP must stay active. Even a low level of product need should be met with coolers stocked with the appropriate ratios of products.

There are two ways to stop the MTP: the surgeon or their surrogate calls the blood bank (when no more blood products are to be used), or the blood bank calls the surgeon after the next cooler has been waiting for pickup for a finite period of time. This is typically about 30 minutes. It is extremely helpful if the exact deactivation time is recorded in the electronic medical record. However, this information can be obtained from the blood bank.

Analysis. It’s all over, and now the real fun begins. For most trauma centers, the blood bank maintains extensive data about every aspect of each MTP event. They record what units were released and when, when they were returned, which ones were used, were they at a safe temperature on return or were they wasted, and much, much more! Typically, one of the blood bank supervisors or a pathologist then compiles and reviews this data. What happens next varies by hospital.

Ideally, the information from every MTP activation gets passed on to the trauma program. Presentation at your transfusion committee is fine, but this data is most suitable for presentation at the trauma operations committee. And if significant variances are present (e.g. product ratios are way off) then it should also be discussed at your multidisciplinary trauma PI committee as well.

There are relatively few standard tools out there that allow the display of MTP data in an easily digestible form. Here are some of the key points that must be reviewed by the trauma PI program:

  • Demographics
  • Components used (for ratio analysis)
  • Lab values (INR, TEG, Hgb, etc)
  • Logistics
  • Waste

I am aware of two tools, the Broxton form and an MTP audit tool from the Australian National Blood Authority. The Broxton tool covers all the basics and includes some additional data points that cover activation criteria, TXA administration, and administration of uncrossmatched blood. Click here to check it out. The Australian tool is much more robust with more data points that make a lot of sense. You can download a copy by clicking here.

Tomorrow, I’ll continue with activation criteria for the MTP.

And don’t forget to subscribe to TraumaMed if you want to get a full newsletter discussing advanced MTP topics this Friday. Otherwise, you’ll be reading a post on CT scans and rib fractures in the elderly! Subscribe and download back issues by clicking here.

Links: (note – future links will not be live until 9am the day they are published)

MTP Week Part 2: How To Build Your Massive Transfusion Protocol

Massive Transfusion Protocol (MTP) week continues! I’m releasing the next Trauma MedEd newsletter to subscribers at the end of the week, which deals with advanced MTP topics. So leading up to that, I am reviewing the basics for the next several days. I’ll continue today with some tips on the logistics of your MTP.

MTP logistics include details such as who will be delivering the blood, what actually goes in each cooler, what ratios should be used, limitations imposed by the use of frozen plasma, and documentation. I’ll discuss details about ratios and FFP in the next Trauma MedEd newsletter.

The runners who travel between blood bank and the patient need to be selected carefully. Blood bank tech? Not ideal because they’ve got more important work to do. ED or OR tech? Maybe, as long as you’ve got a reliable pool. Student or resident? Probably not, because they may not know their way to the blood bank, which are typically placed in the farthest corner of the basement as possible. One of the most creative solutions I’ve seen is the use of a hospital security officer. Think about it. They know the hospital layout cold, including that obscure corner where the blood bank is located. And there are plenty around all the time!

Documentation is critically important, both in the trauma bay and the blood bank. Trauma activations, especially ones requiring MTP, are very fast moving and complex. Two sets of documentation are crucial: accurate records of blood product administration (on the trauma flow sheet), and documentation of just about everything else (in the blood bank). A specific timestamp on the trauma flow sheet that records the exact time of activation of MTP is a big plus.

What about coolers? I’ve seen everything used from uninsulated plastic buckets, picnic coolers, and pneumatic tube containers to large, self-contained rolling refrigeration units. The choice of container really boils down to cost vs waste. The cheaper it is, the less insulated it is, the more likely that blood products will be discarded due to high temperature if not transfused promptly. The best blend of cost vs utility seems to be the good, old-fashioned picnic cooler. It’s very portable, reasonably cheap, and can be tested for temperature maintenance. Just be sure to secure a pouch to the outside to keep platelets at room temperature to maintain full functionality.

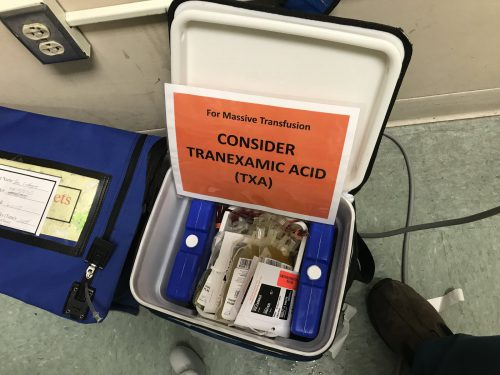
Here’s a sample MTP cooler that’s ready for use. The platelets are in the pouch on the left. Note the reminder to prompt the team to give TXA if not contraindicated. This is often forgotten in the heat of the trauma activation.

Who actually runs your MTP? In some ways, it should run itself. Coolers get delivered, products get transfused. However, some decision making is needed to decide how long to continue and whether any tweaking of product ratios needs to happen. In the emergency department, the surgeon or emergency physician can do this. But once a trauma patient arrives in the OR, that is no longer the case. The emergency physician was left behind in the ED and the surgeon is up to her elbows in trouble. What about the anesthesiologist? Nope, they are busy keeping the patient safely asleep, regulating rapid infusions, and actually administering the blood.

Most of the time, however, these two physicians actually end up running the MTP while multi-tasking at their other job. Unfortunately, this can lead to errors and delays. One best practice to consider: a highly trained trauma resuscitation nurse or advanced practice provider (APP) can run the MTP from the sidelines. They travel with the patient from ED to OR, managing the MTP the entire time. This offloads responsibility from busier people.

Tomorrow, I’ll continue with MTP deactivation and analysis.

And don’t forget to subscribe to TraumaMed if you want to get a full newsletter discussing advanced MTP topics this Friday. Otherwise, you’ll be reading a post on CT scans and rib fractures in the elderly! Subscribe and download back issues by clicking here.

Links: (note – future links will not be live until 9am the day they are published)